
For those that often enjoy reverse engineering shellcode, or obfuscated malware in general, you may have come across an interesting “malware” family named GuLoader – malware in quotations as it has in the past been linked to a company selling a software packer named CloudEyE (see: Checkpoint Research), though it does appear most of it’s usage has been to load further malware such as AgentTesla, Formbook, Remcos, and more.
Recently I’ve been looking more and more into malware functionality from a developmental perspective, specifically from an obfuscation standpoint, and as the core of GuLoader is simply just a blob of shellcode – meaning there is a lot of flexibility when it comes to obfuscation – I decided to take a deeper dive. One of the main elements I chose to focus on involved the stack manipulation found within the core payload, used when decrypting blobs of data.
So, within this post we’ll be taking a brief look at how GuLoader manipulates the stack to decrypt these blobs of data, and then attempt to implement this functionality ourselves for decrypting strings within an executable, as shellcode is a pain to develop!
Analysing Stack Manipulation within GuLoader
Sample SHA-256: d42e8d8eaddfc72e19cb0256ca22c6d502e90c2fb1bdc2cdad092e906df0b886
I won’t be covering the unpacking process of the shellcode, as it isn’t the focal point of the post, but in order to unpack this specific sample you can take the following steps:
- Set BP on VirtualAlloc
- Set a Hardware-Execute BP on first byte of allocated memory
- Once hit, setup Trace-Into to break on the condition dis.iscond(cip) == 1
- You should be at a conditional jump; set a BP on the address after the jump
    - This will be the "entry-point" of the shellcode
- Dump out the shellcode at this point, and open in IDA
- In IDA, go to the entry-point found earlier, and define as code
- The function jumps around a bit, but go to the end and find the call
    - This call is going to be where our analysis starts off at
If you followed those steps, the function should look as follows:
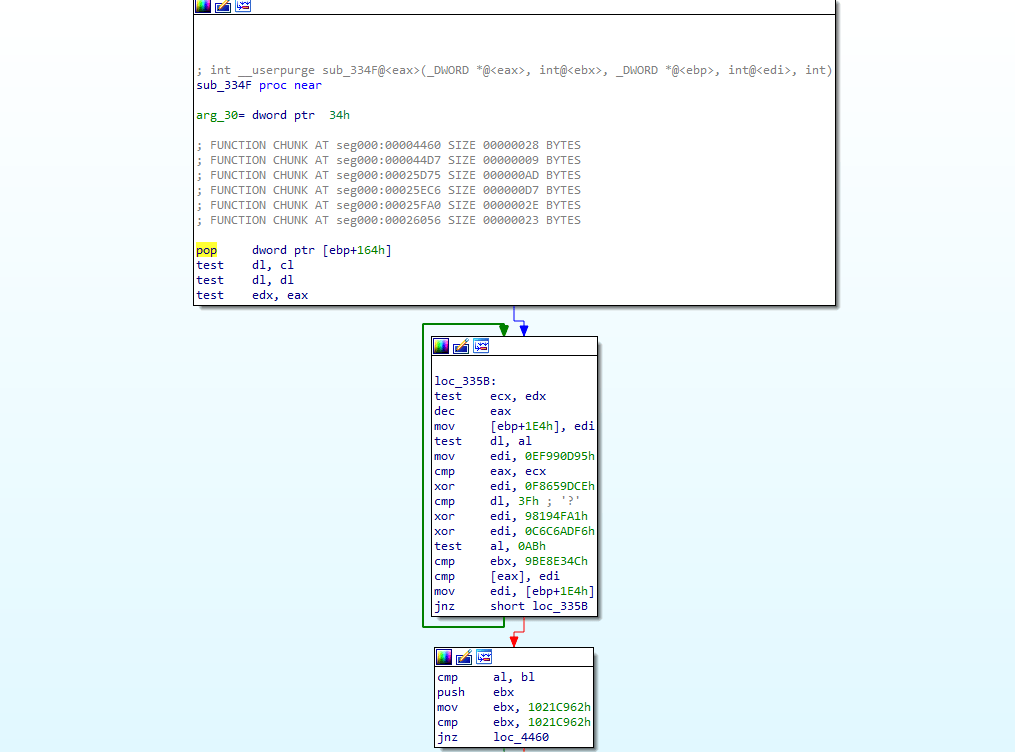
The reason we set the conditional jump breakpoint is there is an additional layer of XOR encryption, so we want to skip over that. Additionally it is heavily obfuscated, so it would take a longer time to locate the conditional jump manually.
Within the “entry-point” function, there’s one particular call that stands out – a call to an address within the shellcode that has not yet been defined as function, indicating a possible lack of return instruction at the end of the function.
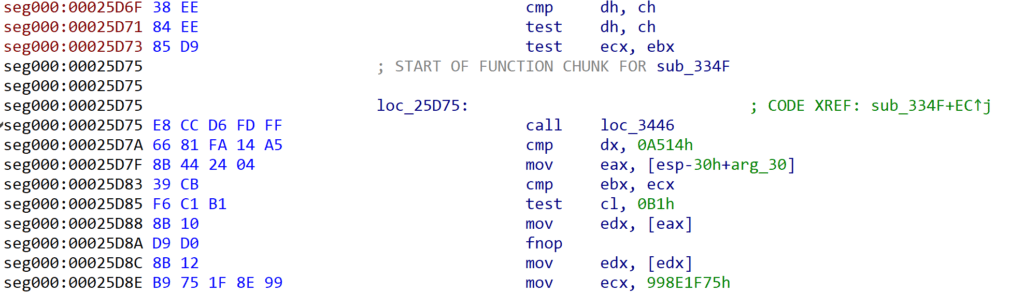
Examining the function we can see there are some legible assembly instructions before a call to another sub-routine, followed by non-assembly instructions. This is a pretty good indicator that within sub_251C2 there is likely some stack manipulation; otherwise it would return to the opcode 0xD9, which would raise an exception. The other possibility is that sub_251C2 will decrypt the bytes directly after it, allowing execution to continue – this is a slightly similar technique to SmokeLoader, which decrypts entire functions rather than snippets of assembly code.
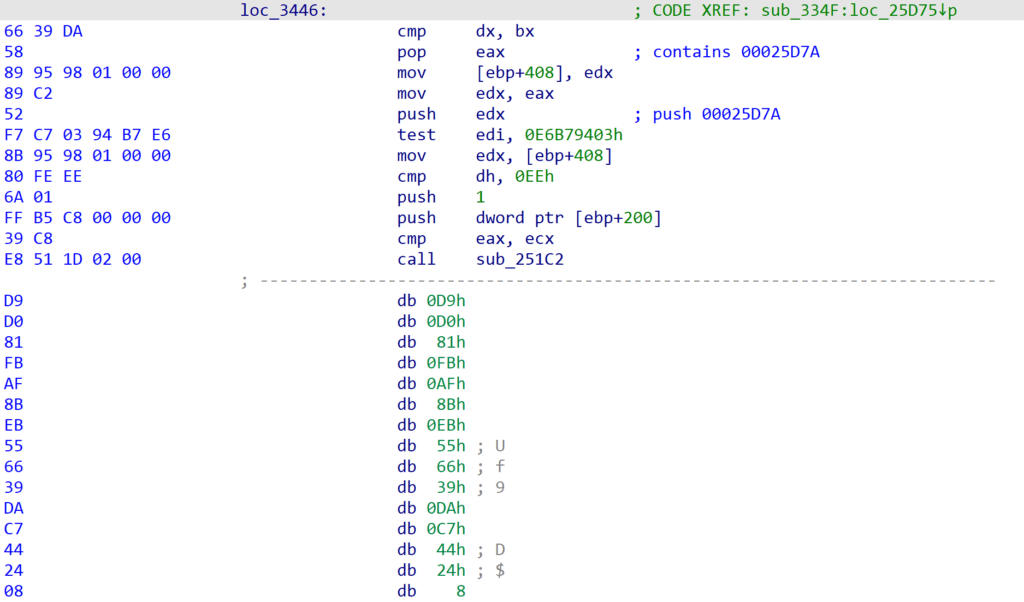
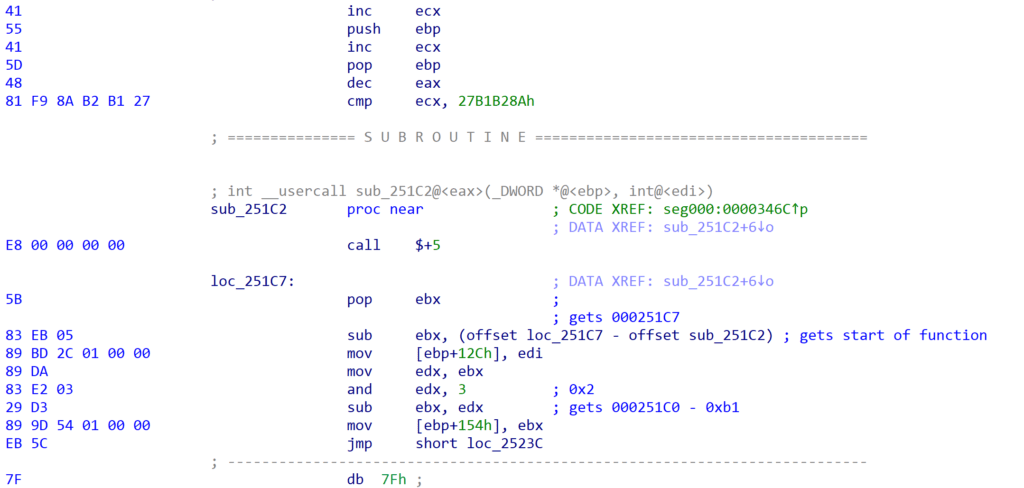
Taking a look at sub_251C2 we can see there is some clear stack manipulation occurring, with the first instruction being a call $+5, which will essentially call the very next address, pushing that next address to the stack. Directly after that, the value at the top of the stack is popped into ebx, so now ebx will contain the address of the pop ebx operation.
Next we see that a few subtraction operations occur, subtracting offsets from the address within ebx. This eventually results in it pointing to a byte found before sub_251C2, specifically within the cmp ecx, 0x27B1B28A – the 0x1B byte.
The decompilation doesn’t really showcase this very well, but it does show the two XOR loops, first decrypting the data, and then re-encrypting it when it was no longer required.
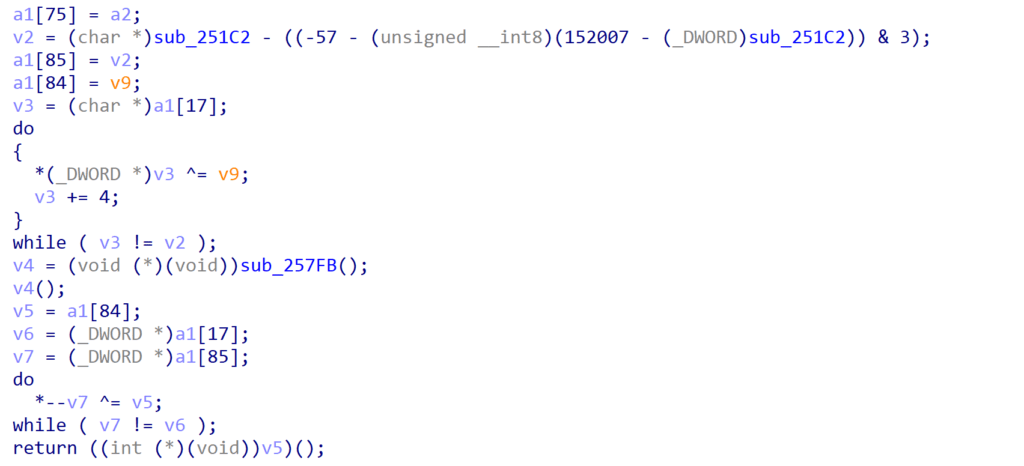
The function performs a few different operations, but the crux of it – or at least the part we’re most interested in – is the stack manipulation assisting with obfuscating the decryption of data.
Implementing Ourselves
So, now comes the fun part; trying to use similar stack manipulation to decrypt strings within our custom payload. First things first, how is this going to be structured?
Well, we’ll likely be hardcoding values – this won’t be calculated on runtime by a compiler, and we’re not adding custom build steps. One possible option is to put together a Python script to accept a string, and then spit out data that can be inserted into our VS project, but we’re only going to be decrypting one string, so we’ll do everything manually.
I put together a pretty basic example of the structure of the program, which can be seen below. The main call within the binary executes the function (likely using the __declspec(naked) convention) w_string_decrypt(), which leads to a direct call to string_decrypt() (also using __declspec(naked)). This direct call results in pushing the $current_address + 5 to the stack, which will be the address to return to. Instead of having further code however, we will instead insert our encrypted string.
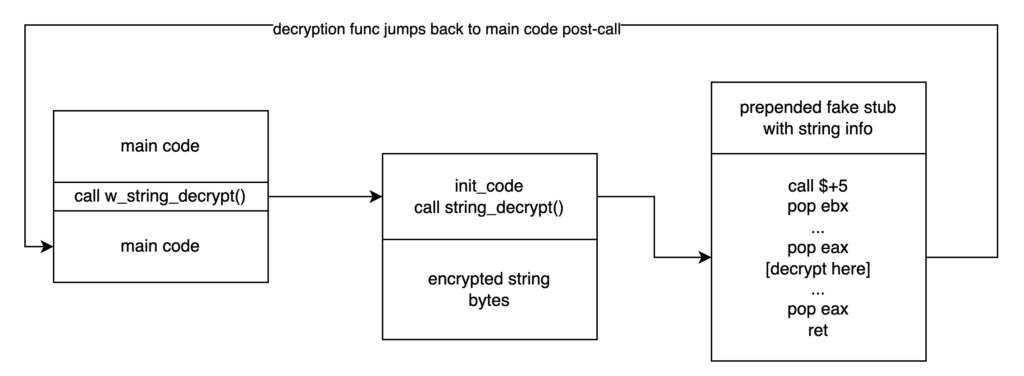
So now, if the string_decrypt() function were to simply pop the value at the top of the stack into ebx, it would have a pointer to the encrypted string, ready to decrypt! As you may have guessed, we will be using inline assembly for parts of this, as it is the easiest (if not the only) way to deal with the stack and registers. That means if you’re hoping to do this with a 64-bit sample using Visual Studio, it won’t work.
Now we have a pretty good idea of the program structure, we can start developing – but before we do, just a disclaimer: I’m not a software/malware developer, and Python has always been my go-to for malware RE stuff, so the code might not be inline with best practices. It’s a tick in my box if it works, so take that as you will!
To start with I put together a very rudimentary sample:
#include <stdio.h>
#include <windows.h>

int main() {

	LPCSTR target_string = "https://www.0ffset.net/beginner/"
	MessageBoxA(NULL, target_string, "Greetings!", MB_ABORTRETRYIGNORE);

	return 0;

}
All the code does is display a message box with the provided text – very basic stuff. The plan is to encrypt the target_string, and have that pushed into the call to MessageBoxA. The next element to create is the string decryption function itself, which will be developed in pure inline assembly. This’ll be very basic, iterating over the string, XORing each byte with a 1-byte key (we’ll go with 0xC3), and storing the decrypted byte in a different memory region.
__declspec(naked) void string_decrypt() {

	__asm {

	xor eax, eax			; use as byte storage
	xor edx, edx			; use as counter

	mov ecx, 0xc3			; key
	mov ebx, target_string_length	; length of string
	mov edi, offset target_string	; string to be decrypted
	mov esi, offset decrypted_str   ; where to store the string

	xor_loop:

		mov al, [edi + edx]		; mov encrypted byte into al
		xor eax, edx			; decrypt byte
		mov [esi + edx], al		; move decrypted byte to mem

		inc edx				; inc counter

		cmp ebx, edx
		jne xor_loop

	mov eax, esi				; store as usual return value
	ret

	}
}
While the above code isn’t perfect, it’s simply a draft for the end result – we won’t be passing in offsets to the target string, nor will we have defined variables for where to store the decrypted string.
With the string_decrypt() function defined, we then want to define a wrapper for the function. This will be pretty simple, just a call to the string decryption function, followed by the encrypted string, as you’ll see below. Notice how we use the __declspec(naked) attribute, this is to remove any stack handling implemented by the compiler.
__declspec(naked) void w_string_decrypt() {
	__asm {
		call string_decrypt
		encrypted_string
	}
}
You might be wondering what encrypted_string is supposed to be in the code above, or at the very least how it’s accepted by the compiler. Well, it will be defined as a macro using the #define directive. The value of this macro will be our encrypted string, but how exactly do we do that?
While you would typically use DB in assembly to insert a byte into the code, Visual Studio doesn’t offer that functionality within inline assembly, so we have to rely on the __asm _emit pseudo-instruction, for example the following would result in a null byte being added directly after the call made to string_decrypt():
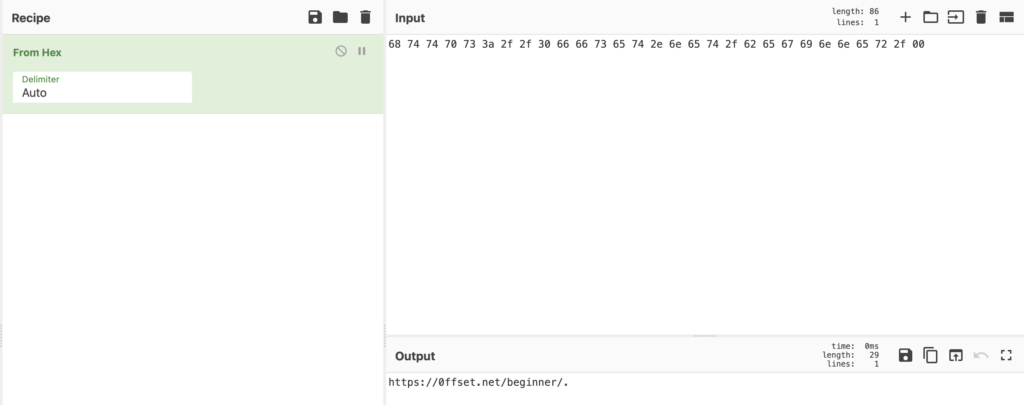
#define encrypted_string __asm _emit 0x00Knowing this, we can start encrypting our string to insert into the code. CyberChef is always a quick way to do so, though make sure you append a null byte to your unencrypted string to make sure there are no issues when using the decrypted version.
With the null byte added, we can XOR it with our 1-byte key, and to make things easier we can replace all instances of a comma with __asm _emit, which nicely formats the blob for us to copy and paste into the code.
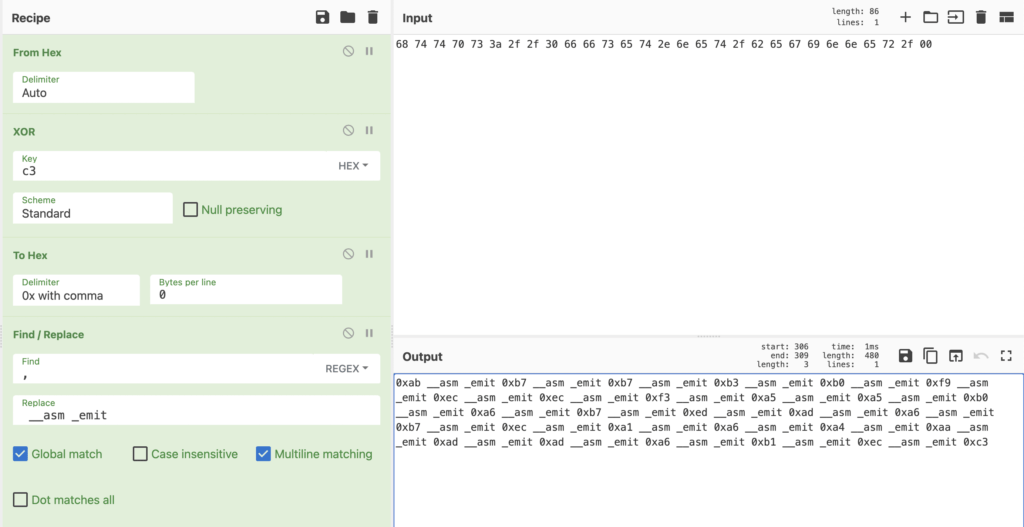
With that, we’ve now got our encrypted string blob:
#define encrypted_string __asm _emit 0xab __asm _emit 0xb7 __asm _emit 0xb7 __asm _emit 0xb3 __asm _emit 0xb0 __asm _emit 0xf9 __asm _emit 0xec __asm _emit 0xec __asm _emit 0xf3 __asm _emit 0xa5 __asm _emit 0xa5 __asm _emit 0xb0 __asm _emit 0xa6 __asm _emit 0xb7 __asm _emit 0xed __asm _emit 0xad __asm _emit 0xa6 __asm _emit 0xb7 __asm _emit 0xec __asm _emit 0xa1 __asm _emit 0xa6 __asm _emit 0xa4 __asm _emit 0xaa __asm _emit 0xad __asm _emit 0xad __asm _emit 0xa6 __asm _emit 0xb1 __asm _emit 0xec __asm _emit 0xc3Now the next phase is going to be focusing on how to store the size of the string. We could store it at the beginning of the above blob, adding an extra byte indicating the length, but I like the idea of using a fake assembly stub prepended to the string_decrypt() function. This sounds quite complex, and while it may be on a large scale, it isn’t for this small sample.
What we want to do is create some simple assembly code first, that resembles a legitimate function. Start with a typical prologue, and end with a return instruction. We could make this more sophisticated by making sure stack values line up and there is a proper epilogue, but for now that isn’t a problem.
We want to have the entire block be a multiple of 16 bytes in size, due to the VS compiler aligning functions to 16 bytes – if we don’t, it will insert 0xCC (INT 3) bytes to align the following function, which could cause some issues for us.
Within this block, let’s use a basic CMP operation, comparing a register with a hardcoded DWORD – you can see an example in the image below.
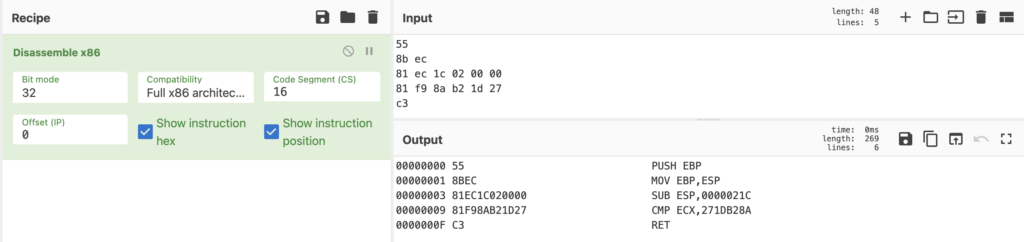
The plan is we’re going to modify the DWORD, so it looks random, but the third byte will be the string size. So for the example above, the string size would be 0x1d (29) bytes.
Defining the fake stub as macros within the code (and splitting it up into several macros to make it easier to read and modify the string size as and when needed), we get the following:
#define fake_stub __asm _emit 0x55 __asm _emit 0x8b __asm _emit 0xec __asm _emit 0x81 __asm _emit 0xec __asm _emit 0x1c __asm _emit 0x02 __asm _emit 0x00 __asm _emit 0x00 __asm _emit 0x81 __asm _emit 0xf9

#define str_size __asm _emit 0x45 __asm _emit 0x2f __asm _emit 0x1d __asm _emit 0x32

#define ret __asm _emit 0xc3
At this point, all we need to do is put it into a function, that will be directly behind the string_decrypt() function. We’ll need to change some values in the project properties to make sure it is compiled in order, but that is something we’ll cover later on.
__declspec(naked) void prepended_fake_stub() {
	__asm {
		fake_stub
		str_size
		ret
	}
}

__declspec(naked) void string_decrypt() {
....
Now we’ve created the fake stub, we need to write some code within the string_decrypt() function to actually parse the string size. This is pretty simple to do, though it isn’t very scalable if you were going to add obfuscation – we’ll be hardcoding the number of bytes to skip, to if that changes there might be some issues. By using the assembly instructions call $+5; pop reg; we can get the address of the pop reg instruction and store it in the reg provided. From there, we subtract values to get to the 4th byte within the CMP instruction.
call $+5		; essentially call the next instruction
pop ebx			; pop address of this instruction off the stack

sub ebx, 5		; subtract 5 from address of above to get func entry
sub ebx, 3		; subtract 3 from start func to get 4th byte in cmp
We’ll place this at the very beginning of the function, so that our subtractions are accurate and the correct byte is parsed. We’ll also add some code to move that byte into a register, and in this case ebx will contain the string size.
__declspec(naked) void string_decrypt() {

	__asm {

		call $+5
		pop ebx

		sub ebx,
		sub ebx, 3

		mov al, [ebx]		; move string length into eax
		xor ebx, ebx		; clear ebx register
		mov ebx, eax		; move length of string to ebx

		xor eax, eax		; use as byte storage
		....
With the string size being identified, we can now work on the memory allocation for the decrypted string, as well as getting a pointer to the encrypted string. Allocating memory is simple enough, with a call to malloc(). At this point the value at the top of the stack is still a pointer to the encrypted string (stored after the call to string_decrypt()), so we can pop a pointer to that into edi for decryption.
push ebx				; push size of string
call malloc				; allocate memory

mov esi, eax				; move return value of malloc to esi
pop edi ; string to be decryptedSo, now the core of the code is pretty much done; we can locate the encrypted string itself, find the string size from the fake stub, and allocate memory, before actually decrypting the string. I went ahead and cleaned up the code slightly so it compiled correctly and ran successfully, but also was slightly cleaner:
__declspec(naked) void string_decrypt() {

	__asm {

		call $ + 5
		pop ebx

		sub ebx, 5
		sub ebx, 3

		mov al, [ebx]
		mov bl, al
		and ebx, 0xff

		pop edi

		push bl
		call malloc

		mov esi, eax

		xor edx, edx

		xor ecx, ecx
		mov cl, 0xc3

		xor_loop :

			mov al, [edi + edx]
			xor al, cl
			mov [esi + edx], al

			inc dl

			cmp bl, dl
			jne xor_loop

		mov eax, esi
		add esp, 4    ; pop 4 bytes from stack (pushed during malloc)
		ret

	}
}
Now we can modify our main function so that target_string will point to the return value of our w_string_decrypt() function – make sure you change the return type of w_string_decrypt() to LPCSTR though, so that the code compiles correctly.
int main() {

	//LPCSTR target_string = "https://www.0ffset.net/beginner/"
	LPCSTR target_string = w_string_decrypt();
	MessageBoxA(NULL, target_string, "Greetings!", MB_ABORTRETRYIGNORE);

	return 0;

}
Visual Studio Compilation Properties
When setting up project settings, you’ll want to make sure that the Runtime Library in C/C++->Code Generation is set to Multi-threaded (MT), so that the runtime library is linked into the binary (does increase the size, but removes the need for VCRuntime on the machine). You’ll also want to make sure OPT:NOREF is selected within Linker->Optimization, and also set the Link Time Code Generation to default.
These will allow the compiler to compile code that isn’t referenced directly, such as our fake assembly stub.
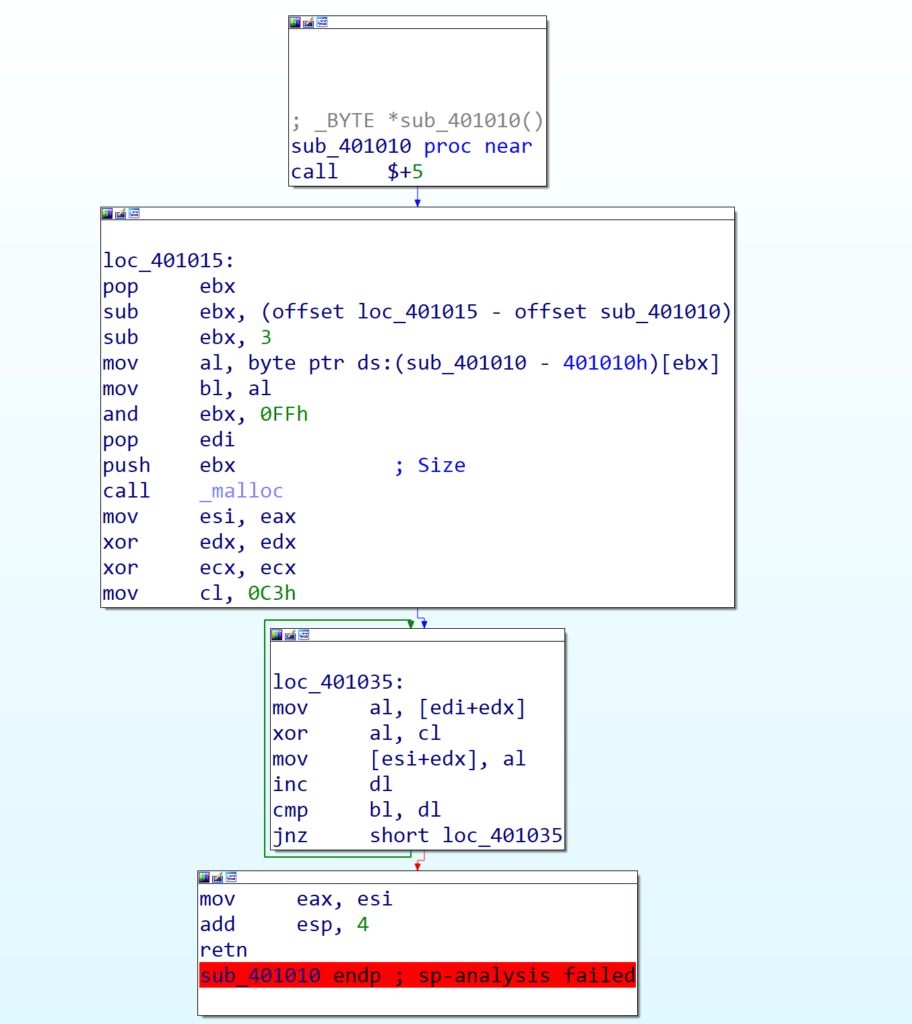
Analysing in IDA
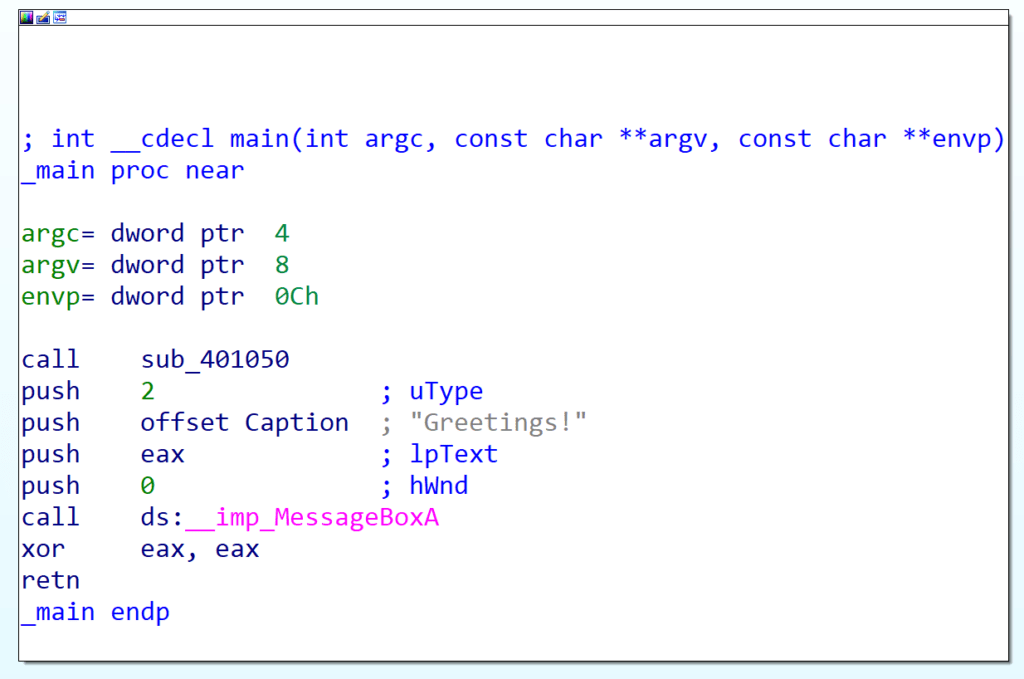
With our program compiled, we can take a look at it in IDA to see if the expected output is shown. Once opened, we can see the main() function, that calls a subroutine, and pushes the result (stored in eax) to a call to MessageBoxA().
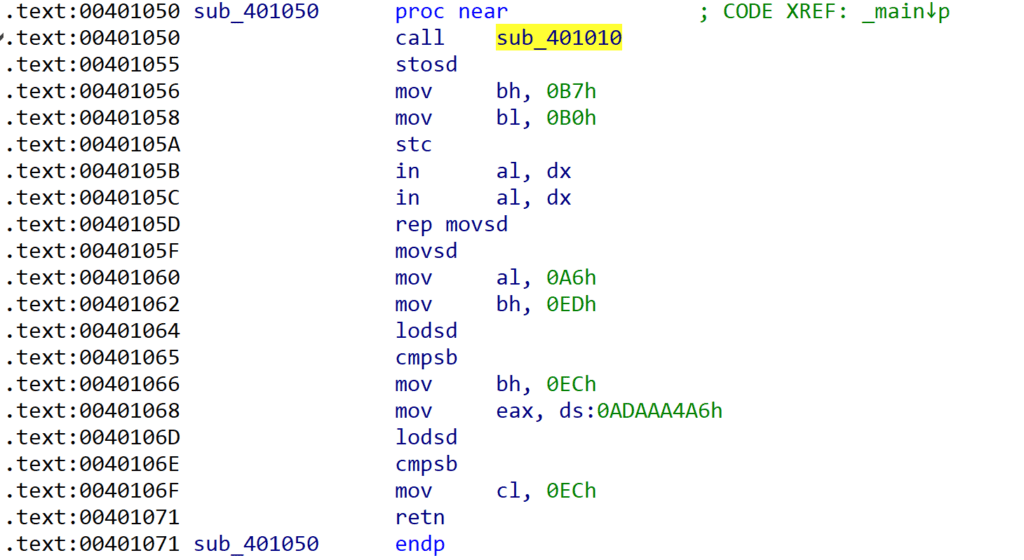
Diving into that subroutine, the first thing we notice is it’s defined as a sub-routine, unlike with GuLoader. The reason for that is we’re using a simple XOR operation, with the key being 0xC3 – as there is a null byte at the end of the decrypted string, the encrypted value will be 0xC3, so this view will differ depending on algorithm and key.
The first instruction is a call to another subroutine, followed by what appears to be legitimate assembly, but the order doesn’t make sense, such as the repeating of the in instruction, moving a strange address into eax, as well as no stack control – a clear sign things are not as they seem.
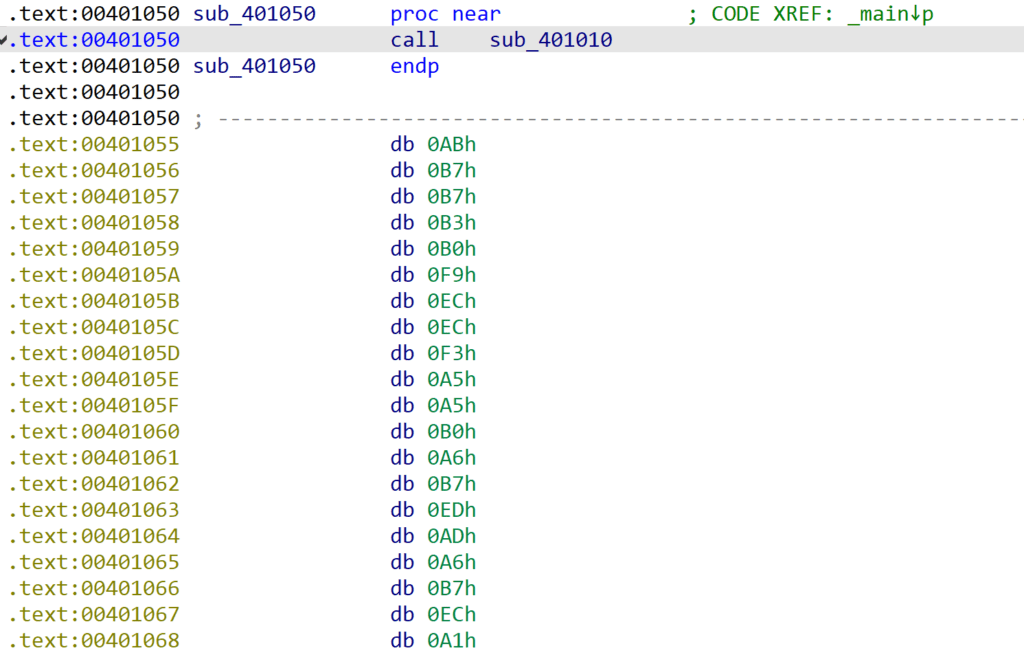
We can go ahead and undefine those bytes, that way the function is much shorter, and it’s clear that the stack is manipulated as there is no return after the call to sub_401010().
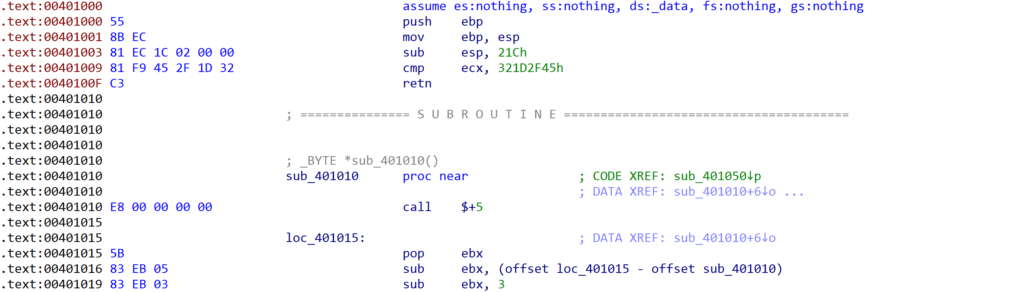
Analysing this function, we can see the initial call $+5, followed by a pop ebx – the program is resolving it’s current address. Then, there is a subtraction operation, as seen in GuLoader, though the integer is hardcoded. There is then a call to malloc(), whereby the size is indicated by ebx – this value is taken from the fake stub we see before the function in the next image. Following that, there is some clear XOR decryption, followed by a return back to the main() function.
Here we can see that IDA has defined the fake stub as assembly code, though not assigned it as a function due to it not being referenced anywhere within the code. A possible work-around for this could be to implement obfuscation that references the start functions of these fake stubs, but never uses them – that would increase the chance IDA would recognize it as a legitimate function.
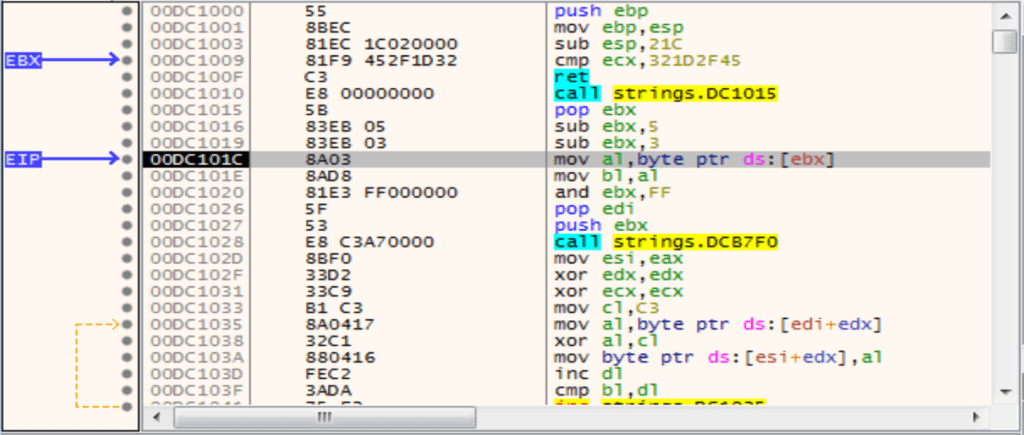
Debugging the Sample
Debugging the sample doesn’t give us anything unusual, it functions as expected, though does make it clear where different registers point to – for example in the below image we can see ebx points to address 0xDC1009, which is already a pretty big red flag when reversing the sample as it’s easy to see a byte of data is being read from that address.
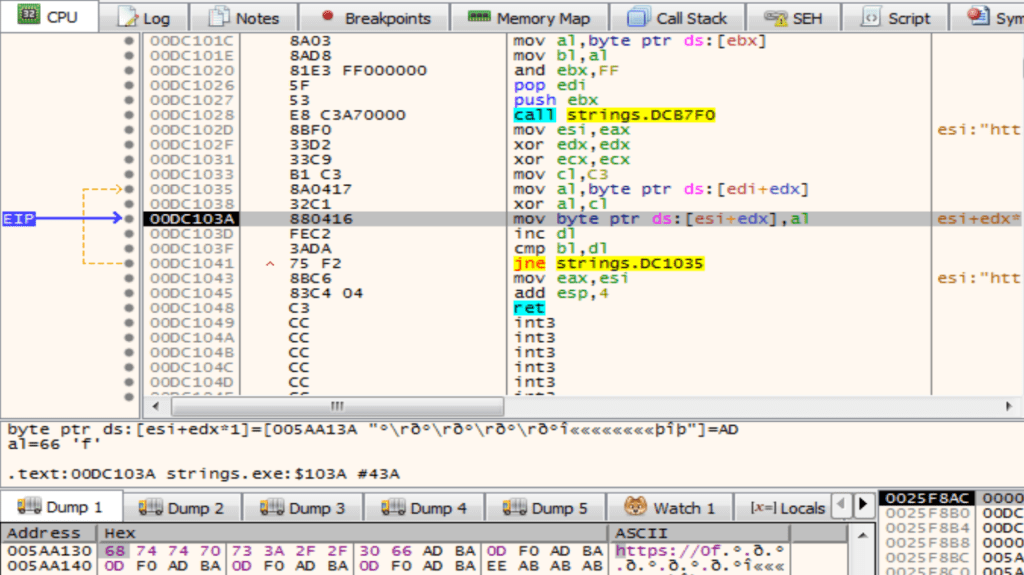
We can also see the string being decrypted in real-time as well, plus see the stack and how it is manipulated to push and pop certain values – this was critical to see during development, as simply printf() statements wouldn’t cut it!
Detecting & Automating Analysis
Now this code isn’t anything advanced, we haven’t leveraged much obfuscation at all with the fake stub, nor used a complex algorithm – so analysis is trivial. As a result, it’s very easy to develop some detections for this, as well as a script to automate decryption.
Detection-wise, we can put together a YARA rule to detect the fake stub via a regular expression (so that the sample is detected regardless of string size), and we’ll also want to pair this with a condition that matches on the initial call instruction – just relying on the fake stub will generate a ton of false positives, so if we add a few conditions it will vastly reduce the rate of FPs.
rule stack_manipulator
{
  meta:
    description = "Detects custom stack manipulation functionality, as well as XOR decryption and fake stub"
    author = "0ffset Training Solutions"

  strings:
      $b1 = {E8 00 00 00 00 5B 83 EB 05}
      $b2 = {8A 04 17 32 C1 88 04 16}
      $b3 = {55 8B EC 81 EC 1C 02 00 00 81 F9 ?? ?? ?? ?? C3}

  condition:
      uint16(0) == 0x5a4d
      and (
        2 of ($b*)
      )
}
For automating decryption, we can leverage these byte patterns to parse the binary file and identify relevant locations, before extracting the required data blobs. As the decryption is a simple XOR, we can either try and brute force the decryption (or identify the key based on the very last byte as it will be a null-byte), or add in parsing for the fake stub. For example, the following steps could be taken to develop an automated decryption script:
- Identify entry of decryption function (E8 00 00 00 00 5B 83 EB 05)
- Find XREFs to address of decryption function, add 5 to each XREF to get encrypted string
- Step back 3 bytes from the 0xE8, to locate the size (or search for $b3)
- Parse decryption function assembly to locate the mov cl, 0x?? where 0x?? is the XOR key
- Decrypt string using the required information
And that’s about it for this post! While an easy technique to detect based on the unusual stack functionality, and simple enough to reverse engineer, it provides a building block for expansion – whether adding further obfuscation with junk instructions, control flow obfuscation, and opaque predicates, or even just increasing the complexity of the algorithm.