
It’s not uncommon to come across some kind of string encryption functionality within malware samples, often more complex than a simple single-byte XOR operation which can often be brute-forced with simplicity.
By encrypting strings, malware authors are able to potentially lower the detection rate by anti-malware software, obscuring strings that may be identified as “malicious”, such as strings indicating malicious functionality, registry keys or file paths linked to malicious activity, and so on. Additionally, encrypting strings can go a long way to slowing down malware analysts, by requiring them to decrypt the strings before properly analysing and building out detection rules for the sample.
Now building out tools for string decryption from the analyst side can be quite simple once you’ve written a few – especially if you’re decrypting the strings within a disassembler that provides an API:
- Find cross-references to the string decryption function
- Find the encrypted string pushed as a parameter to the function
- Decrypt the encrypted string within Python (replicate the algorithm first)
- Add a comment, or overwrite the encrypted string
The difficulty increases when the algorithm is somewhat “polymorphic”, in that each instance of the decryption routine is slightly different. Additionally, if the string is built dynamically compared to being hardcoded, it requires the analyst to locate the pieces, and put them together prior to decryption.
This is what we’re going to be looking at in this post, and in a second follow-on part later on.
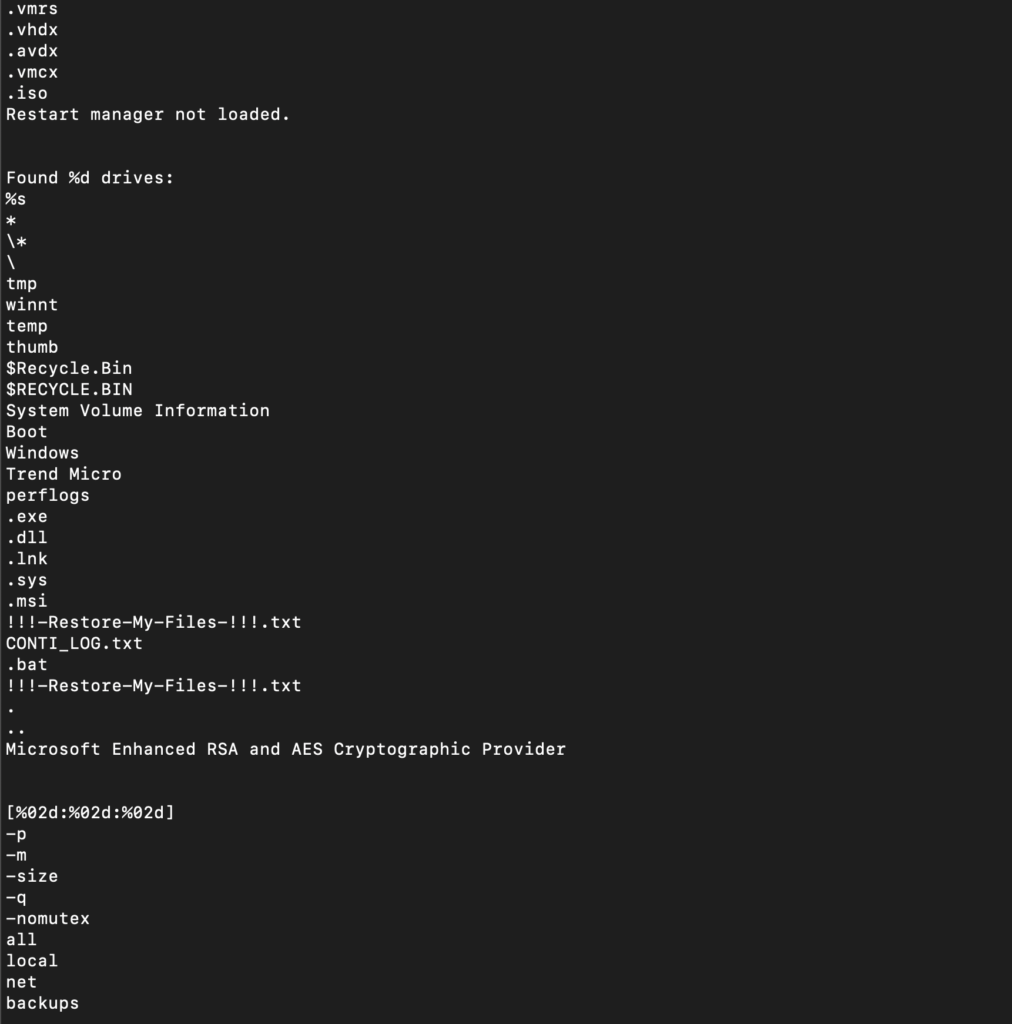
We’re going to be looking at a sample of malware that has a slightly different decryption routine for each string, and also builds the encrypted string on the stack during execution, prior to decryption. The specific sample is a version of Conti ransomware.
However, rather than build a string decryptor that relies on IDA Python, we’re going to be building a standalone decryptor that uses the Capstone Disassembler and Unicorn Emulation Framework.
Why?
Well lets take Emotet as an example. In the later iteration of the malware family, when it was still active, it stored a list of roughly 64 C2 server IPs as obfuscated values, built on the stack prior to decryption. Each C2 server was deobfuscated within it’s own function, and each function was added to an array. When Emotet needed to retrieve a C2, it would pick a random function from the array, and execute it to deobfuscate an IP. If the retrieved C2 was online, Emotet would continue interacting with it. Otherwise, it would pick another one until it located an active server.
This meant a sandbox would only identify a few outgoing connections to IP addresses, rather than all 64 IPs being observed. This is where manual extraction would be required, and in most cases you would need to emulate the 64 deobfuscation functions in order to avoid replicating all of them. Within something like IDA, you could leverage FLARE-EMU to do such a thing, while harnessing IDA’s disassembly/decompilation capabilities.
This is great for 1 or 2 samples, but if you want to extract C2 lists from 100+ Emotet samples, you’ll want to avoid opening each in IDA, running a script, and taking the output. You could opt to run IDA without the UI (headless), but if:
- you don’t own IDA Pro, or
- you’re using a system that is running on an OS you don’t have an IDA license for, or
- you want to avoid relying on external platforms
you’d want to use something else – ideally Capstone, and Unicorn.
Capstone & Unicorn
Capstone Disassembler:
From Capstone’s website:
Capstone is a lightweight multi-platform, multi-architecture disassembly framework.
Our target is to make Capstone the ultimate disassembly engine for binary analysis and reversing in the security community.
https://www.capstone-engine.org/
Capstone allows you to disassemble hex bytes to assembly representations – think IDA, but without all of the UI and nice additional features – Capstone just provides the raw information it identified based on the bytes you passed to it.
Unicorn Emulation Framework:
Unicorn on the other hand could be compared to a debugger, rather than a disassembler:
Unicorn is a lightweight multi-platform, multi-architecture CPU emulator framework.
https://www.unicorn-engine.org/
If you want to execute a snippet of assembly code within Python, Unicorn should be the go-to. Qiling is a good option, but is more focused on higher level emulation such as executing binary files:
Unicorn is just a CPU emulator, so it focuses on emulating CPU instructions, that can understand emulator memory. Beyond that, Unicorn is not aware of higher level concepts, such as dynamic libraries, system calls, I/O handling or executable formats like PE, MachO or ELF. As a result, Unicorn can only emulate raw machine instructions, without Operating System (OS) context
Qiling is designed as a higher level framework, that leverages Unicorn to emulate CPU instructions, but can understand OS: it has executable format loaders (for PE, MachO & ELF at the moment), dynamic linkers (so we can load & relocate shared libraries), syscall & IO handlers. For this reason, Qiling can run executable binary without requiring its native OS
https://github.com/qilingframework/qiling
Additionally, it’s built on Unicorn, so for full control over basic assembly we’ll do just fine with that.
So, lets get started!
Analysis
TL;DR
Identifying the Encryption Routines
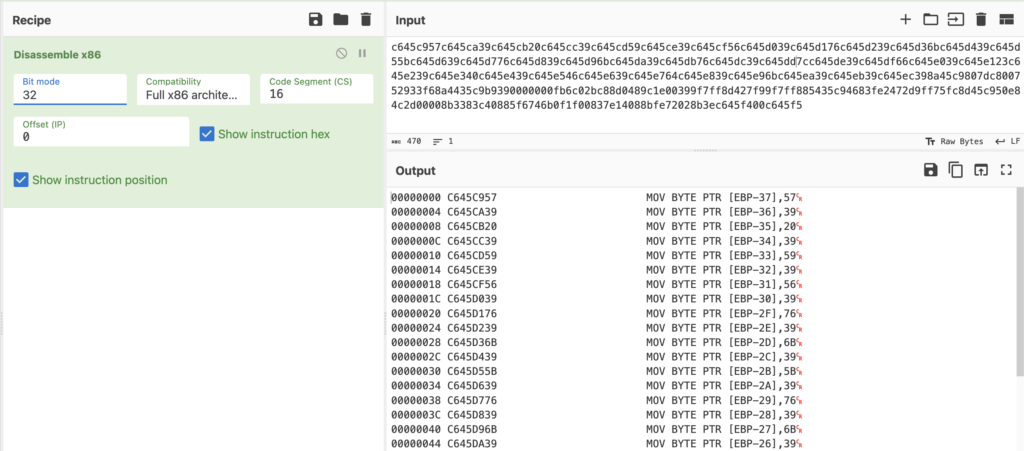
The first part of any string decryption automation process is of course identifying where the string decryption occurs. For stack string decryption this can be slightly more complex, as you can’t search through the data sections to find possibly encrypted strings and work backwards from there.
Instead, we’ll need to walk through the code, searching for a lot of MOV instructions where data is being moved into stack addresses.
Luckily with Conti it’s very simple to locate this, as we can find it within the WinMain function.
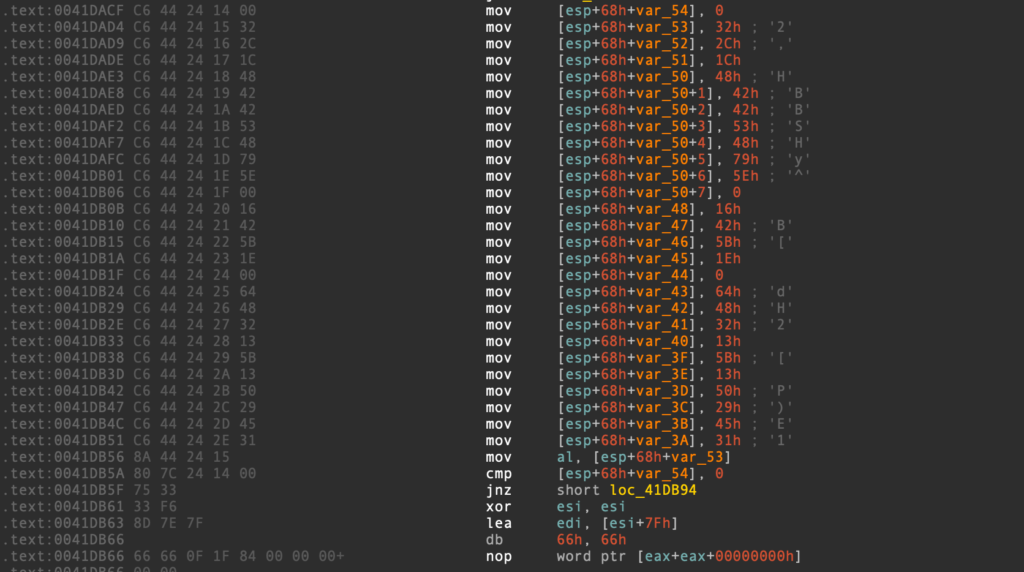
If we decompile this block, it’s also quickly identifiable within the decompilation as a series of value assignment operations. IDA also attempts to parse some of the stack string bytes, so if each byte was an ASCII character, it would likely display the entire string for you rather than breaking it up into what we see below.
Now we’ve identified where a stack string is built, how do we find the decryption routine?
Again, this is simple enough in Conti as it is right below, however if that wasn’t the case you’d want to search for XREFs within the function to the var_XX variable that the first/last byte in the stack string was moved into. In this case, we’d look for var_53, and if it wasn’t referenced at all, we’d search for var_3A.
Looking at the decryption code, it is pretty basic in that it is a single block with 9 main instructions excluding the instructions to copy and overwrite bytes from the encrypted string, and the counter code.
.text:0041DB70                 mov     al, [esp+esi+68h+var_53]
.text:0041DB74                 mov     ecx, 31h ; '1'
.text:0041DB79                 movzx   eax, al
.text:0041DB7C                 sub     ecx, eax
.text:0041DB7E                 imul    eax, ecx, 17h
.text:0041DB81                 cdq
.text:0041DB82                 idiv    edi
.text:0041DB84                 lea     eax, [edx+7Fh]
.text:0041DB87                 cdq
.text:0041DB88                 idiv    edi
.text:0041DB8A                 mov     [esp+esi+68h+var_53], dl
.text:0041DB8E                 inc     esi
.text:0041DB8F                 cmp     esi, 1Ah
.text:0041DB92                 jb      short loc_41DB70
The above can be summarised as follows:
- Move encrypted byte into AL
- Subtract encrypted byte value from 0x31
- Multiple result of above with 0x17, stored in EAX
- Signed division of EDX:EAX, with value in EDI
- Addition of remainder in EDX with 0x7F, stored in EAX
- Signed division of EDX:EAX, with value in EDI
- Overwrite encrypted byte with value in DL
- Increment ESI
- Compare ESI against hardcoded string size
We can build the following snippet which we can execute in Python and see the output:
a = string[i]
string[i] = ((((0x31 - a) * 0x17) % 0x7F) + 0x7F) % 0x7F)
Looking at the IDA decompilation, it’s pretty much identical:
for ( i = 0; i < 0x1A; ++i )
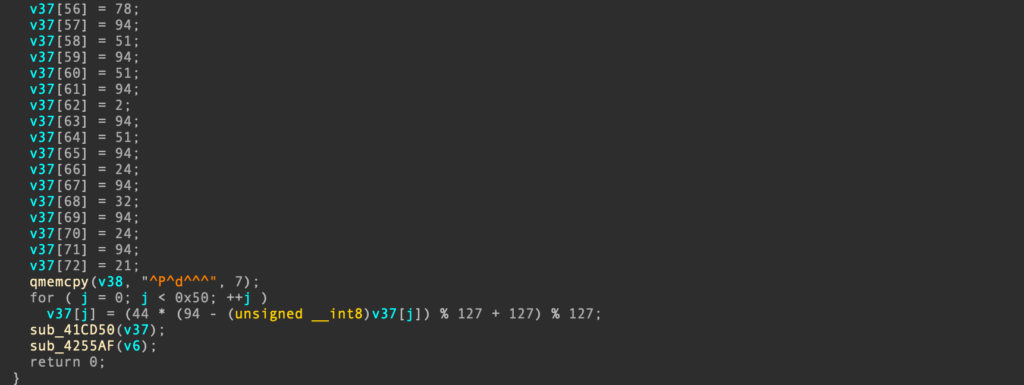
v43[i] = (23 * (49 - (unsigned __int8)v43[i]) % 127 + 127) % 127;Now it would be great if we could just use this to decrypt all the strings, but if we have a look at another example, we get the following decompilation:
for ( i = 0; i < 0x1A; ++i )
    v13[i] = (24 * (78 - (unsigned __int8)v13[i]) % 127 + 127) % 127;
As you can see 23 is now 24, and 49 is now 78.
Ok, so what if we simply extract those values? We can write a regex that will set those integers as wildcards, and we can then capture those and use them to modify the algorithm?
If we take a look at the assembly code for this snippet you may notice a difference or two:
.text:00420FA1                 mov     al, [ebp+esi+var_24B]
.text:00420FA8                 mov     ecx, 4Eh ; 'N'
.text:00420FAD                 movzx   eax, al
.text:00420FB0                 sub     ecx, eax
.text:00420FB2                 lea     eax, [ecx+ecx*2]
.text:00420FB5                 shl     eax, 3
.text:00420FB8                 cdq
.text:00420FB9                 idiv    ebx
.text:00420FBB                 lea     eax, [edx+7Fh]
.text:00420FBE                 cdq
.text:00420FBF                 idiv    ebx
.text:00420FC1                 mov     [ebp+esi+var_24B], dl
.text:00420FC8                 inc     esi
.text:00420FC9                 cmp     esi, 1Ah
.text:00420FCC                 jb      short loc_420FA1
.text:00420FCE                 mov     ebx, [ebp+var_250]
Instead of an IMUL operation, we have a LEA call followed by a shift-left – so where did the 24 come from? Well, IDA basically simplified the algorithm, converting the LEA & SHL operations to an imul of 24. The issue we’ve got is we’ve now got to handle different methods of adding, subtracting, multiplying, etc.
Which is why we’re going to be using Unicorn for emulation, rather than completely relying on Capstone to statically disassemble.
Now there is one last thing to take note of – Conti also has stack strings that are passed to a function and decrypted; we won’t be looking at these in this part, but will be in the next part. The reason being is we will need to find cross-references for decryption functions, and then step back to find the stack string that is built. As we aren’t able to easily find cross-references with capstone, we’ll need to leverage another tool such as r2pipe, but again that is something for the next post!
For now, let’s start with building out our automation script, by developing our first regular expression!
Building the “Finder” Regular Expression
When it comes to building regular expressions for byte patterns, I’ll usually fall on IDA for identifying patterns that could be used to accurately locate the correct blocks. Going to Search -> Sequence of Bytes… we can use ?? as wildcards for bytes that may change per iteration. For example, in the code below we can see that ESI is a counter and is being compared against 0x1A.
.text:00420FC8 46                                   inc     esi
.text:00420FC9 83 FE 1A                             cmp     esi, 1Ah
.text:00420FCC 72 D3                                jb      short loc_420FA1
For identifying similar blocks where the length may change, we can use search for the following sequence of bytes within IDA
46 83 FE ?? 72 From this query we can find 56 possible matches – which is quite low, and we’re also assuming that the ESI register is always used as the counter. From looking through the different string decryption blocks, it looks like AL is always used in an initial MOV operation, moving the encrypted byte to it. These instructions appear to have one of two possible structures:
8A 84 3D F1 FE FF FF
8A 44 35 CD
So not really the best byte pattern given the changes – it might be better to focus on the division instructions, though they also pick up the string decryption functions rather than just the inline code.
.text:0041AB20 99                                      cdq
.text:0041AB21 F7 FB                                   idiv    ebx
.text:0041AB23 8D 42 7F                                lea     eax, [edx+7Fh]
.text:0041AB26 99                                      cdq
.text:0041AB27 F7 FB                                   idiv    ebx
So, we’re going to instead work with the initial 8A 44 and 8A 84 instructions, and see how far that gets us!
Quickly converting these thoughts into a script, we get the following:
data = open("file.bin", "rb").read()
rule = re.compile(b"\x8A\x44|\x8A\x84")
matches = rule.finditer(data)
print (len(list(matches)))

>>> 103
While there are likely more than 103 inline encrypted stack strings, our goal is to build a script that can actually decrypt those 103 strings that we’ve found, before we can go and perfect it.
So! Now we can actually find the decryption routine, let’s start working on walking back to locate the first encrypted byte moved onto the stack.
Locating the First Stack-Byte
The way we’re going to approach this is quite hacky, as I’m actually not sure if there is a way to iterate over a block of code in reverse within Capstone. As a result, we’re basically going to decompile the block, store it as a list, and reverse the list.
How exactly are we going to determine the block size? Especially given we’ve got code blocks that are quite varied throughout the binary, with certain instances having additional nop instructions, or slightly longer strings, etc.? Well, if the last part wasn’t hacky, this part will be – we’re just going to take a chunk of ~500 bytes before the MOV AL, … instruction, and use that. If we encounter many issues, we can of course increase this size, but again, no point perfecting until we have a working script!
data_block = data[m.start()-500:m.end()]
disasm_list = list(md.disasm(data_block, 0, len(data_block)))
disasm_list = reversed(disasm_list)
We’re also going to want to get the stack offset of the variable referenced in the MOV instruction we’ve just found, for cross referencing later on. In order to do this, we can run the following:
string = data[m.start():m.end()]
disasm = list(md.disasm(string, 0, len(string)))
offset = disasm[0].operands[1].value.mem.disp
In the instruction below, the code above would give us the offset -87:
mov al, [ebp+esi-87]Now we have the reversed list of instructions and the offset of the first encrypted byte, we want to start narrowing down the size of the data block. We don’t want to emulate all 500 bytes, as 450 may be irrelevant and cause further issues.
To do that, we’re going to loop through the reversed list of instructions, and check for any instruction that has the MOV mnemonic, and moves data into memory (the stack). If we locate any matching instructions, we then want to check if the stack offset within the instruction is equal to the stack offset we found earlier. If it is, we have likely found the start of the stack building routine!
for i in disasm_list:
    if i.mnemonic == "mov" and i.operands[0].type == 3:
        if i.operands[0].value.mem.disp == offset:
            print ("found stack string creation address > ", hex(i.address))
Before we continue, lets give this a run:
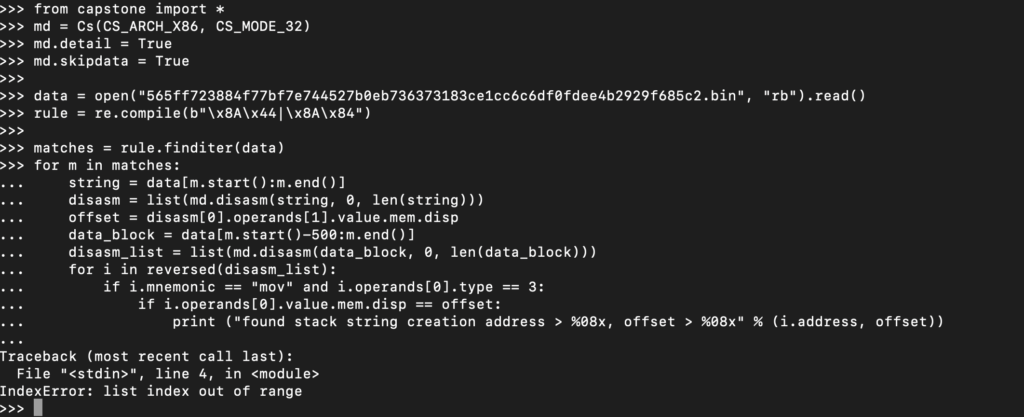
As you can see, we had an error immediately. This is due to the m.start():m.end() line, as we’re only capturing 2 bytes from the binary at this point. Let’s update the regex to search for 2-3 bytes of additional data for the 8A 44 pattern, and 2-6 bytes for the 8A 84 pattern.
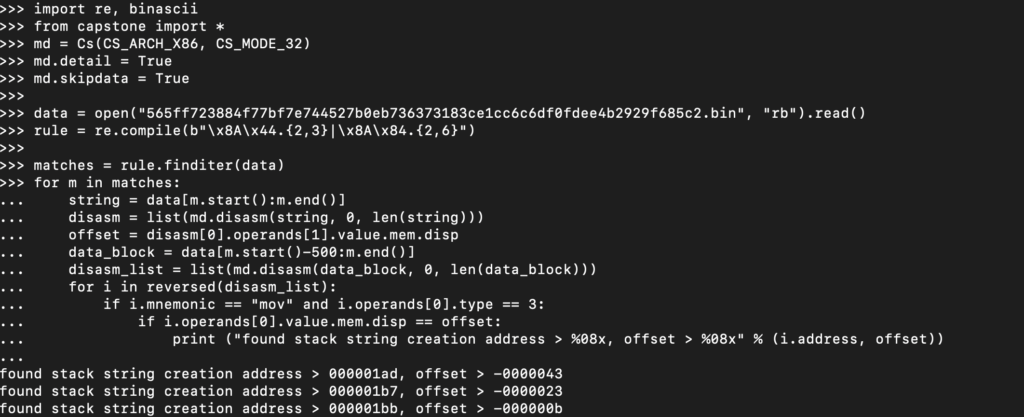
Perfect!
Now we want to make sure we get rid of all the data we don’t need before the stack string creation address:
smaller_block = data[
    ( ( m.start() - 500 ) + i.address ) : m.end() + 75
]
The best way to check if this worked as expected is to quickly disassemble it with CyberChef to see if the MOV instruction appears at the beginning as expected.
Now you may be wondering, why did we add 75 to the end? Well, currently we only have the bytes up until the start of the decryption routine – not the routine itself, which doesn’t really help us. So, we now want to iterate through the smaller data block and search for a “JB” instruction, which is going to allow the decryption code to decrypt more than 1 byte of data. This is a simple enough addition:
for y in md.disasm(smaller_block, 0, len(smaller_block)):
    if y.mnemonic == "jb":
        print ("found end of loop > %08x" % y.address)
        smaller_block = smaller_block[:y.address+y.size]
        print (binascii.hexlify(smaller_block))
        break
Putting this together and running it, and then double checking in CyberChef, you should be able to see that so far it’s running quite well!
With that, we now have extract the entire block of code needed to decrypt the strings, and I think we’re just about ready to start emulating! Before doing so, we just need to fine tune a few more things…
Prepare for Emulation
One key thing to take note of is the division elements of each string decryption routine – the value 0x7F is used across the sample, in every instance. Additionally, IDIV requires it’s first operand to be a register, not a raw value, so you’ll only come across IDIV EBX, IDIV ECX, etc. The issue we’ll have if we start emulating right now is some of our blocks don’t include the instruction where 0x7F is moved into the register used for the IDIV operation. Without that initialisation, you’ll likely get this error a lot:
Unhandled CPU exception (UC_ERR_EXCEPTION)So with that in mind, let’s build out our emulation code!
I usually base a lot of my emulators off of Unicorn’s own sample code, so we can get setup quite quickly:
from unicorn import *
from unicorn.x86_const import *

def unicorn_block(block):
    # init unicorn
    mu = Uc(UC_ARCH_X86, UC_MODE_32)
    # setup memory and write code to memory
    ADDRESS = 0x1000000
    mu.mem_map(ADDRESS, 4 * 1024 * 1024)
    mu.mem_write(ADDRESS, block)
    # set these registers to 0x7f
    mu.reg_write(UC_X86_REG_ESI, 0x7f)
    mu.reg_write(UC_X86_REG_EDI, 0x7f)
    mu.reg_write(UC_X86_REG_EBX, 0x7f)
    mu.reg_write(UC_X86_REG_ECX, 0x7f)
    # setup stack and base pointer
    mu.reg_write(UC_X86_REG_ESP, ADDRESS + 0x100000)
    mu.reg_write(UC_X86_REG_EBP, ADDRESS + 0x200000)
    # emulate machine code in infinite time
    try:
        mu.emu_start(ADDRESS, ADDRESS + len(block))
    except Exception as E:
        print (E)
    # read value in EBP (pointer to base)
    ebp = mu.reg_read(UC_X86_REG_EBP)
    # read memory from EBP - 0x100000, and strip \x00 bytes by decoding
    data = mu.mem_read(ebp - 0x100000, 0x100000).decode("utf-8")
    print (data)
    return
With that sorted, let’s go ahead and run it!
Emulate!
As you can see, it looks like it works quite well!
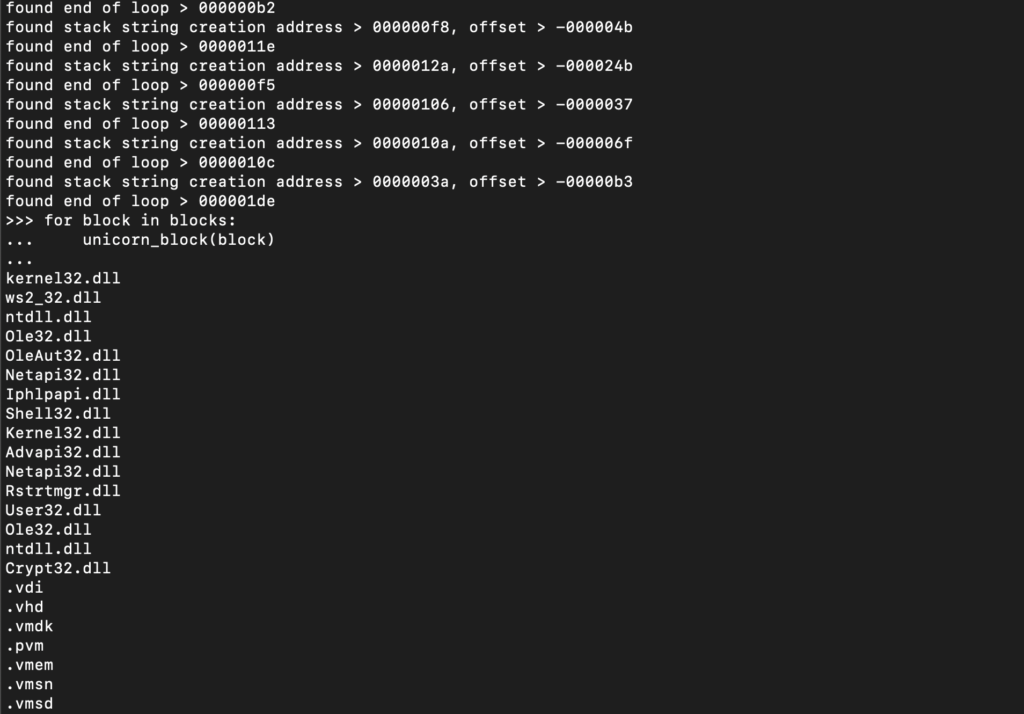
However, if we recall back to the initial regex building, we’d identified a total of 103 matches – yet we’ll only have 75 strings; where did the remaining 28 strings go?? Let’s do some debugging.
Adding a few checks and flags, we manage to get our first error prone block:
ffffff20c6855cffffff4cc6855dffffff7dc6855effffff23c6855fffffff40c68560ffffff40c68561ffffff758a8555ffffffe8e6d5ffffc64584008bf0c6458558c6458678c645872fc6458804c645893ac6458a6dc6458b43c6458c26c6458d31c6458e5bc6458f45c6459045c64591708a4585807d84008975f4752633ff8a443d85b9700000000fb6c02bc86bc12399f7fb8d427f99f7fb88543d854783ff0d72dcc68544ffffff008d8d44ffffffc68545ffffff74c68546ffffff3ec68547ffffff22c68548ffffff30c68549ffffff3ec6854affffff49c6854bffffff3ec6854cffffff65c6854dffffff55c6854effffff14c6854fffffff30c68550ffffff30c68551ffffff338a8545ffffffe8a7d4ffffc68574ffffff00c68575ffffff02c68576ffffff21c68577ffffff07c68578ffffff3bc68579ffffff07c6857affffff3ec6857bffffff5bc6857cffffff3bc6857dffffff31c6857effffff2ac6857fffffff58c6458058c6458166898528ffffff8a8575ffffff80bd74ffffff00753033ff0f1f40008a843d75ffffffb9660000000fb6c02bc86bc12c99f7fb8d427f99f7fb88943d75ffffff4783ff0d72d6c645c400c645c529c645c622c645c74fc645c87ec645c931c645ca4fc645cb48c645cc67c645cd75c645ce75c645cf378a45c5807dc400752233c98a440dc50fDisassembling this, we get the following:
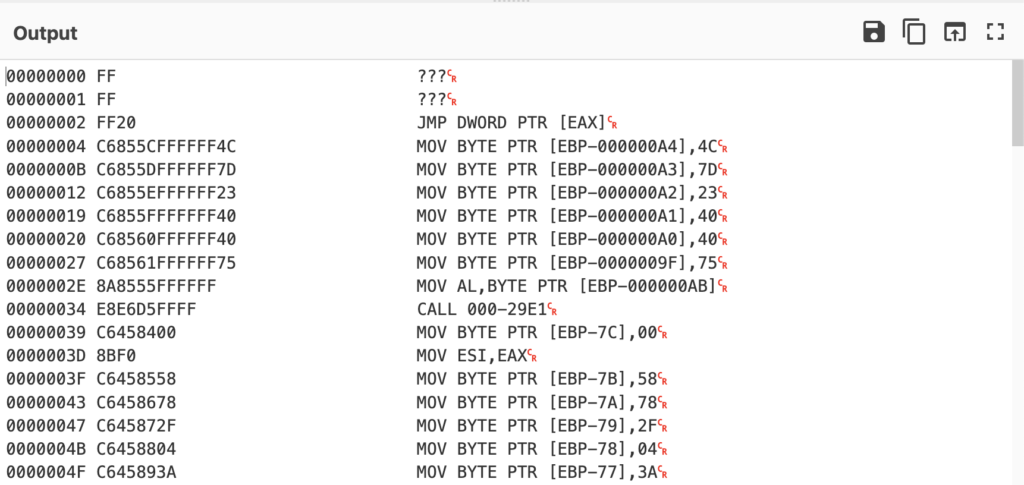
So as you can see, it appears our 500 byte chunk cut halfway through a MOV operation, and as a result the first two instructions are invalid – resulting in the failed disassembly. So, lets add in some code to avoid this error.
loop = 1
while not disasm_list or len(disasm_list) < 10:
    data_block = data[ ( m.start() - 500 ) + loop - 1 : m.end() ]
    disasm_list = list(md.disasm(data_block, 0, len(data_block)))
    loop += 1
Here we’re basically checking to see if the disasm_list variable has more than 10 elements (AKA instructions), to avoid situations where perhaps the instruction at offset 8 might be corrupted.
And now after a few tweaks we’ve got 97 extracted strings! Regarding the remaining 6, it’s possible our rule picked up some false positives, or the string was even larger (the ransom note is encrypted in the binary, so it’s very likely that caused our issue, as we’re only reading 500 bytes). So if you’re up for a challenge, I’d say take a look at the current script (or develop your own of course!), see where problems might be caused, and see if you can decrypt 100% of the inline strings within the sample 😀
For now, that is pretty much it for this post – of course, as mentioned, Conti is an older ransomware sample and building a tool like this doesn’t make a huge amount of sense as there isn’t a need to decrypt strings en-masse across thousands of Conti samples (unless you’re focused on ransom notes and performing linguistic analysis), though the goal was to introduce Capstone & Unicorn, and how it can be used without relying on external tools during the automation period.
With that, you can find the script here, and in the next part we’ll be looking at leveraging r2pipe, Unicorn, and Capstone to extract not only inline strings, but also encrypted stack strings passed to a function!