

Setting Up a Safe Malware Analysis Environment
Carrying on with the previous post of getting started with malware analysis (you can find it here), I’ve had requests to do a write up on how I setup my environment for analysis. This guide is also helpful for those of you running a one laptop setup, because that’s what I’m currently using! Obviously you’ll be able to customize the specs based on your own setup, such as allocated RAM and hard drive space, but I’ll be talking about the specs that I currently have set.
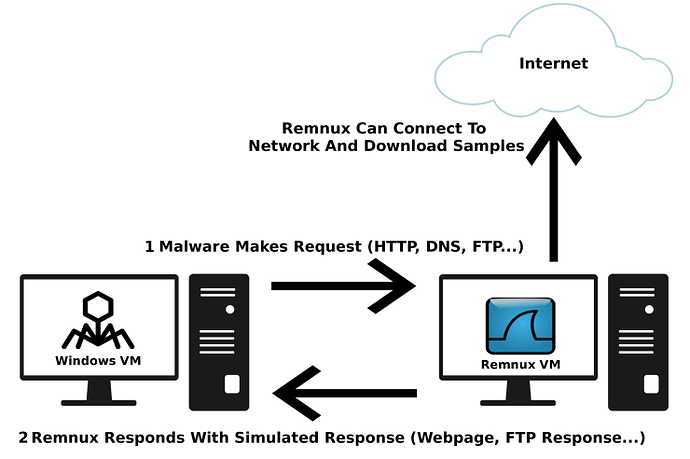
I’m currently running everything on a 64-bit ASUS R556L with a slow 8GB of Memory and an Intel i5-5200U CPU, with the OS being Ubuntu. Not the latest and greatest, but it works. Now when it comes to the actual analysis, I typically run only one VM (due to the lack of resources on the system), which is my Windows 7 Virtual Machine. It has been setup with 2GB of Memory, 18MB of Video Memory, and a 50GB hard drive. For more in-depth analysis, I run a Remnux VM, which comes packaged as a .OVA file. Remnux allows me to use pre-installed tools such as InetSim, which acts as a “fake internet”, allowing me to observe any network behavior of the malware without it actually connecting out to it’s C2 server. All of this is run using VirtualBox, which is also free. So, now that you know the hardware and software I’m running on, let’s get into the actual setting up part!
Whilst I do use Windows 7 for my RE, I can’t seem to find a legitimate download for it anymore (off of the Microsoft site), however you can find a legitimate Windows 10 ISO here. I won’t be going through the installation of Windows on the VM, as it should be simple enough, but you can find a full tutorial here.
From the network standpoint, you can select 1 of 4 options, depending on your layout. If you are simply using a Windows VM for analysis, you can select NAT, to allow the VM to connect out to the internet but not see other devices on your network, or No Adapter, to cut off the VM completely from the internet. If you are using both Remnux and Windows, you can choose Host-Only Adapter, which creates a private VM network with the two VM’s and your computer, or you can select Internal Network, which creates a private VM network between the two VM’s only. The safest option is the Internal Network, as then you don’t have the risk of your computer being infected. As I use Ubuntu as my main OS and I analyze Windows specific malware, there is slightly less risk involved, but it’s definitely not no-risk. However, as I have not been able to setup an Internal Network successfully, check out this amazing post by Roberto Rodriguez about setting up a Malware Analysis Lab with an Internal Network, and I will be showing you how to setup a Host-Only Network. The majority of the information I mention for setting up InetSim comes from his post, so go check it out! Anyway, if you’re following my post, make sure you set the Windows VM Network Adapter to a Host Only Network.
Now you’ve setup your base Windows VM, we can setup the Remnux VM. You can download the VM from Remnux’s website here. Once setup with Virtualbox, connect the VM to a network (use NAT here) and run:
update-remnux full
on the terminal to update the software. Once the latest software has been installed, we can configure the network adapters for it. Instead of using NAT, change the adapter to Host-Only. What should happen is, as long as DHCP is enabled, both the Remnux machine and the Windows machine should be assigned an IP address. In this case, the IP for my Remnux machine is 192.168.56.3, and the IP for my Windows machine is 192.168.56.4.
Now, if you want to you can enable a second adapter on the Remnux machine and set that as NAT, so that it can connect to the internet as well, as you can see down below.
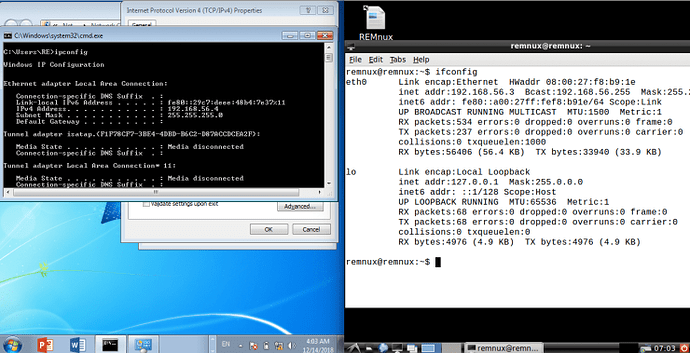
Before we setup InetSim, we want to change the default gateway of the Windows machine so it points to our Remnux VM. Simply go to the IPV-4 Properties menu, as shown in the image below, and make sure you set the gateway IP and the preferred DNS server as the Remnux machine. The IP address previously assigned to the Windows VM can remain the same, so you don’t need to change that.

Now we can setup InetSim on the Remnux VM. For more customization, the main files can be found here:
- Init.d config file: /etc/default/inetsim
- Main Config : /etc/inetsim/inetsim.conf
- Reports : /var/log/inetsim/reports
- Main Log: /var/log/inetsim/
- Data Files: /var/lib/inetsim/
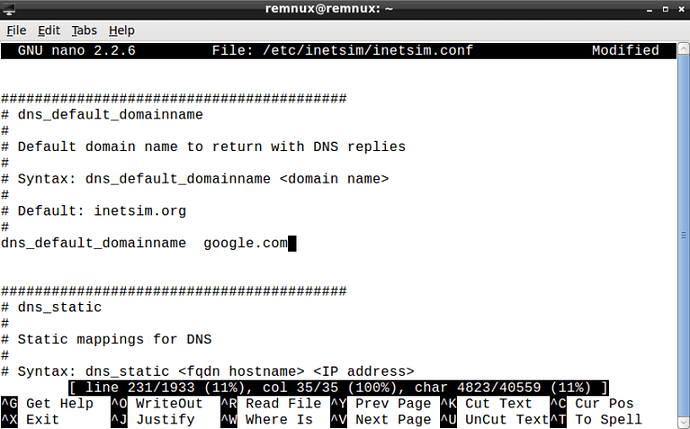
We’re first going to access the inetsim.conf file, so open that (with sudo privileges) using your favorite text editor. First, on line 29, remove the # from #start_service dns, so DNS is enabled. Next, go to line 69 and remove the # from #service_bind_address, and then replace the 10.10.10.1 with our IP, so 192.168.56.3. Do the same thing on line 207, removing the # and replacing the IP address. Finally, if you want to change the domain name of the returned InetSim page, simply go to line 231, uncomment it, and change some.domain to any domain of your choosing. This will help prevent malware fingerprinting and identifying InetSim. You can now exit out of that.
If you want InetSim to start at boot, open up /etc/default/inetsim and changed ENABLED=0 to ENABLED=1. Next, we need to create an IPTables rule to redirect any connections to eth0, using this command:
sudo iptables -t nat -A PREROUTING -i eth0 -j REDIRECT
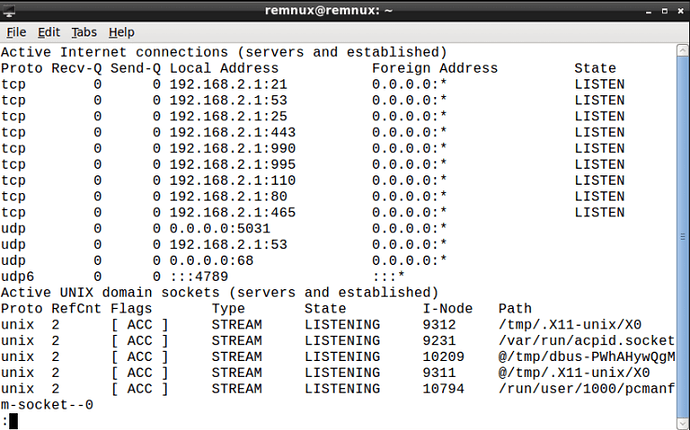
Finally, restart InetSim using sudo /etc/init.d/inetsim restart. To check if it is running properly, run netstat -an | less – if all is well, you should see several TCP sockets open on LISTEN, like below.
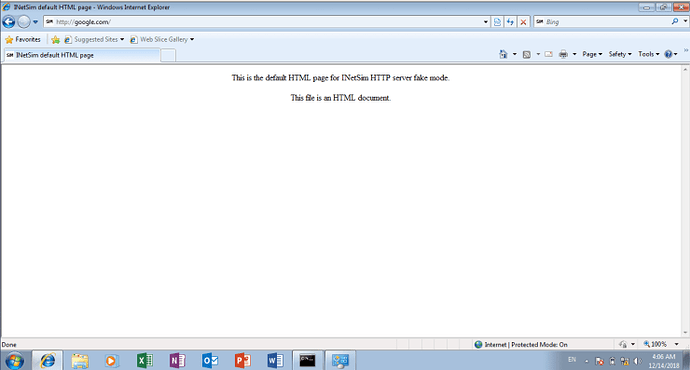
Once we have configured InetSim, browse to any site on your Windows machine and it should display the InetSim default HTTP page. If so, congratulations, it works!
Now that both VM’s are fully setup network-wise, we can start installing local tools on the Windows machine. If you want to simply install all the tools, check out Flare-VM by FireEye. It is a simple Powershell script that will download all of the programs that you’d need for an analysis, and more. From Decompilers to Debuggers to Pentesting programs such as Metasploit, if you have the time and hard disk space to use this tool, I highly recommend using. You can find it here. Simply follow the instructions and it should all go smoothly. If you’re like me and have limited resources and time, here is a list of all the tools I use on a regular basis and are vital to analyzing malware:
Static Analysis:
- IDA Pro Free (Version 5 and 7)
- For x32 and x64 Windows Malware – unless you have the paid version
- Cutter (Radare2 GUI)
- Radare2, as well as being free, supports many more architectures than IDA Pro Free does, and now has a great GUI
- dnSpy/ILSpy
- For .NET Malware
- JD-GUI
- For Android/Java Malware
- Dex2Jar
- For Android Malware
- APKTool
- For Android Malware
- PEStudio
- Gaining an overview of the executable
- PEBear
- Useful in many different scenarios, such as mapping unmapped files
- De4Dot
- For deobfuscating obfuscated .NET Malware
- Resource Hacker
- For viewing resources in an executable
Dynamic Analysis:
- x32/64Dbg
- Debugger
- Immunity Debugger
- Debugger
- OllyDBG
- Debugger
- ProcessHacker
- Monitoring all running processes
- ProcessMonitor
- Monitoring lower level activities of a process
- Wireshark
- Monitoring the network traffic
Misc:
- Python
- Extremely useful for automation
- .NET
- Required to run .NET malware
- Java
- Required to run Java malware
- Microsoft Office (or the free LibreOffice)
- Very helpful for analyzing macro based malware or embedded EXE’s
- Google Chrome
- So much better than Internet Explorer, and useful when analyzing malware that injects into it, such as banking trojans
- HxD
- Great Hex Editor
So, now you’ve setup your Malware Analysis Lab with all of the tools you could need, as well as a traffic interceptor/sniffer VM, and have a lot of resources at your disposal, you can start analyzing malicious samples in no time! I find the best way to learn something from scratch is just to start doing and following malware analysis tutorials or simply googling things when you’re stuck! Although if you’re more of a learn-by-reading person and are looking for an extremely helpful book to start your journey with, I highly recommend Practical Malware Analysis by Michael Sikorski and Andrew Honig, which at the time of writing (14th of December) is on sale for $20 less! It was probably my first ever IT Security related book, and it sure was worth it.
Practical Malware Analysis: The Hands-On Guide to Dissecting Malicious Software
Anyway, that brings an end to this post, I hope you found it useful! I’m currently working on creating a WordPress.org website instead of a WordPress.com website, so that I can host it on it’s own domain without having to pay for any monthly plans other than the hosting, which should end up being much cheaper. If you’d like to support me and my content, feel free to check out my Patreon! It’ll help a lot 🙂 Also, if you’ve got any questions, you can always DM me over Twitter @0verfl0w_, and I should respond in the same day.
Comments (2)
Comments are closed.
Ben Mason
19th July 2019Great post, Microsoft allows for trial VM downloads of Win 7 and Win 10 at: https://developer.microsoft.com/en-us/microsoft-edge/tools/vms/
3xp0rt
24th April 2020For dynamic analysis, the best solution it’s cuckoo VM. IMHO.