Welcome back! If you haven’t checked out my last post on reverse engineering shellcode techniques, you can check it out here! This time we’re taking a look at stage 2 of the shellcode, which we previously decrypted using IDAPython in the last post. We’re going to be covering quite a lot this week, so if you want to follow along, you can grab the initial shellcode from VirusBay! Without further ado, let’s jump straight in!
(Also, if you weren’t aware of it, Vitali Kremez and I are currently working on developing a much more advanced malware analysis course, and have drafted up a potential syllabus, and we’d love your feedback! Go here, check out the syllabus, and complete the survey to get 10% off when it releases! Thanks for your support!)
MD5 Hash: 9d7e34250477acf632c6c32fc2c50d3b
Shellcode Analysis Stage 2 – Static Analysis:
So, after converting the decrypted bytes into code through IDA and then creating a function at the address 0x2C (simply press “P” with the cld instruction highlighted), we can view the next stage of the shellcode in the graph format. As the graph view of the function is far too big to fully screenshot, I’ve converted it to pseudocode to get a brief overview of what the function looks like – although this is the only time we’ll be using it for this write-up!


Inside the function I have renamed to Second_Stage(), we can see cld is executed initially, and then there is a call to sub_B4(), so let’s move into that function. Immediately upon jumping to the function, we can see hex values being pushed before a call to the address stored in ebp. At this point in the analysis, I have a feeling that we are dealing with some API hashing here.
For those that aren’t too familiar with shellcode and its inner workings, here’s a quick explanation of how API hashing works and why most malicious shellcode (and even sophisticated malware families) use it.
Shellcode, unlike EXEs, has no file header, no imports, and no exports. The reasoning for this is it has been developed to run pretty much anywhere and everywhere, without any issues. As a result, the shellcode needs to manually locate and import API upon runtime – I will be going over exactly how it does this soon, but in a nutshell it will parse the Process Environment Block (PEB), search for the target DLL name (kernel32.dll, ntdll.dll, etc.) and then get the address of the target DLL in memory. From there it will parse executable using the headers to find the exports, and loop through the list until it finds the correct export. At this point, it will get the address of the exported function, and jump to that address to call it. A lot of the time, it will initially locate GetProcAddress and LoadLibrary, so that it can quickly import API rather than parsing several DLLs.
In order to locate the target DLL, a name must be provided to the API locating function. For less sophisticated shellcode, the name may simply be provided as a string, such as “LoadLibraryA”, and so it is much easier to see what is going on. However, API hashing is another method of loading the correct API without implicitly stating which API to load. The API locating function may implement some hashing routine (such as CRC), that will hash each DLL name found and compare it to a hardcoded hash. If the hashes match, the DLL is then parsed for it’s exports, with each export being hashed and compared to another hardcoded hash value, until a match is found. The correct export is then called.
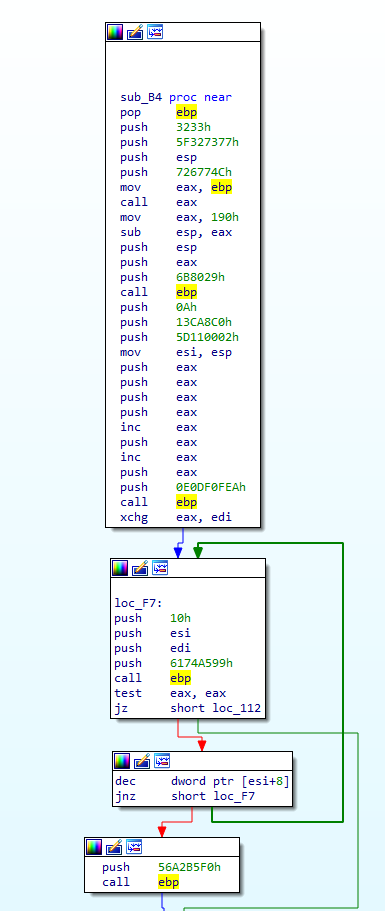
Anyway, enough with the theory, let’s get into the practical. Looking at the last image, you might notice the values 0x3233 and 0x5f327377 being pushed to the stack, before eax is called. We can actually convert these two values into strings by pressing “R” with them selected, to reveal the 2 following strings; 23 and _2sw. Swap and reverse these (to compensate for how IDA displays them), and we get the string ws2_32. Ring any bells? This is the name of the DLL that provides Winsock API such as WSAStartup, connect, send, recv, etc. From there, esp is pushed – esp points to the top of the stack which now contains the string ws2_32, so it essentially pushes the full name of the DLL to the stack. Next, the value 0x726774C is pushed, which we can assume is most likely the hash of the API, as immediately after, ebp is moved into eax, and eax is then called. Based on this, we can also assume that the function at ebp takes 2 parameters, a hashed API and an argument for said API. In this case the argument is a DLL name, so its highly likely that the hashed API is similar to LoadLibrary, but rather than making assumptions, let’s take a look!
Similarly to the first stage, sub_2B() will immediately pop the value at the top of the stack into ebp – this means the API loader function begins at offset 0x32, at the instruction after the call to sub_2B(). Now we know where the function starts, let’s analyze that before continuing with sub_2B().
When analyzing and attempting to implement algorithmic functions, I typically like to break them down into separate parts, to make analysis easier. In this case, the function at offset 0x32 contains 2 main loops, so I will be splitting the function using them.

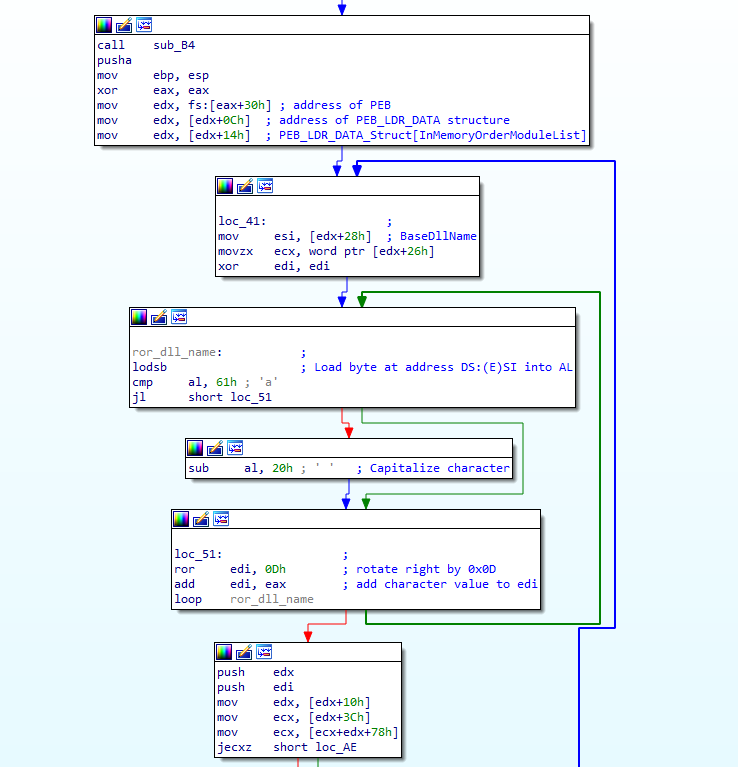
Looking at the first part (after the call to sub_2B()), there is a pusha instruction, esp is moved into ebp, and then eax is cleared. Take note of the first 2 instructions, as we’ll come back to this later. From there, the shellcode gets the address of the Process Environment Block (PEB) at offset 0x30 in the Thread Environment Block (TEB). From there, it will get the address of the PEB_LDR_DATA structure from offset 0x0C in the PEB. The PEB_LDR_DATA structure can be seen below.
typedef struct PEB_LDR_DATA {
    ULONG      Length;
    BOOLEAN    Initialized;
    PVOID      SsHandle;
    LIST_ENTRY InLoadOrderModuleList;
    LIST_ENTRY InMemoryOrderModuleList;
    LIST_ENTRY InInitializationOrderModuleList;
} PEB_LDR_DATA, *PPEB_LDR_DATA;
The shellcode will then add 20 to the base address of the PEB_LDR_DATA structure, which will result in it pointing to the InMemoryOrderModuleList – which is a pointer to another structure – this time a LDR_MODULE structure, which can be seen below.
typedef struct _LDR_MODULE {

  0x00 LIST_ENTRY              InLoadOrderModuleList;
  0x08 LIST_ENTRY              InMemoryOrderModuleList;
  0x10 LIST_ENTRY              InInitializationOrderModuleList;
  0x18 PVOID                   BaseAddress;
  0x1c PVOID                   EntryPoint;
  0x20 ULONG                   SizeOfImage;
  0x24 UNICODE_STRING          FullDllName;
  0x2c UNICODE_STRING          BaseDllName;
  0x34 ULONG                   Flags;
  0x38 SHORT                   LoadCount;
  0x3a SHORT                   TlsIndex;
  0x3c LIST_ENTRY              HashTableEntry;
  0x3c ULONG                   TimeDateStamp;

} LDR_MODULE, *PLDR_MODULE;
As this structure was accessed through InMemoryOrderModuleList, edx points to offset 0x08, rather than the base of the structure at 0x00. Next, it will add 40 to the current offset and store the value in esi. So now esi contains the value from offset 0x30 inside the LDR_MODULE structure, which points to an offset halfway through the BaseDllName – why is that?
Well, as you can see, FullDllName and BaseDllName are both of the type UNICODE_STRING, which we can see the structure of by checking MSDN:
typedef struct _UNICODE_STRING {
  0x00 USHORT Length;
  0x02 USHORT MaximumLength;
  0x04 PWSTR  Buffer;
} UNICODE_STRING, *PUNICODE_STRING;
As the Length and MaximumLength values are 2 bytes long, the shellcode retrieves the actual DLL name from offset 0x04, which is the Buffer. With the DLL name stored in esi, the MaximumLength value is then moved into ecx, before edi is cleared. Now it’s time to enter the actual loop.

First, a byte at [esi] is loaded into al, and as there was a call to cld at the very start, each call to lodsb will increment esi by 1. Next, al is compared to 0x61, and if it is equal to or more than 0x61, it will subtract 32 from the value stored in al. This will capitalize each character if they are not already capitalized. This is an important feature to remember, for when we are recreating the hashing algorithm. Once the letter has been capitalized, the shellcode will rotate edi to the right by 0x0D, and then add the capitalized letter inside eax to edi. This will continue looping until the shellcode has looped around each character. Once the algorithm has finished looping, the final hash value will be stored in edi. However, there is one final thing to take note of in this loop – the type of Buffer inside the UNICODE_STRING structure: PWSTR. This means, the DLL name is stored in a wide format, and so rather than passing kernel32.dll to our hashing algorithm, we need to pass:
k\x00e\x00r\x00n\x00e\x00l\x003\x002\x00.\x00d\x00l\x00l\x00\x00\x00So, now the first loop has been analyzed, let’s move onto the second loop!

First, the shellcode pushes edx and edi to the stack, which contain a pointer to the InMemoryOrderModuleList and the previously calculated hash. Next, 0x10 is added to the offset of edx so it now points to the module BaseAddress, which is then moved into edx. From there, the shellcode will parse the PE header in order to get the address of the export table in memory, and store said address in ecx. It will then check if ecx is 0 or not – if it is empty (meaning there is no export table), it will loop back around to the first loop, and perform the same operations on the next DLL. If ecx contains a valid address, the shellcode will continue to parse the executable until it finally gets a pointer to the exported API, at which point it will locate the name of the export, and enter another hashing loop. This time, it’s a bit different though. The case of the name remains the same, so LoadLibraryA would be hashed as LoadLibraryA and not LOADLIBRARYA.
As with the previous loop, a byte at [esi] is loaded into al, edi is rotated 13 times to the right, and then the value inside al is added to edi. Then, the shellcode checks to see if the value in al is 0, and if it is, it will break out of the loop. Something to take note of here is that the comparison is done after the ror and add instructions, meaning we need to make sure \x00 is appended to the export name when we replicate the hashing algorithm.
Once the hashing algorithm has finished, it will add the value in [ebp-8] to edi, and then compare this to the value in [ebp+36]. If the values match, it will end up executing the located API, otherwise it will loop back around, and hash the next export. Based on the comparison here, we can assume [ebp+36] is the hardcoded hash value – but how do we know this for sure and what is [ebp-8]?

So, we know ebp is the base pointer, meaning it points to the base of the stack, and esp is the stack pointer, meaning it points to the top of the stack. However, if you remember at the very start of the function, esp was moved into ebp, just after the call to pusha. Looking at the whole function and only highlighting all the push instructions, we can see there are only 3 main stack operations after esp is moved into ebp. Every time push is called, the stack decreases by a value of 4. This means the stack decreases by a value of 12 before we get to the add instruction. As it decreases whenever something is pushed, if we wanted to get the DLL name hash value pushed we need to subtract 8 from ebp. On the other hand, whenever pop is called, the stack increases by a value of 4. As they say a picture paints a thousand words, you can check out a basic diagram of how this works below.

Now we know that [ebp-8] is pointing to the previously calculated hash, but how do we know what [ebp+36] is? Well, as the shellcode is adding 36 to ebp, it means the value its looking for was pushed to the stack before ebp was “initialized”. This means that the value was pushed before esp was moved into ebp, so let’s work back from there.
Firstly, when a function is called, the return address is always at the top of the stack. We can then see that pusha is called before ebp is initialized, and pusha will simply push all of the general purpose registers onto the stack. As there are 8 registers, esp will be decreased by 32. This means that the value in [ebp+36] was pushed inside sub_B4(), immediately before the API lookup function was executed (call ebp). Looking back at this function, we can see that the value 0x726774C is pushed, before ebp is called. This is the hardcoded hash value, which is found at [ebp+36], and I have added another diagram below for clarity.

So, know we know that in order to get the final hash, we must add the hash of the DLL name to the export name, so let’s give it a try! The script is fairly basic, all it does is format the string properly (if it is an export name, append \x00, otherwise turn it into a wide string by splitting it and then joining it together with \x00, and then appending 3 \x00 bytes), and then perform the hashing algorithm before returning the final value. We then add this return value to the returned hash of LoadLibraryA, which outputs the correct hash; 0x726774c. Great! We now have a fully functional replica of the hashing algorithm!

Once the API has been located, the function will then use several pop and popa instructions to get the correct address to return to (the address after the call in sub_B4()). Once the LoadLibraryA call returns, the base address of the loaded library (ws2_32) will be stored inside eax!

So, we know that the API hashing/locator function takes, at the very least, 1 argument, with any additional arguments being passed to the loaded API itself:
API_Loader(HashOfTarget, API_Argument_1, API_Argument_2, ...)We also have a good idea on what DLLs are being used – kernel32.dll and ws2_32.dll. Rather than guess what API is being loaded, we can actually write a “brute-force” tool by having a list of exports from these 2 DLL’s, and checking the hashes against a hash we pass to the program. To get a list of exports, we can go here, find the DLL we’re looking for, copy out the exports and format them into a list format that Python can understand. Once we’ve got a full list of exports in place, all we need to do is loop through them, hash them and add them to the hash of the DLL name. Then, we simply compare it to the passed hash, and if it matches then we return from the function, otherwise we keep going. If the hash doesn’t match any export in kernel32, we then move onto ws2_32 and check the exports in that.

With that in place, we can simply run it against each hash hardcoded into the shellcode, and then comment the code in IDA to show what each hash maps to.

As you can see, there are a lot of Winsock API calls in the shellcode, and it seems like the shellcode connects to a C2, receives 4 bytes of data from it, allocates a region of memory, and then receives more data from the C2. We can assume the initial recv call gets the size of the next lot of data to receive, as it only receives 4 bytes from the C2, and the value received is then used in the next recv call as the length. However, the main thing we’re after here is the C2 address and port it connects to. Conveniently, it’s not too hard to find and is actually pushed as hex values before the call to WSASocketA:
push    013CA8C0h
push    5D110002h
Reversing these values (once again to handle how IDA displays it), we get 0xC0A83C01. When we convert each byte in the DWORD to an integer, we get the following:
0xC0 -> 192
0xA8 -> 168
0x3C -> 60
0x01 -> 1
So! We’ve now got the C2 IP Address! 192.168.60.1 – now to get the port value. As the maximum port number is 65535, which corresponds to 0xffff, the port number can only be 2 bytes long, meaning we only need the first half of the next value pushed; 0x5D110002. Reversing the first half, we get 0x115D, which as an integer is 4445! Congratulations! We’ve now managed to reverse the sample enough to extract the C2 and port: 192.168.60.1:4445.
With that information in hand, and a basic understanding of the communications routine, we can start writing a basic emulator to interact with the C2! However, this blog post ended up being a lot longer than expected, so we will cover that in the next part! Also, if there’s something you’d like to see covered in a blog post that I haven’t already covered, or something you’re not sure about, feel free to comment down below or just message me on Twitter (@0verfl0w_) and I’ll be sure to respond! Thanks!
Comment (1)
Comments are closed.
Emulating Malicious Shellcode Communications - 0ffset
4th March 2020[…] replicated the API hashing routine. If you haven’t checked out that post, you can check it out here, and the one before that here! In this post we’re going to be writing an emulator for the […]