It’s been a while since I posted a blog aimed at beginners in terms of reversing techniques for analyzing malware, rather than a “how-does-it-work” type post, so for this blog post I decided to focus on concepts tied very closely to malicious software, such as shellcode, (recognizing and implementing) encryption algorithms, and so on. I also didn’t want to choose a sample that was too advanced, such as Dridex, as I wanted to keep it fairly basic – and where’s one of the best places to look for some pretty basic and commonly used malware, that you probably have installed? Metasploit! So I went ahead and generated some shellcode with Metasploit (using an encoder too), so let’s get reversing! (If you want to follow along, you can grab the shellcode file off VirusBay!)
(Also, if you weren’t aware of it, Vitali Kremez and I are currently working on developing a much more advanced malware analysis course, and have drafted up a potential syllabus, and we’d love your feedback! Go here, check out the syllabus, and complete the survey to get 10% off when it releases! Thanks for your support!)
MD5 Hash: 9d7e34250477acf632c6c32fc2c50d3b
Shellcode Analysis Stage 1 – Static Analysis:
First things first, you’re going to want to open up the shellcode in a disassembler of your choice – I personally prefer IDA Pro, however I won’t be using the pseudocode functionality, and will be focusing on the disassembly view instead, so this should be applicable to any tool of your choice. IDA Pro lets you select how the binary data is loaded (16, 32, or 64 bit), and so I’m going to choose 32 bit initially, and if there are any errors with disassembly, we can simply change it. Once the binary file has been loaded, select the very first byte and press “C”, which will attempt to convert the first byte to code, and as a result, re-analyze the file and try to disassemble the rest of the bytes into assembly. As you can see below, the entry point starts at position 0x00, and the shellcode continues up to position 0x2A, at which point IDA is unable to convert the remaining bytes into assembly.

Based on that fact alone, we can assume that that portion of data is encrypted somehow, and the shellcode above decrypts and executes it. Therefore, let’s take a look at the very first function to run, sub_0(). This function is simply responsible for jumping to the offset 0x25, which will execute sub_2(), which I’ve named main_func() as it contains the majority of the code, so let’s now move onto looking at this function.

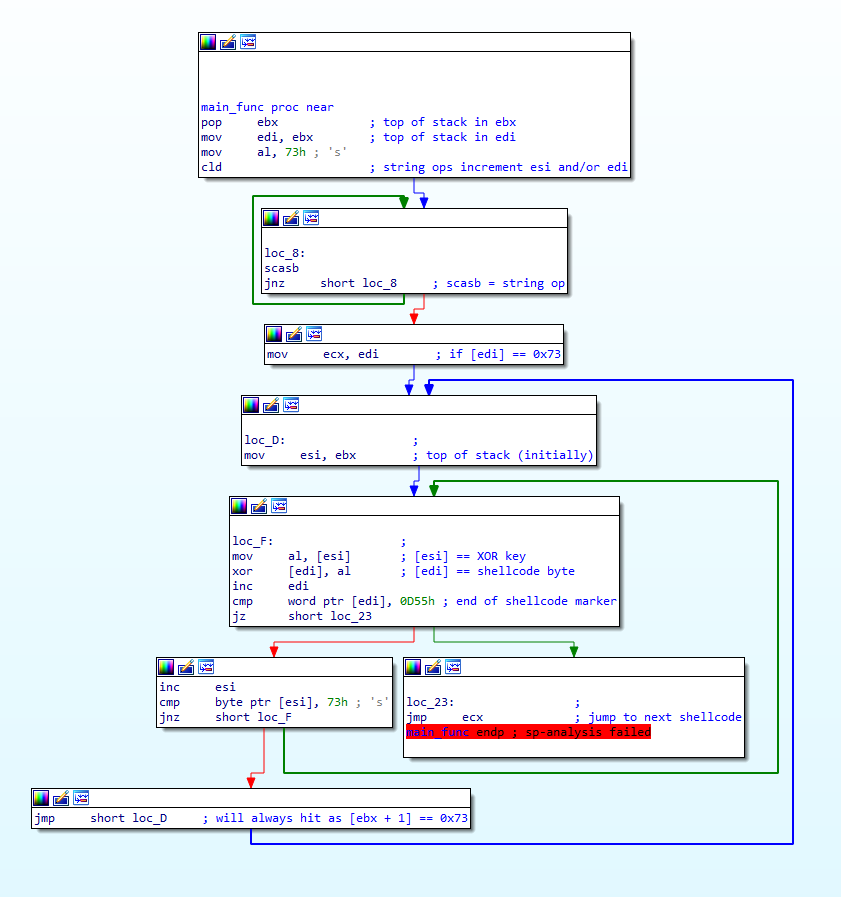
So, the decryption inside this function is fairly simple – just a basic XOR loop that will XOR data pointed to by [edi] with data pointed to by [esi]. After every XOR operation, edi (a memory address) is incremented, and the program compares [esi:esi+1] to 0x550D (IDA displays the value in Little-Endian in this case, hence why it is shown as 0x0D55). If the values match, it will jump to the address pointed to by ecx, otherwise it will increment esi, compare the data it points to now to 0x73, and if it matches it will restore the original address (stored in ebx). If it doesn’t match it will loop back to the XOR code and continue.

So, based on this we know esi is used as the key, and edi is used as the encrypted shellcode. We also know that the key length could be any length, and that ebx will contain the address that points to the first byte of the key.
With all this information, let’s first try and figure out where the encrypted data starts and stops. Starting at the XOR loop (loc_F) and moving upwards, we can first see the address stored inside edi is moved into ecx – this makes sense as the program jumps to the address in ecx once the decryption has completed.
Continuing on, we find where edi gets the encrypted code address from; ebx. At the very top of the function, the value at the top of the stack is popped off, and stored in ebx – this value is then moved into edi, before moving 0x73 into the lower bits of eax, calling cld, and then entering a scasb loop. The question is, what is at the top of the stack when it’s popped into ebx?
Well, a simple look at the stack in a debugger will tell you that when a function is called, the value on the top of the stack is the address to return back to – which is the address of the instruction after the call instruction. In the image below, the return address is 0x013B1CAB, and the address the function was called from is 0x013B1CA6 (the call instruction here takes up 5 bytes). So, how does this apply to our shellcode?

If you remember, the main_func was called from the position 0x25. The unrecognized data started at 0x2A. 5 bytes after position 0x25 to make room for the call instruction. Therefore, the data at the top of the stack in main_func() is the value 0x2A. Hooray! Now we know where the encrypted data starts! Right?

As a matter of fact, wrong! Remember how cld is called after 0x73 is moved into al? Well the cld instruction is responsible for clearing (set to 0) the DF (direction) flag in the EFLAGS register. When this flag is 0, any string operations increment the index registers, notably esi and/or edi, depending on which register was used in the operation. Once cld is called, a loop is entered that constantly executes scasb until the ZF (Zero) flag has been set (set to 1). What does scasb do though? All it does is simply compare the byte in al to [edi], and set the status flags based on the result. If it doesn’t match, the ZF will remain cleared, otherwise it is set, and the program breaks out of the loop. Furthermore, as scasb is a string operation, it will increment the address in edi after each loop, meaning that until [edi] equals 0x73, the program will never execute the decryption function. We now know that the encrypted data starts at 0x73, and the key is the data from address 0x2A, and up until the [address] = 0x73. Conveniently, looking at the image above, 0x73 is the second byte in the data pointed to by ebx – therefore, the XOR key is 0x06, and the encrypted data starts at 0x2B! Scrolling down to the very end of the function, we can find the bytes 0x550D, meaning the encrypted data is 401 bytes long!
With that all covered, let’s move onto the decryption phase!
Shellcode Analysis Stage 2 – Decryption:

So we’ve now got the XOR key – 0x06 – and where the encrypted data begins – 0x2B. With this knowledge, we can easily write a basic XOR decryption function in Python that takes 2 parameters; a key, and the encrypted data. Add a simple check to the function to see if the data matches 0x550D and the script is done!

But in order to actually use this, we need to extract the data from IDA, either manually or using YARA or Regex to locate it – and then we’d have to open it in a new IDA session, and there might be instances where this second “stage” calls functions from the first stage – perhaps to XOR another section of data. Luckily for us, we can convert this basic script to IDAPython format, and have it overwrite the encrypted shellcode with the decrypted shellcode!
And don’t worry, it’s extremely simple to migrate over to IDAPython. First we need to import the required library – idaapi – and then we want to change the for loop to a while loop – before we were able to call len() on the passed in data, however in this case we don’t know how long the data is, as we are now passing in the address of the encrypted data.
In addition to this, we can have the while loop continuously loop as long as there is still data left in address+i. This is possible through using the Byte() function, which takes a byte of data from a given address, which is our encrypted blob in this case. From there, we assign this byte of data to a variable, byte, and compare it to 0x55. We also compare address+(i+1) to 0x0D, to make sure that both markers are present.
If these markers are not present, then we XOR byte with the given key, and then call PatchByte(), which will overwrite the byte at address+i with our variable, byte. Finally, we increment i by 1 and the loop continues!

Importing this into IDA, and typing ida_xor_crypt(0x06, 0x2B) in the command line will execute our function, overwriting the data as you can see in the image below! It no longer starts with 0x73, as it is now 0x75.

To double check it all worked, we can press “C” again with 0x75 selected, and it should be completely disassembled, matching the image below!

And with that, we have completely decrypted the next stage! Congratulations! In the next post we will be going through this stage, looking at all sorts of obfuscation and functionality, so stay tuned for that! It’s not as advanced as a lot of my other posts, but I do hope some of you find it helpful! Also, if there’s something you’d like to see covered in a blog post that I haven’t already covered, or something you’re not sure about, feel free to comment down below or just message me on Twitter (@0verfl0w_) and I’ll be sure to respond! Thanks!
Comments (5)
Comments are closed.
2月17日每日安全热点 - 美网络司令部VT上分享朝鲜恶意样本 - 安全客,安全资讯平台
17th February 2020[…] 静态逆向Shellcode技术:第1阶段 https://www.0ffset.net/reverse-engineering/malware-analysis/common-shellcode-techniques/ 修补MacOS Sketch.App在Ghidra中的无限试用 […]
Reverse Engineering Shellcode Techniques - 0ffset
22nd February 2020[…] checked out my last post on reverse engineering shellcode techniques, you can check it out here! This time we’re taking a look at stage 2 of the shellcode, which we previously decrypted using […]
bob
3rd March 2020Hey this is a great blog. I have a question: How I can I use msfvenom to generate this sample? What’s the option?
Thanks!
0verfl0w_
4th March 2020Hey! Thanks! This is the windows/meterpreter/reverse_tcp_rc4 payload 🙂
Emulating Malicious Shellcode Communications - 0ffset
4th March 2020[…] routine. If you haven’t checked out that post, you can check it out here, and the one before that here! In this post we’re going to be writing an emulator for the shellcode, as if it was a real sample […]