

New TA402/MOLERATS Malware – Decrypting .NET Reactor Strings
It’s sure been a while since the last post! We’ve gone through several iterations of website design over the past few months (plus fixing all the malformed images due to the theme transfer), but should be back for good now! For this commemorative post, we’ll be diving into a recently discovered malware sample known as LastConn, a payload used by the MOLERATS APT group, which was obfuscated using .NET Reactor. The problem is, de4dot is unable to deobfuscate it, so the job falls upon us to do so. We’ll be examining the string encryption routine, replicating it in Python, testing it manually, and then automating it somewhat to extract all string related indicators from the binary, and decrypt the relevant strings! Let’s get into it!
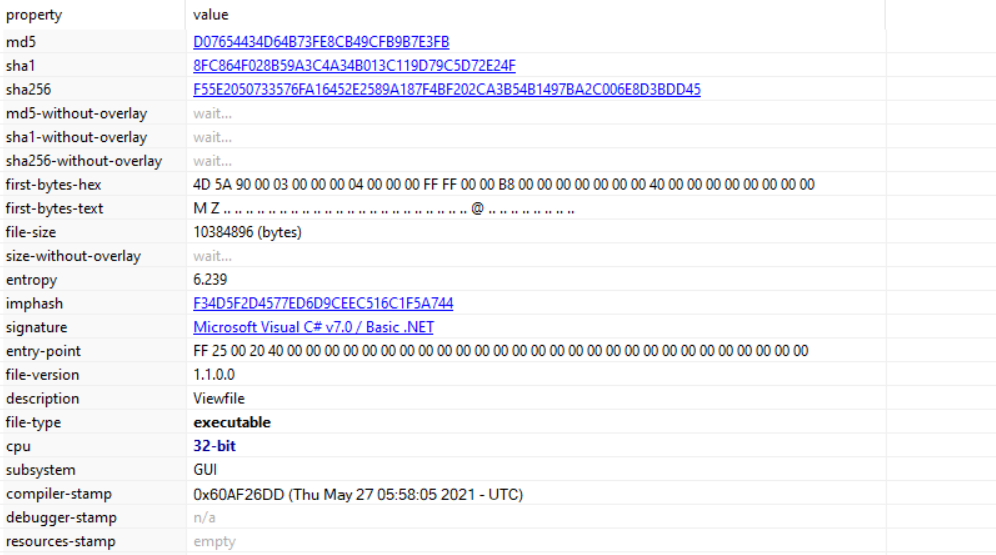
LastConn MD5 Hash: D07654434D64B73FE8CB49CFB9B7E3FB
Table Of Contents
- MOLERATS Group
- LastConn Implant
- .NET Reactor Obfuscator
- Initial Analysis
- Manual String Decryption
- Replicating the Algorithms
- Semi-Automation
MOLERATS: Overview
MOLERATS, also known as TA402, are a Middle Eastern based APT group known for performing intrusions against Middle Eastern Government Organisations, including Israel, the UAE, and Turkey. The most recent campaign, discovered by ProofPoint, once again targeted government organisations and organisations with diplomatic relationships in the Middle East. The prime focus of the attackers is to exfiltrate sensitive information in order to gather intelligence, using spear-phishing as an initial infection vector. In this campaign, ProofPoint discovered the threat actors utilising a somewhat new malware dubbed as LastConn.
LastConn: Overview
LastConn is believed to be an updated version of the SharpStage backdoor, previously discovered by CyberReason back in December 2020. The SharpStage backdoor, developed in .NET, utilised DropBox API for exfiltration, and had specific checks for Arabic on the infected machine. LastConn also implemented similar checks, as well as the DropBox API for communication. One of the discovered samples utilised an obfuscator that De4Dot could not successfully deobfuscate, known as .NET Reactor.
.NET Reactor: Overview
.NET Reactor is a powerful code protection and software licensing system for software written for the .NET Framework, and supports all languages that generate .NET assemblies. It is commercially available, and provides features such as string encryption, control flow obfuscation, and code virtualisation. A free trial is provided for the software as well, which seems to have been used by the threat actors, based on a string found in the list of decrypted strings. Talking about decrypted strings, let’s start analysing!
Initial Analysis:
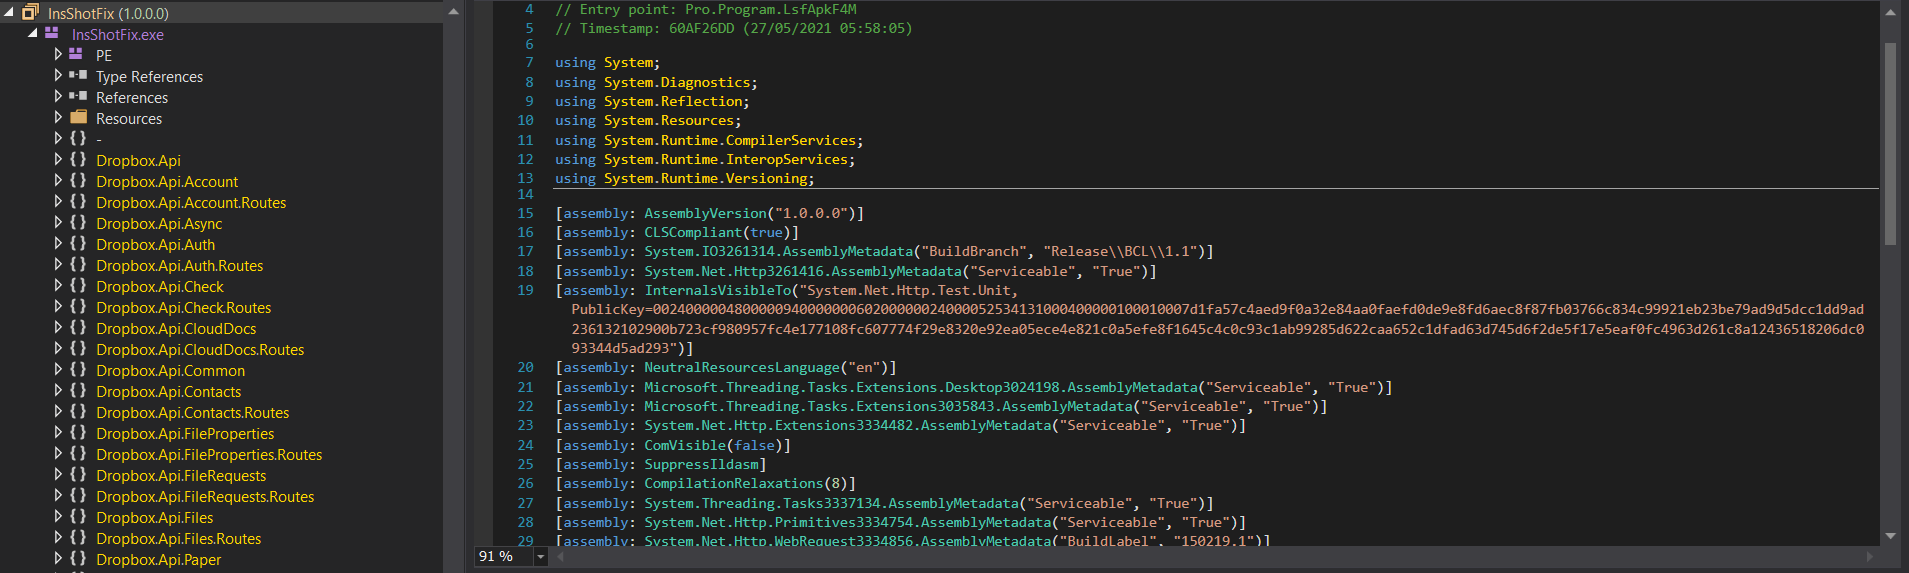
Opening up the initial sample in PEStudio, we can confirm that we are dealing with a fairly large .NET binary. At a first look, my thoughts were that the main payload was packed, resulting in the large file size, however upon opening the sample in dnSpy we can see that it is not packed – in fact we can see the unobfuscated symbols in the Assembly Explorer, with classes like Dropbox.Api and Newtonsoft.Json visible.
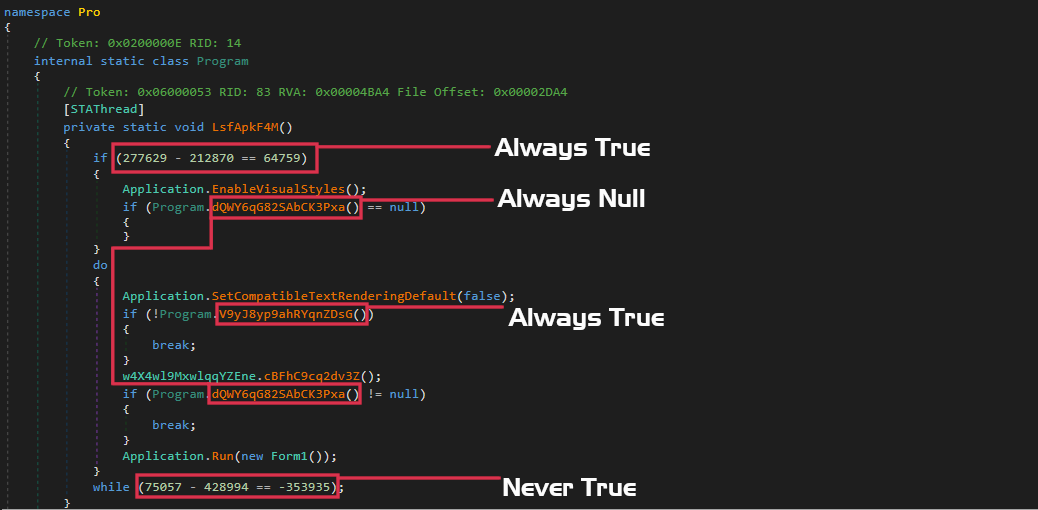
As mentioned, .NET Reactor provides functionality to encrypt strings, obfuscate control flow, and even virtualise the .NET instructions in a similar fashion to x86 Assembly virtualisation, which, luckily in this case, the threat actors chose not to enable! Instead, the main methods of protection in this binary surround the string encryption and control flow obfuscation, as well as the addition of junk code. We can clearly see this in the entry point function, labelled as LsfApkF4M().
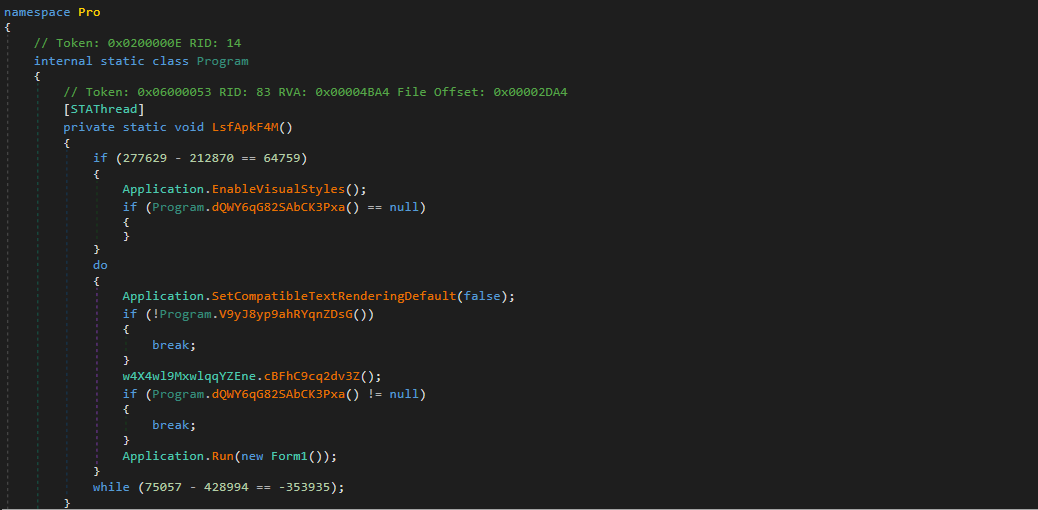
You’ll probably notice the junk code (subtraction of 212870 from 277629) which will always return true. However, the junk code isn’t limited to one-liners; two comparisons are performed between null and the return values from the function dQWY6qG82SAbCK3Pxa() – which will also return null. Therefore, we can now take note that a large number of functions in the binary are probably going to be made up of junk code that all return a constant value.
The main function of importance inside the entry point is at the very end, where we see the sample will execute Form1() – this is where the interesting stuff occurs. However, just before that we do encounter the very first “anti-analysis” check, which is a date check. The sample will refuse to continue execution if it has been executed after the 30th of June, 2021. While this is not the most interesting function, it does show us the first instance of a string decryption function. If the sample has been executed after the 30th of June, an exception will be thrown. The argument passed to the Exception() call is a string, and is returned from the function MYcw9uffxdYPAXmUtn.pyM1eVFCveMv9BuGJ6().
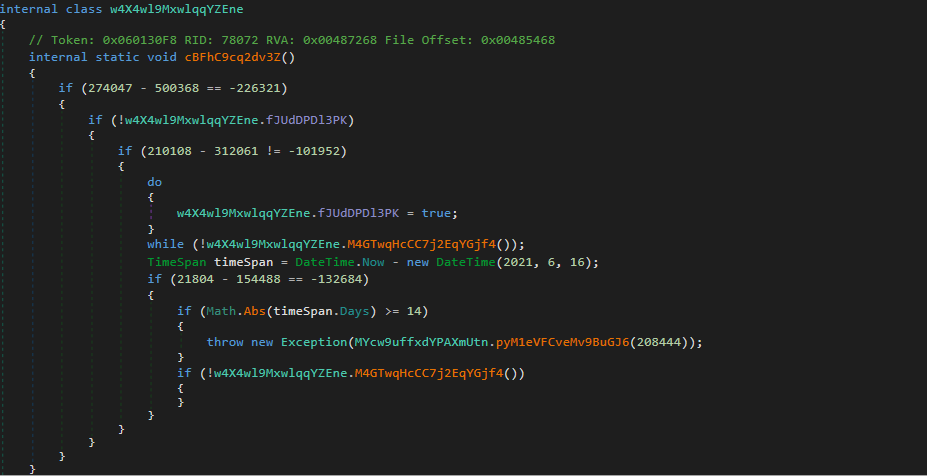
Upon checking the identified “anti-analysis” function again, and seeing that the function would display “This assembly is protected by an unregistered version of Eziriz’s “.NET Reactor”! This assembly won’t further work.”, it became clear that this is more likely to be a function created by .NET Reactor, to prevent the obfuscated payload working after a specific trial end date.
This particular function has the value 208444 passed as an argument, indicating that the strings are potentially stored in some kind of an array/list. Regardless, we have now found what looks to be a string encryption routine, so let’s dive in!
String Decryption:
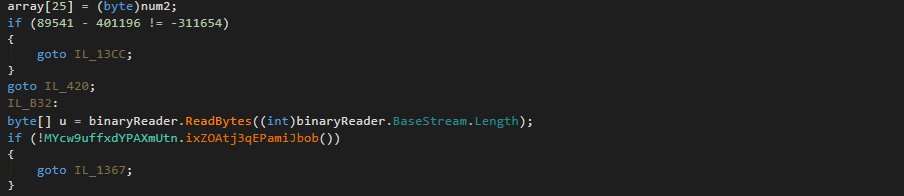
Unfortunately for us, the control flow of this function has been highly obfuscated, with multiple goto’s, loops, and plenty of conditional statements. However, we can piece some information together just by scrolling through the lines of code. Firstly, there is an array variable which is constantly changing through the flow of execution, at least in the first loop. It changes so often it would be very time consuming to manually calculate the bytes inside the variable, and so dynamic analysis will have to be used.
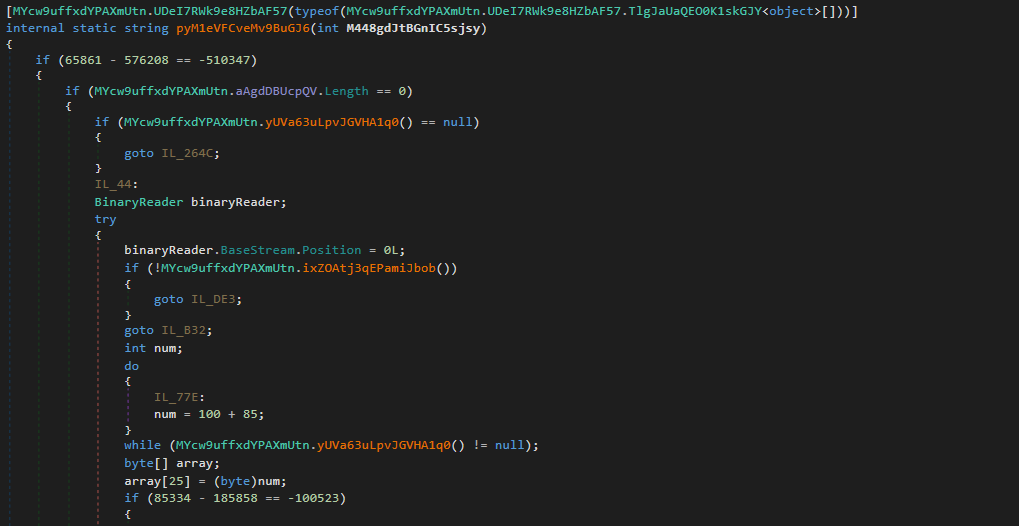
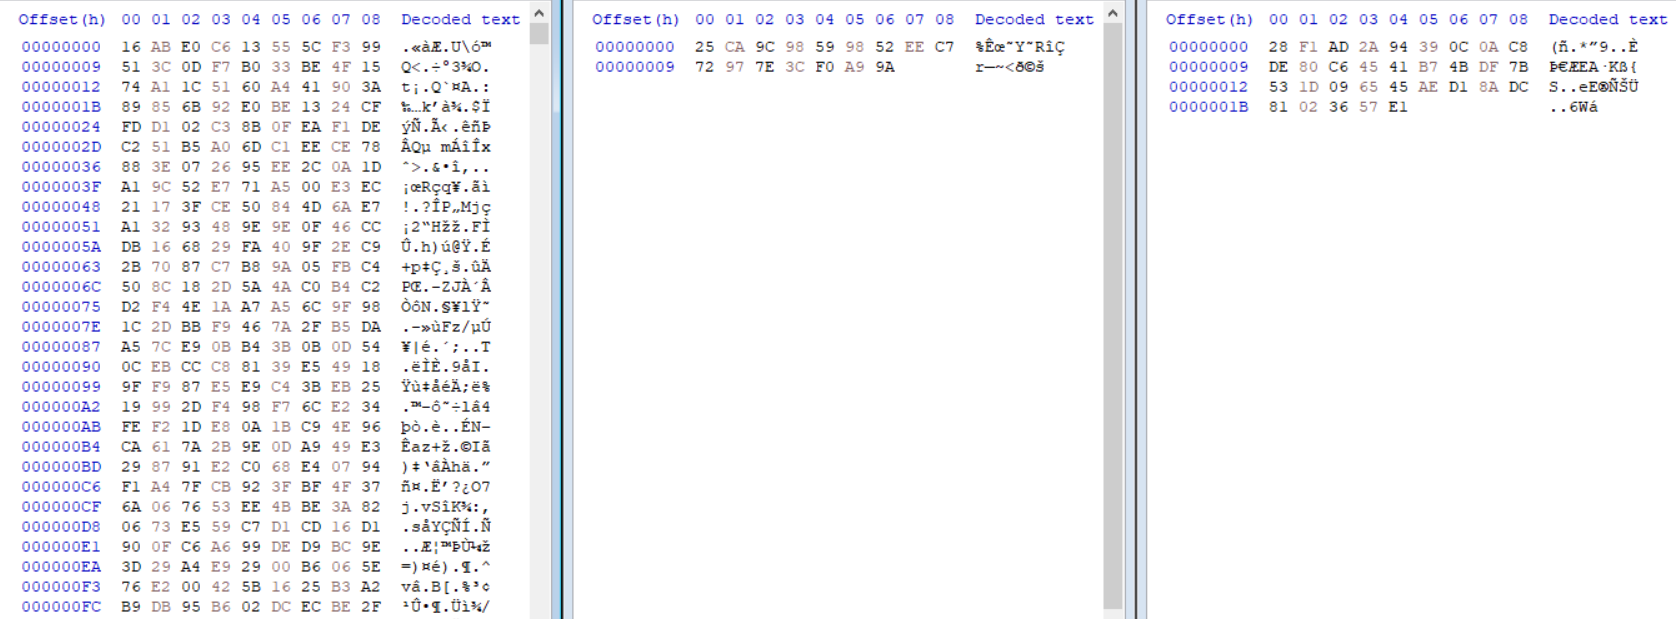
Next, we can see a variable named binaryReader is referred to quite a lot throughout the function. A simple CTRL+F indicates this will contain data read from the resource 28VD5i1hSj4mcdhHmc.KIl6nvHWBWAvSEm7PO. Initially, this data does not seem to be used for anything interesting, however it is a strange blob of data and is still referenced in the function, so let’s go ahead and extract that to be used later on.

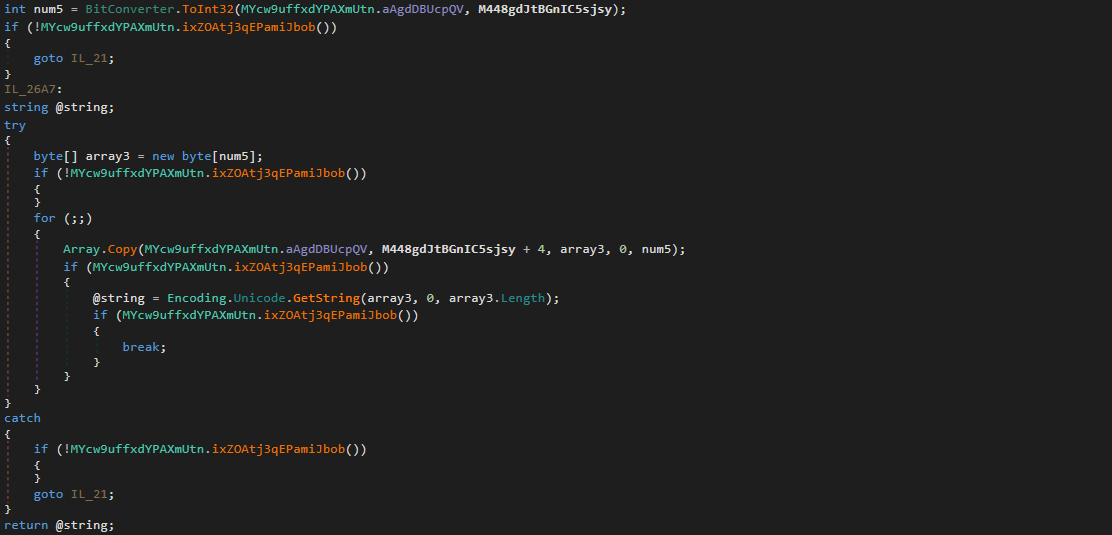
At the very end of the string decryption function, we can clearly see the variable returned is named string, and it is retrieved through the variable array3. array3 is initialized above, with a Copy() call, which will copy the data from MYcw9uffxdYPAXmUtn.aAgdDBUcpQV to array3. Another point of interest is the usage of the argument M448gdJtBGnIC5sjsy as the index – this argument is equal to 208444 in the first call to this function.
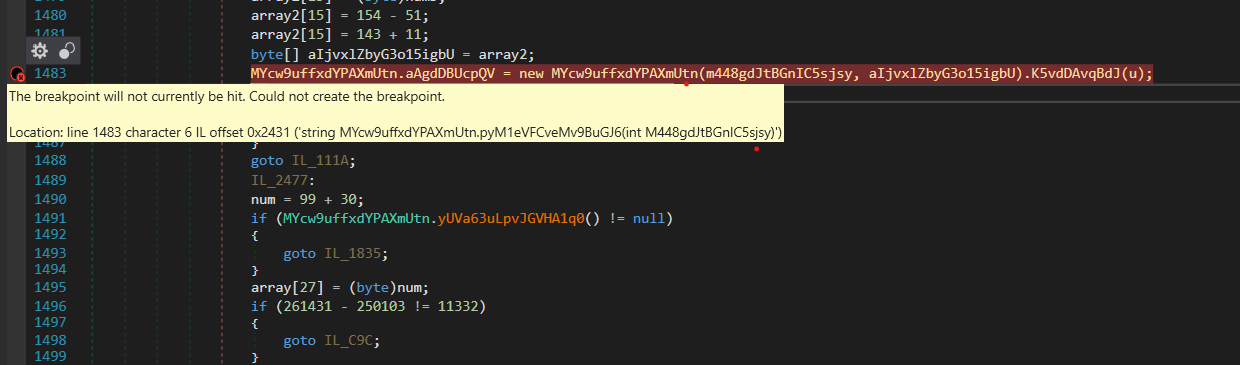
MYcw9uffxdYPAXmUtn.aAgdDBUcpQV is initialised using data inside 3 variables, and a function call: array, array2, u, and MYcw9uffxdYPAXmUtn().K5vdDAvqBdJ(). array and array2 are dynamically generated through the multiple loops and conditional statements, but u on the other hand contains the data inside binaryReader: the resource data we dumped previously.
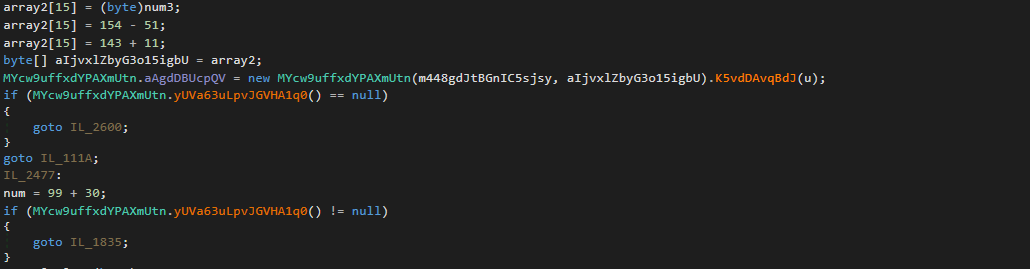
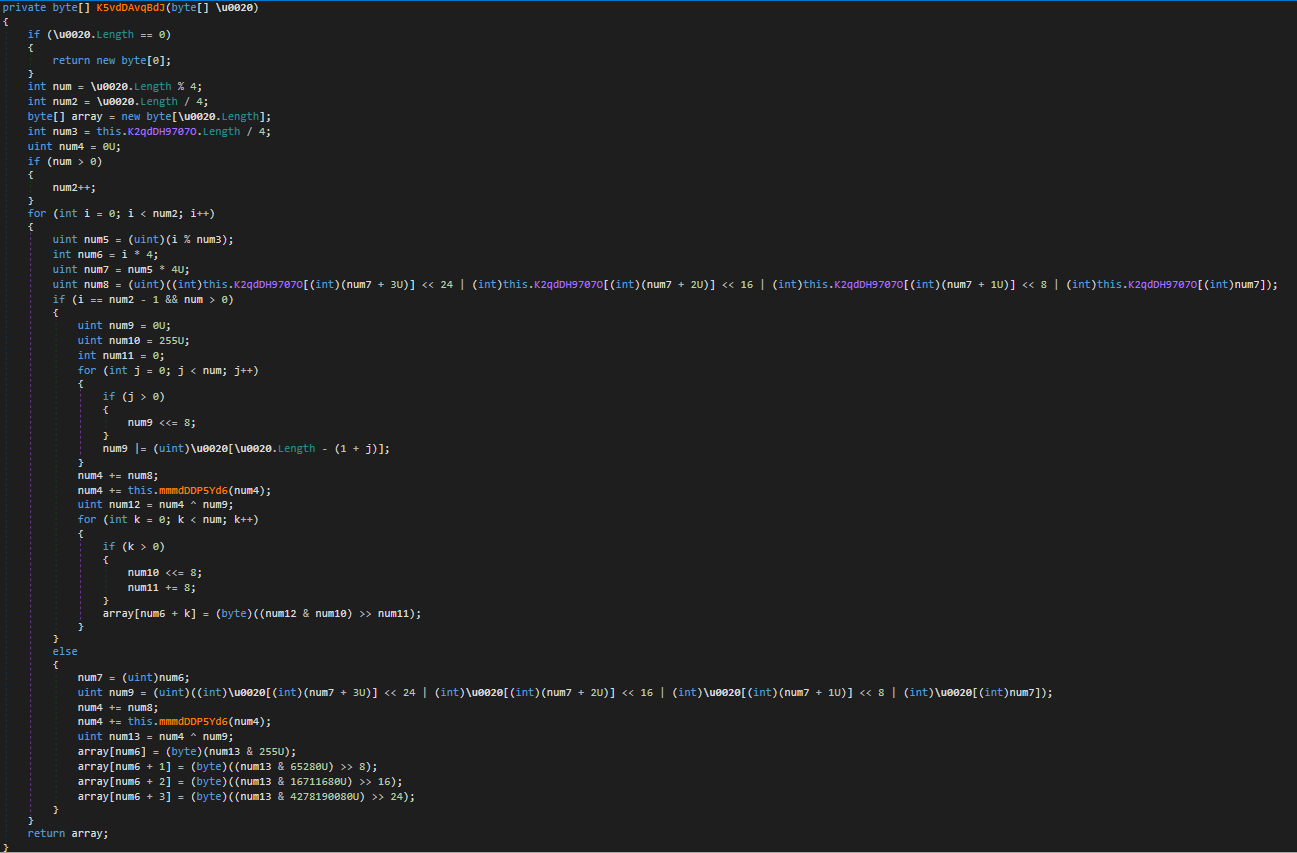
The function MYcw9uffxdYPAXmUtn().K5vdDAvqBdJ() is our first real algorithm inside the string encryption routine. The algorithm itself is seemingly custom to .NET Reactor, and uses the data inside array to decrypt the resource data. The decrypted data is stored as an array, at which point the integer passed in as an argument to the initial string encryption routine is used as an offset.
Enough about theory, let’s go ahead and debug the sample using dnSpy to extract the data inside array and array2, and then we can move onto looking at replicating the algorithm!
Doing so should be fairly simple, as we know where the decrypted data is returned, so we just need to set a breakpoint on the function MYcw9uffxdYPAXmUtn().K5vdDAvqBdJ(), and then dump the data inside the target variables. Buuut we cannot place a breakpoint on that address, as dnSpy cannot create one.
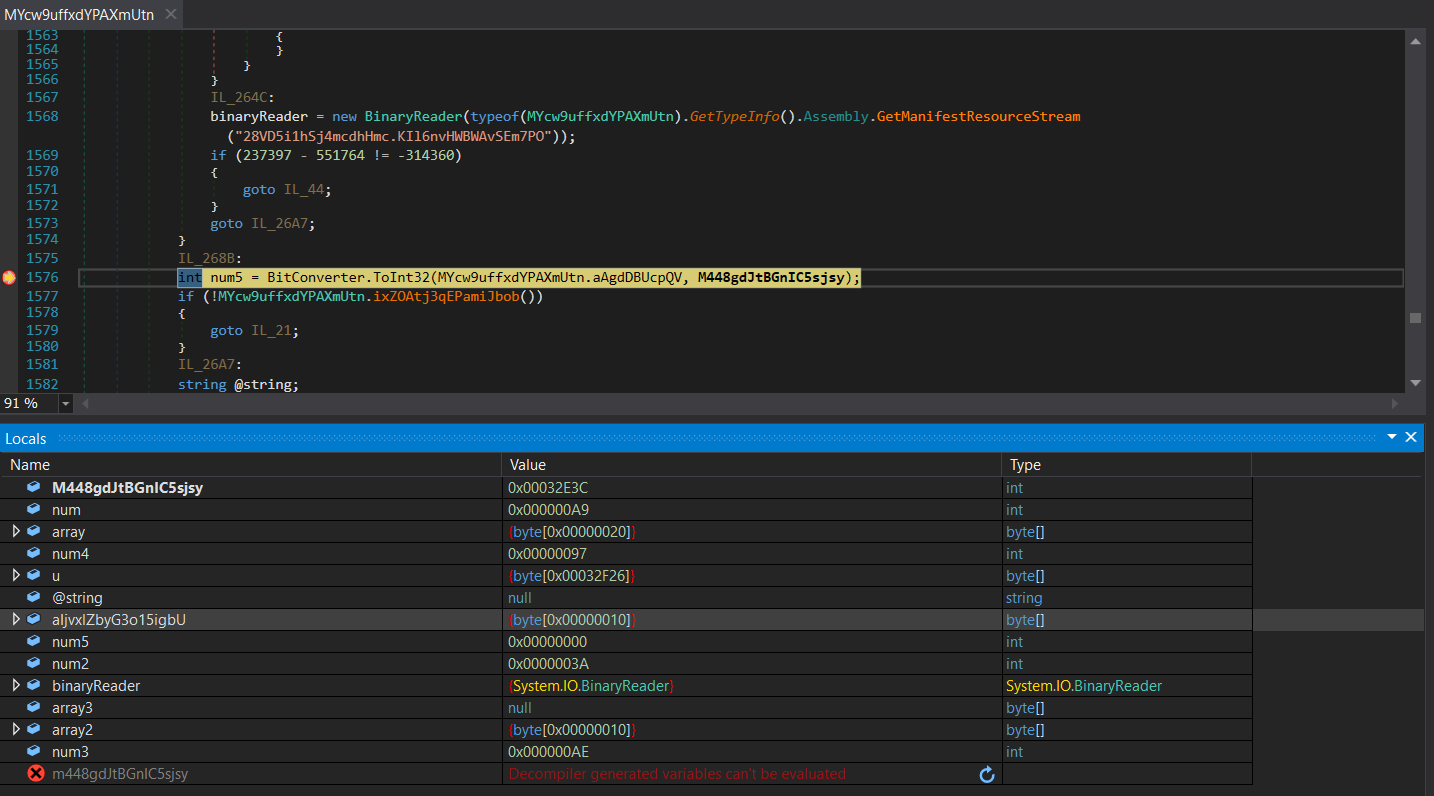
Instead, we will place a breakpoint just after the try block has come to an end, so where the variable num5 is initialised. Sure enough, we can now dump both target variables – array is 32 bytes long, and array2 is 16 bytes long, indicating a possible key and IV setup. With all the pieces of the puzzle, we can now go ahead and attempt to replicate the decryption!
Replicating Algorithms:
We will be replicating the algorithm in Python, and luckily as dnSpy decompiles .NET binaries very well, it should be a somewhat quick process considering how closely decompiled .NET resembles Python. Before we do that, let’s go ahead and run the binary through de4dot, as it will provide us a nice base to work off by removing as much obfuscation as it can.

Viewing the string encryption function, it is clear that de4dot has done a great job. The biggest difference however is inside the custom algorithm, in the function mmmdDDP5Yd6(). In the images below, you can see the difference between the original binary (left), and the de4dot altered binary (right). This difference will make it a lot easier to replicate the algorithm.

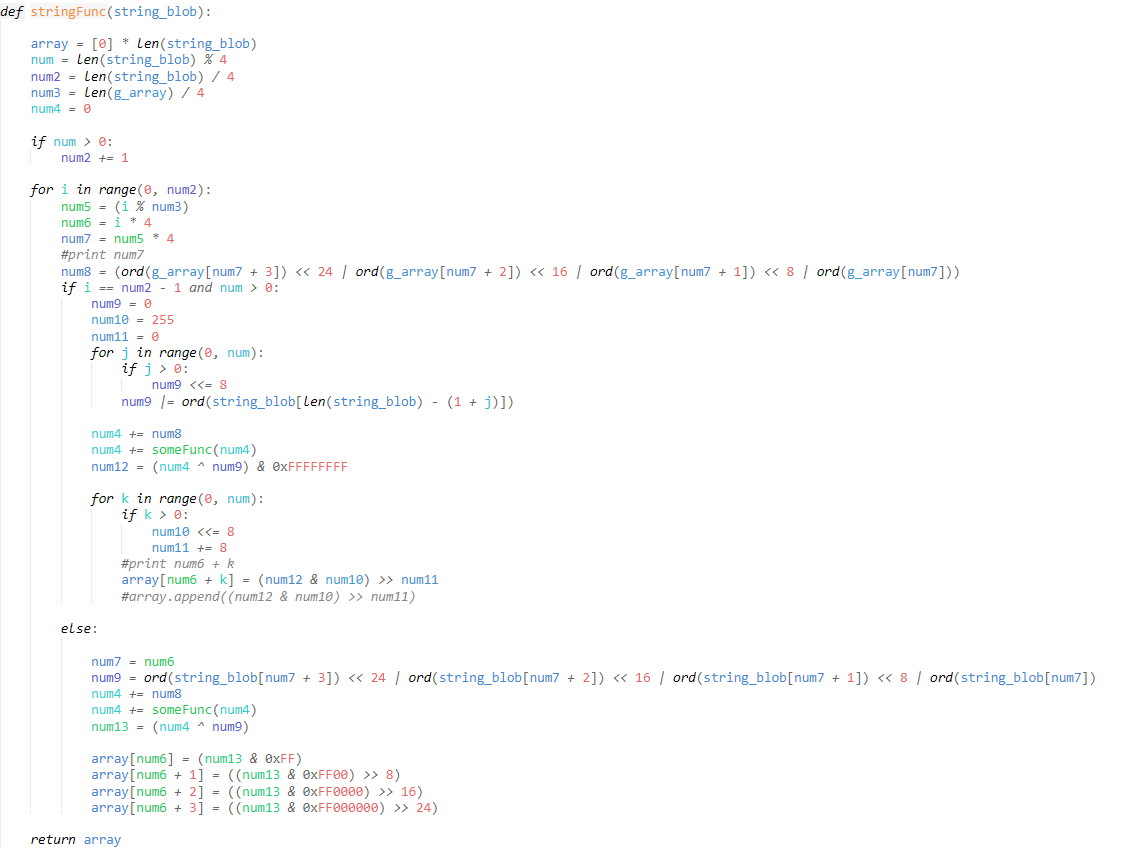
So, let’s start by implementing the mmmdDDP5Yd6() function. If we were to copy and paste it (and remove the U’s), it would execute correctly, but the returned value would be incorrect. The reason for this is Python is happy to work on a 64 bit integer, and so if we were to execute the code using 4 as the value for the uint_0 variable, the result would be –0x627474A8294. We only want to deal with 32 bit values, so we will be using & 0xFFFFFFFF in our function a lot; specifically on every line, like shown below.

Running the updated code, using the same value for uint_0, we get 0xB8B4C22C. So now we know we can avoid dealing with 64 bit integers, we can jump back to the main algorithm, and replicate that!

The rest of the algorithm is fairly simple to implement, however there is 1 global variable that stands out: K2qdDH9707O. This is assigned in a call just before the string encryption algorithm, and is in fact the data stored inside the variable array. Interestingly, array2 does not seem to be used at all throughout the function, so we can ignore it from here on out.

After converting the script from .NET to Python, we can now go ahead and test it! We already have the array data, and the resource data, so all we need to figure out is how the function uses the argument to locate the correct string.
Well, we don’t need to look very hard to find it – jumping right to the end we can see a fairly simple block of code, which we covered at the beginning of the String Decryption chapter.
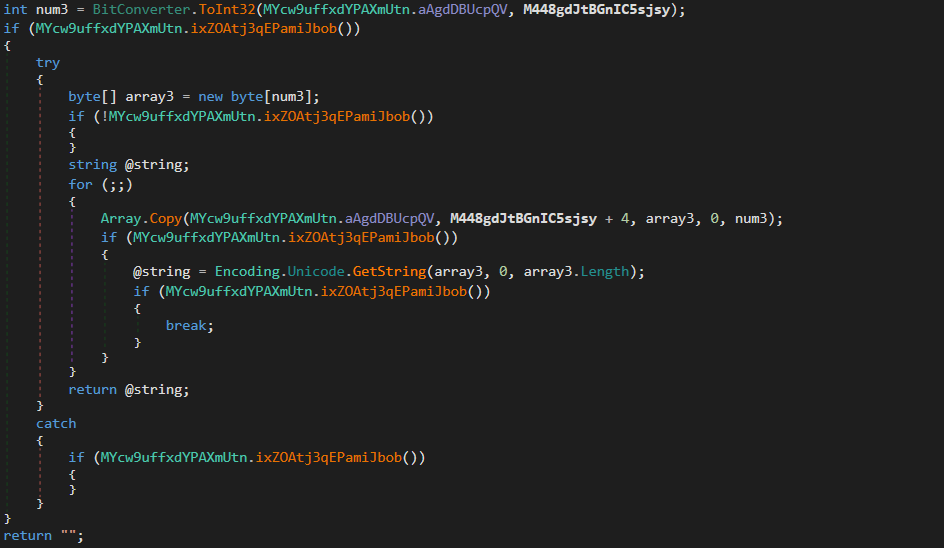
First, num3 is calculated by calling ToInt32() and passing MYcw9uffxdYPAXmUtn.aAgdDBUcpQV as the source data, and M448gdJtBGnIC5sjsy (the function argument) as the start index. Next, the variable array3 is initialized to the size of num3, so we can safely assume that num3 is a string size. array3 is then filled with data from MYcw9uffxdYPAXmUtn.aAgdDBUcpQV, with the start index set to M448gdJtBGnIC5sjsy + 4. This means the strings will be stored as follows:
[4 BYTE SIZE][STRING]And that is pretty much it! The string blob itself is decrypted all at once, and so the argument is only used to retrieve a specific string in the decrypted data. Putting all this together, we get the following script:
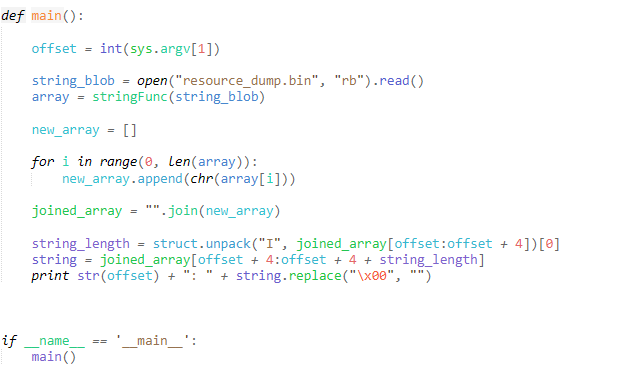
Running it with a few values we can find in the script also yields some nice results! We can also just dump all the decrypted strings to browse through, to get a good idea of what this tool is capable of doing!
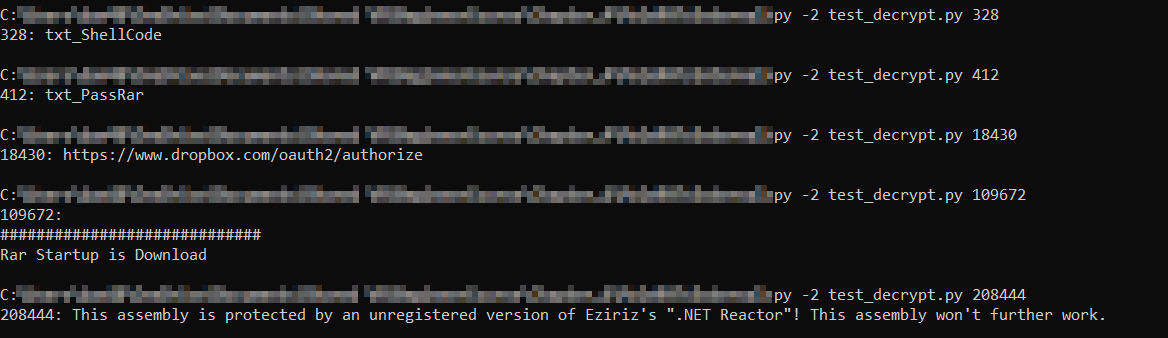
Now, it is all good being able to decrypt strings with user input, but let’s take this one step further and attempt to automate it!
Semi-Automation:
Automation is where things start to become quite complex. I don’t typically focus on .NET malware, and so there’s still a number of things I have to figure out – including figuring out how to have an automated string decrypter resolve strings or even comment similar to IDAPython. Currently, the automation of this string decrypter goes as far as locating all calls to the string decryption function, extracting the offset, and returning the correct string for that function. Unfortunately, this is where that stops. I have yet to successfully overwrite the IL instructions with a simple ldstr (like this blog post), and receive the following error:
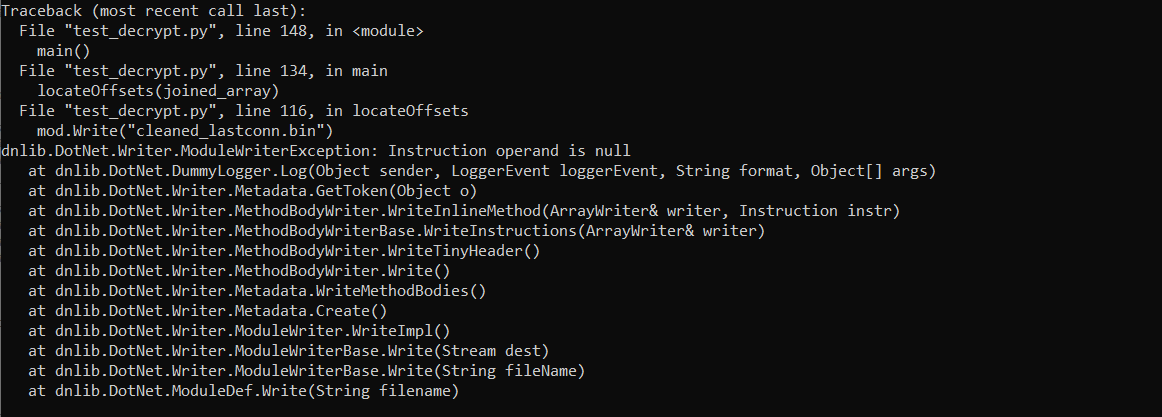
If anyone has any idea what the issue is, I’d be very grateful if you could let me know! Regardless, let’s have a look at how we can use Python and DNLIB to locate function calls and offset arguments in the binary!
In order to load the dnlib library, we need to make sure we have pythonnet installed, which can be installed using pip install pythonnet. Additionally, make sure you have the DNLIB DLL downloaded! With that, we need to import the Common Language Runtime (manages execution of .NET programs), as well as the System.Reflection namespace. This can be done as follows:
import clr
from System.Reflection import Assembly, MethodInfo, BindingFlag
from System import Type
Then, we need to load DNLIB using clr.AddReference(). This allows us to import functions from DNLIB, including the DotNet namespace. And now we’re ready to start parsing .NET binaries!
clr.AddReference(r"dnlib")

import dnlib
from dnlib.DotNet import *
from dnlib.DotNet.Emit import OpCodes
The parsing code was adapted from polynomenx’s blog post as listed above, and it is a brilliant example of what is possible pairing DNLIB with Python. In this case, we can search through the binary in a similar way, searching for all mentions of the method pyM1eVFCveMv9BuGJ6.
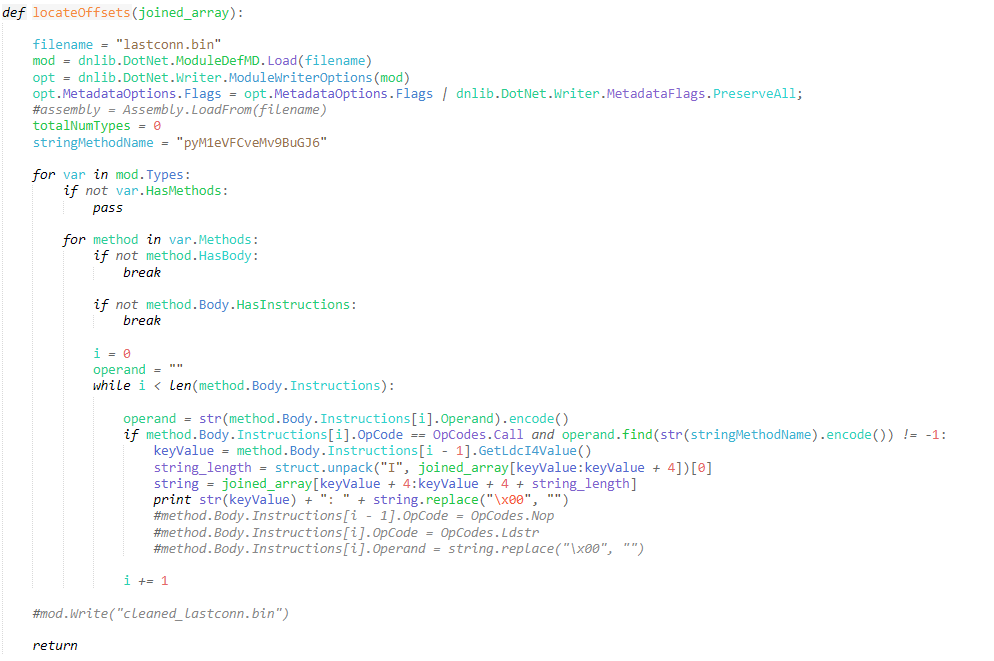
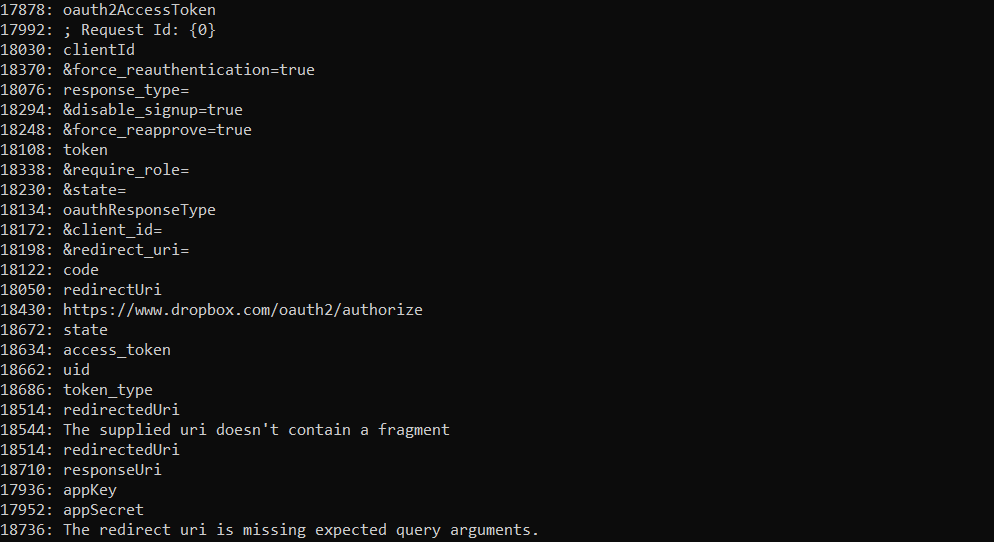
After executing the above script, we can view the glory that is automation! We can print all the strings, or simply pipe the output to a file to view later on – providing us with the same output that ProofPoint uploaded to their GitHub. While .NET Reactor obfuscated malware does not use the same encryption key, it’s fairly simple to reverse the string encryption (at least in this version) and use the tools we covered in this post to develop a semi-automated string decrypter, speeding your analysis up by 10-fold!
You can grab the full (and cleaned up) script from here!
It’s currently optimized for Python 2.7, but with some slight alterations it should be good to go for Python 3!
After uploading the script I noticed some issues with it not picking up several calls to the string decryption function inside the main Pro.Form1(). It does pick up quite a few strings, though there are some obvious strings that do not appear in the dump, but are visible in the string dump on the ProofPoint ThreatResearch Github.
It could just be that I’m running the entire thing in Python instead of C#, but if anyone knows the specifics I’d love to find out!
And that wraps up this post on decrypting the strings inside the MOLERATS LastConn payload!
You may have noticed the changes to the website design, as well as cleaned up the course page – now we have finally finished working on the design and restoration, posts will be more frequent, so stay tuned! We’ve got quite a lot planned over the next few months!
Anyway, if you’ve got any feedback or questions, feel free to drop a comment down below, drop me a message over Twitter (@0verfl0w_), or via email (daniel@0ffset.net)!
Thanks for taking the time to read through the post!